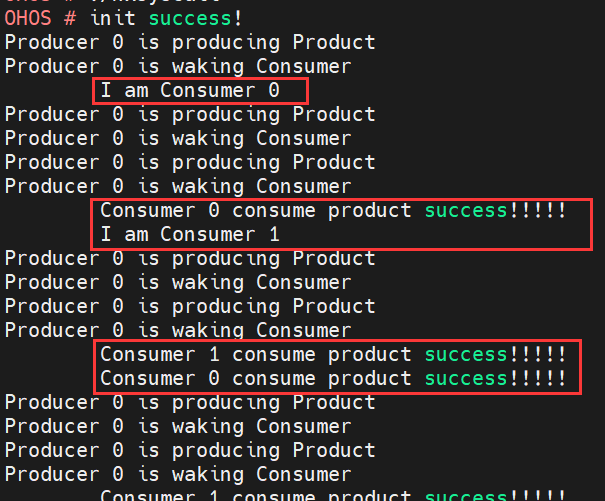
效果如下图:

给大家解释一下上述效果:在左侧(顶格)的是生产者(Producer);在右侧(空格)的是消费者(Consumer)。生产者有1个,代号为“0”;消费者有2个,代号分别为“0”和“1”。
生产者首先生产出一个产品,输出“is producing Product”。然后唤醒消费者来消费,输出“is waking Consumer”。
消费者生成时会报告自己的信息,比如“I am Consumer 0”代表它是0号消费者。如果有东西可以消费,它会输出“Consumer 代号 consume product success!!!!”代表消费成功。
程序实现的效果是:生产者不断生产“产品”,然后消费者“0”和“1”不断进行消费,如此循环往复。
代码非常简单,如下:
#include <stdlib.h>
#include <stdio.h>
#include <unistd.h>
#include <sys/mman.h>
#include <pthread.h>#define CONSUMER_NUM 2#define PRODUCER_NUM 1pthread_t pids[CONSUMER_NUM+PRODUCER_NUM];int ready = 0;
int running =1;pthread_mutex_t mutex;pthread_cond_t has_product;void* producer(void* arg){int no = (int)arg;while(running){pthread_mutex_lock(&mutex);ready++;printf("Producer %d is producing Product\n",no);fflush(stdout); pthread_cond_signal(&has_product);printf("Producer %d is waking Consumer\n",no);fflush(stdout); pthread_mutex_unlock(&mutex);sleep(1);}
return NULL;
}void* consumer(void* arg){int num = (int)arg;while(running){pthread_mutex_lock(&mutex); while(ready==0){printf("\tConsumer %d is waiting...\n",num);fflush(stdout); pthread_cond_wait(&has_product,&mutex);}ready--;printf("\tConsumer %d consume product success!!!!!\n",num);fflush(stdout); pthread_mutex_unlock(&mutex);sleep(3);}
return NULL;
}void HxSyscall(int num){                                          pthread_mutex_init(&mutex,NULL);pthread_cond_init(&has_product,NULL);printf("init success!\n");int i;int thread_ids[CONSUMER_NUM + PRODUCER_NUM]; for(i=0; i<PRODUCER_NUM; i++){thread_ids[i] = i;pthread_create(&pids[i], NULL, producer, (void*)i);}for(i=0; i<CONSUMER_NUM; i++){printf("\tI am Consumer %d \n",i);fflush(stdout); sleep(2);thread_ids[PRODUCER_NUM + i] = i;pthread_create(&pids[PRODUCER_NUM + i], NULL, consumer, (void*)i);}for(i=0; i<PRODUCER_NUM + CONSUMER_NUM; i++){pthread_join(pids[i], NULL);}pthread_mutex_destroy(&mutex);pthread_cond_destroy(&has_product);return;
}
大家只需要按照project1的方式,将上述代码放入home/openharmony/kernel/liteos_a/syscall下的hx_syscall.c文件夹下即可(这里为了方便基础较薄弱的同学操作,所以我们仍旧采用勖哥在pro1中的函数命名),接下来大家只需要按照pro1的方式进行编译烧录即可运行。
【如果觉得有帮助记得点赞+收藏⭐】

C#语言基础)


![java分割----String[] stringArray = str.split(“ “);](http://pic.xiahunao.cn/java分割----String[] stringArray = str.split(“ “);)


)