- 一、ansible简介
- 1. ansible是什么
- 2.ansible的特点
- ansible的架构图
- 二、ansible 任务执行
- 1、ansible 任务执行模式
- 2、ansible 执行流程
- 3、ansible 命令执行过程
- 二 .Ansible安装部署
- 1.yum安装
- 2.ansible 程序结构
- 3、ansible配置文件查找顺序
- 4、ansible配置文件
- 5.ansible自动化配置
- 三、模块介绍
- 1.ping模块
- 2.command模块
- 3.shell模块
- 4.copy模块
- 5.file模块
- 6.fetch 模块
- cron模块
- 7.yum模块
- 8.service 模块
- 9.USER模块
- 10.group模块
- 11.script模块
- 12.setup模块
- 四、Ansible playbook简介
- Ansible playbook使用场景
- 1.格式简介
- 2、核心元素
- 3、基本组件
- 运行三部曲
- 举例:部署wordpress
- 五、角色订制:roles
- ① 简介
- ② 角色集合
- ③ 角色定制实例
- 六、 Ansible 性能调优
- (1) Ansible SSH 关闭秘钥检测
- (2) OpenSSH 连接优化
- (3) SSH pipelining 加速 Ansible
- (4)Ansible Facts 缓存优化
一、ansible简介
1. ansible是什么
ansible是最受欢迎的自动化运维工具,基于pythen开发,集合了众多运维工具的优点,实现了批量应用部署,批量系统配置,批量程序配置
ansible是基于 paramiko 开发的,并且基于模块化工作,本身没有批量部署的能力。真正具有批量部署的是ansible所运行的模块,ansible只是提供一种框架。ansible不需要在远程主机上安装client/agents,因为它们是基于ssh来和远程主机通讯的。ansible目前已经已经被红帽官方收购,是自动化运维工具中大家认可度最高的,并且上手容易,学习简单。是每位运维工程师必须掌握的技能之一。
2.ansible的特点
1.部署简单,只需在主控端部署,被控端不需要部署
2.默认使用SSH协议对设备进行管理
3.有大量常规运维操作模块,可实现日常绝大部分操作
4.配置简答,功能强大,扩展性强
5.支持API及自定义模块,可以通过Python轻松扩展
6.通过Ploybooks来制定强大的配置,状态管理
7. 轻量级,无需在客户端安装agent,更新时,只需在操作机上进行一次更新即可;
8. 提供一个功能强大、操作性强的Web管理界面和REST API接口——AWX平台
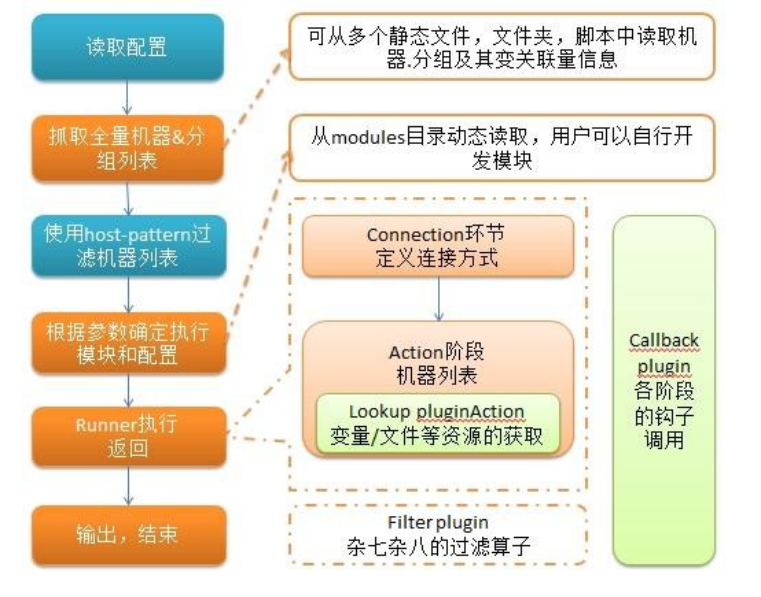
ansible的架构图

Ansible:Ansible核心程序。
HostInventory:记录由Ansible管理的主机信息,包括端口、密码、ip等。
Playbooks:“剧本”YAML格式文件,多个任务定义在一个文件中,定义主机需要调用哪些模块来完成的功能。
CoreModules:核心模块,主要操作是通过调用核心模块来完成管理任务。
CustomModules:自定义模块,完成核心模块无法完成的功能,支持多种语言。
ConnectionPlugins:连接插件,Ansible和Host通信使用
二、ansible 任务执行
1、ansible 任务执行模式
Ansible 系统由控制主机对被管节点的操作方式可分为两类,即ad-hoc和playbook:
- ad-hoc模式(点对点模式) 使用单个模块,支持批量执行单条命令。ad-hoc 命令是一种可以快速输入的命令,而且不需要保存起来的命令。就相当于bash中的一句话shell。
- playbook模式(剧本模式) 是Ansible主要管理方式,也是Ansible功能强大的关键所在。playbook通过多个task集合完成一类功能,如Web服务的安装部署、数据库服务器的批量备份等。可以简单地把playbook理解为通过组合多条ad-hoc操作的配置文件。 类似于shell脚本,可以进行多个步骤
- role模式(角色模式) 类似于多个脚本导入
2、ansible 执行流程
 简单理解就是Ansible在运行时, 首先读取
ansible.cfg中的配置, 根据规则获取Inventory中的管理主机列表, 并行的在这些主机中执行配置的任务, 最后等待执行返回的结果。
3、ansible 命令执行过程
- 加载自己的配置文件,默认
/etc/ansible/ansible.cfg; - 查找对应的主机配置文件,找到要执行的主机或者组;
- 加载自己对应的模块文件,如 command;
- 通过ansible将模块或命令生成对应的临时py文件(python脚本), 并将该文件传输至远程服务器;
- 对应执行用户的家目录的
.ansible/tmp/XXX/XXX.PY文件; - 给文件 +x 执行权限;
- 执行并返回结果;
- 删除临时py文件,
sleep 0退出;
二 .Ansible安装部署
1.yum安装
[root@ansible ~]# yum install epel-release -y
[root@ansible ~]# yum install ansible -y
2.ansible 程序结构
安装目录如下(yum安装):
配置文件目录:/etc/ansible/
执行文件目录:/usr/bin/
Lib库依赖目录:/usr/lib/pythonX.X/site-packages/ansible/
Help文档目录:/usr/share/doc/ansible-X.X.X/
Man文档目录:/usr/share/man/man1/
3、ansible配置文件查找顺序
ansible与我们其他的服务在这一点上有很大不同,这里的配置文件查找是从多个地方找的,顺序如下:
- 检查环境变量
ANSIBLE_CONFIG指向的路径文件(export ANSIBLE_CONFIG=/etc/ansible.cfg); ~/.ansible.cfg,检查当前目录下的ansible.cfg配置文件;/etc/ansible.cfg检查etc目录的配置文件。
4、ansible配置文件
ansible 的配置文件为/etc/ansible/ansible.cfg,ansible 有许多参数,下面我们列出一些常见的参数:
inventory = /etc/ansible/hosts #这个参数表示资源清单inventory文件的位置
library = /usr/share/ansible   #指向存放Ansible模块的目录,支持多个目录方式,只要用冒号(:)隔开就可以
forks = 5       #并发连接数,默认为5
sudo_user = root        #设置默认执行命令的用户
remote_port = 22        #指定连接被管节点的管理端口,默认为22端口,建议修改,能够更加安全
host_key_checking = False #设置是否检查SSH主机的密钥,值为True/False。关闭后第一次连接不会提示配置实例
timeout = 60        #设置SSH连接的超时时间,单位为秒
log_path = /var/log/ansible.log     #指定一个存储ansible日志的文件(默认不记录日志)
5.ansible自动化配置
[root@ansible ~]# vim /etc/hosts  #域名解析,不解析也可以直接使用ip
127.0.0.1   localhost localhost.localdomain localhost4 localhost4.localdomain4
::1         localhost localhost.localdomain localhost6 localhost6.localdomain6
10.36.192.100 package.qf.com
192.168.20.142 web1
192.168.20.143 web2
[root@ansible ~]# vim /etc/ansible/hosts  #添加ansible组成员
web1
web2[web]
web1
web2
[root@ansible ~]# ssh-keygen
Generating public/private rsa key pair.
Enter file in which to save the key (/root/.ssh/id_rsa):
Enter passphrase (empty for no passphrase):
Enter same passphrase again:
Your identification has been saved in /root/.ssh/id_rsa.
Your public key has been saved in /root/.ssh/id_rsa.pub.
The key fingerprint is:
SHA256:ehSHBudIgje/wFwNB23QgqAVvh8sOB+QnNCa1oJb7r8 root@ansible
The key's randomart image is:
+---[RSA 2048]----+
|..++..*Bo        |
|o=+ +oo*=.       |
|==o+ +.o= .      |
|+=.++ .. o       |
|++= o. .S        |
|.o.+ ..o         |
| .. . . .        |
|  .    .         |
|   .E.           |
+----[SHA256]-----+
[root@ansible ~]# ls
anaconda-ks.cfg  yum.repo.sh
[root@ansible ~]# ssh-copy-id 192.168.2
0.142
/usr/bin/ssh-copy-id: INFO: Source of key(s) to be installed: "/root/.ssh/id_rsa.pub"
The authenticity of host '192.168.20.142 (192.168.20.142)' can't be established.
ECDSA key fingerprint is SHA256:dWovuygINJWYMOHuvV0FwX0pLKMURbVczsPeHQBI1Ts.
ECDSA key fingerprint is MD5:68:84:47:c5:45:13:75:ce:98:40:2d:8f:be:2f:71:c2.
Are you sure you want to continue connecting (yes/no)? yes
/usr/bin/ssh-copy-id: INFO: attempting to log in with the new key(s), to filter out any that are already installed
/usr/bin/ssh-copy-id: INFO: 1 key(s) remain to be installed -- if you are prompted now it is to install the new keys
root@192.168.20.142's password: Number of key(s) added: 1Now try logging into the machine, with:   "ssh '192.168.20.142'"
and check to make sure that only the key(s) you wanted were added.[root@ansible ~]# ssh-copy-id 192.168.20.143
/usr/bin/ssh-copy-id: INFO: Source of key(s) to be installed: "/root/.ssh/id_rsa.pub"
The authenticity of host '192.168.20.143 (192.168.20.143)' can't be established.
ECDSA key fingerprint is SHA256:dWovuygINJWYMOHuvV0FwX0pLKMURbVczsPeHQBI1Ts.
ECDSA key fingerprint is MD5:68:84:47:c5:45:13:75:ce:98:40:2d:8f:be:2f:71:c2.
Are you sure you want to continue connecting (yes/no)? yes
/usr/bin/ssh-copy-id: INFO: attempting to log in with the new key(s), to filter out any that are already installed
/usr/bin/ssh-copy-id: INFO: 1 key(s) remain to be installed -- if you are prompted now it is to install the new keys
root@192.168.20.143's password: Number of key(s) added: 1Now try logging into the machine, with:   "ssh '192.168.20.143'"
and check to make sure that only the key(s) you wanted were added.
组成员可以使用通配符来匹配,这样对于一些标准化的管理来说就很轻松方便了
三、模块介绍
1.ping模块
使用ansible web -m ping命令来进行主机连通性测试
[root@ansible ~]# ansible web1 -m ping
web1 | SUCCESS => {"ansible_facts": {"discovered_interpreter_python": "/usr/bin/python"}, "changed": false, "ping": "pong"
}
[root@ansible ~]# ansible web2 -m ping
web2 | SUCCESS => {"ansible_facts": {"discovered_interpreter_python": "/usr/bin/python"}, "changed": false, "ping": "pong"
}
[root@ansible ~]# ansible web -m ping
web2 | SUCCESS => {"ansible_facts": {"discovered_interpreter_python": "/usr/bin/python"}, "changed": false, "ping": "pong"
}
web1 | SUCCESS => {"ansible_facts": {"discovered_interpreter_python": "/usr/bin/python"}, "changed": false, "ping": "pong"
}
2.command模块
这个模块可以直接在远程主机上执行命令,并将结果返回给主机
chdir # 在执行命令之前,先切换到该目录
executable # 切换shell来执行命令,需要使用命令的绝对路径
free_form # 要执行的Linux指令,一般使用Ansible的-a参数代替。
creates # 一个文件名,当这个文件存在,则该命令不执行,可以用来做判断
removes # 一个文件名,这个文件不存在,则该命令不执行
[root@ansible ~]# ansible web -m command -a 'ls'
web2 | CHANGED | rc=0 >>
anaconda-ks.cfg
file
yum.repo.sh
web1 | CHANGED | rc=0 >>
anaconda-ks.cfg
file
yum.repo.sh
不会通过shell进行处理,比如$HOME和操作如"<“,”>“,”|“,”;“,”&" 工作(需要使用(shell)模块实现这些功能)。注意,该命令不支持| 管道命令。
chdir 先切换目录在执行命令
[root@ansible ~]# ansible web -m command -a 'chdir=/data touch file'
[WARNING]: Consider using the file module with state=touch rather than running
'touch'.  If you need to use command because file is insufficient you can add
'warn: false' to this command task or set 'command_warnings=False' in
ansible.cfg to get rid of this message.
web2 | CHANGED | rc=0 >>web1 | CHANGED | rc=0 >>
[root@ansible ~]# ansible web -m command -a 'chdir=/data ls -l'
web2 | CHANGED | rc=0 >>
总用量 8
-rw-r--r-- 1 root root  0 11月  9 13:15 aaa.jpg
lrwxrwxrwx 1 root root 13 11月  9 13:15 bbb.jpg -> /data/aaa.jpg
-rw-r--r-- 1 root root  0 11月  9 13:36 fileweb1 | CHANGED | rc=0 >>
总用量 8
-rw-r--r-- 1 root root  0 11月  9 13:14 aaa.jpg
lrwxrwxrwx 1 root root 13 11月  9 13:15 bbb.jpg -> /data/aaa.jpg
-rw-r--r-- 1 root root  0 11月  9 13:36 file
[root@ansible ~]# ansible web -m command -a 'creates=/data/ ls'
web2 | SUCCESS | rc=0 >>
skipped, since /data/ exists
web1 | SUCCESS | rc=0 >>
skipped, since /data/ exists
[root@ansible ~]# ansible web -m command -a 'removes=/data/ ls'
web2 | CHANGED | rc=0 >>
anaconda-ks.cfg
file
yum.repo.sh
web1 | CHANGED | rc=0 >>
anaconda-ks.cfg
file
yum.repo.sh
[root@ansible ~]# ansible web -m command -a 'creates=/data/dir ls'
web2 | CHANGED | rc=0 >>
anaconda-ks.cfg
file
yum.repo.sh
web1 | CHANGED | rc=0 >>
anaconda-ks.cfg
file
yum.repo.sh
[root@ansible ~]# ansible web -m command -a 'removes=/data/dir ls'
web2 | SUCCESS | rc=0 >>
skipped, since /data/dir does not exist
web1 | SUCCESS | rc=0 >>
skipped, since /data/dir does not exist
3.shell模块
shell模块可以在远程主机上调用shell解释器运行命令,支持shell的各种功能
[root@ansible ~]# ansible web -m shell -a 'cat /etc/passwd | grep root'
web2 | CHANGED | rc=0 >>
root:x:0:0:root:/root:/bin/bash
operator:x:11:0:operator:/root:/sbin/nologin
web1 | CHANGED | rc=0 >>
root:x:0:0:root:/root:/bin/bash
operator:x:11:0:operator:/root:/sbin/nologin
只要是我们的shell命令,都可以通过这个模块在远程主机上运行
4.copy模块
模块用于将文件复制到远程主机,同时支持给定内容生成文件和修改权限等
src#被复制到远程主机的本地文件。可以是绝对路径,也可以是相对路径。如果路径是一个目录,则会递归复制,用法类似于"rsync"
content#用于替换"src",可以直接指定文件的值
dest#必选项,将源文件复制到的远程主机的绝对路径
backup#当文件内容发生改变后,在覆盖之前把源文件备份,备份文件包含时间信息
directory_mode#递归设定目录的权限,默认为系统默认权限
force#当目标主机包含该文件,但内容不同时,设为"yes",表示强制覆盖;设为"no",表示目标主机的目标位置不存在该文件才复制。默认为"yes"
others#所有的 file 模块中的选项可以在这里使用
复制文件
[root@ansible ~]# ansible web -m copy -a 'src=/root/hello dest=/data/hello'
web2 | SUCCESS => {"changed": false, "dest": "/data/hello/", "src": "/root/hello"
}
web1 | SUCCESS => {"changed": false, "dest": "/data/hello/", "src": "/root/hello"
}
[root@ansible ~]# ansible web -m copy -a 'content="I am zx\n" dest=/data/name mode=666'
web1 | CHANGED => {"ansible_facts": {"discovered_interpreter_python": "/usr/bin/python"}, "changed": true, "checksum": "26cb5bd8bbbe3a7c26dd7ea358ff2bdf00ba7dc2", "dest": "/data/name", "gid": 0, "group": "root", "md5sum": "c3a60e23801dec079e23a2278f3c45af", "mode": "0666", "owner": "root", "size": 8, "src": "/root/.ansible/tmp/ansible-tmp-1699509721.65-6361-39694660058027/source", "state": "file", "uid": 0
}
web2 | CHANGED => {"ansible_facts": {"discovered_interpreter_python": "/usr/bin/python"}, "changed": true, "checksum": "26cb5bd8bbbe3a7c26dd7ea358ff2bdf00ba7dc2", "dest": "/data/name", "gid": 0, "group": "root", "md5sum": "c3a60e23801dec079e23a2278f3c45af", "mode": "0666", "owner": "root", "size": 8, "src": "/root/.ansible/tmp/ansible-tmp-1699509721.65-6363-47560471525069/source", "state": "file", "uid": 0
}#查看一下我们生成的文件及其权限
[root@ansible ~]# ansible web -m shell -a 'ls -l /data'
web2 | CHANGED | rc=0 >>
总用量 1
-rw-rw-rw- 1 root root  8 11月  9 14:02 name
web1 | CHANGED | rc=0 >>
总用量 1
-rw-rw-rw- 1 root root  8 11月  9 14:01 name
看出我们的name文件已经生成,并且权限为666
[root@ansible ~]# ansible web -m copy -a 'content="I am zhangxiao\n" backup=yes  dest=/data/name mode=666'
web2 | CHANGED => {"ansible_facts": {"discovered_interpreter_python": "/usr/bin/python"}, "backup_file": "/data/name.12174.2023-11-09@14:05:39~", "changed": true, "checksum": "9421436680fddec0ef052697e1f8193f05477718", "dest": "/data/name", "gid": 0, "group": "root", "md5sum": "3f7addfff5ebd2e9b7a4b3b0805ce8fe", "mode": "0666", "owner": "root", "size": 15, "src": "/root/.ansible/tmp/ansible-tmp-1699509935.19-6479-111214173298969/source", "state": "file", "uid": 0
}
web1 | CHANGED => {"ansible_facts": {"discovered_interpreter_python": "/usr/bin/python"}, "backup_file": "/data/name.15224.2023-11-09@14:05:32~", "changed": true, "checksum": "9421436680fddec0ef052697e1f8193f05477718", "dest": "/data/name", "gid": 0, "group": "root", "md5sum": "3f7addfff5ebd2e9b7a4b3b0805ce8fe", "mode": "0666", "owner": "root", "size": 15, "src": "/root/.ansible/tmp/ansible-tmp-1699509935.19-6477-223241063689385/source", "state": "file", "uid": 0
}
[root@ansible ~]# ansible web -m shell -a 'ls -l /data'
web2 | CHANGED | rc=0 >>
总用量 8
-rw-rw-rw- 1 root root 15 11月  9 14:05 name
-rw-rw-rw- 1 root root  8 11月  9 14:02 name.12174.2023-11-09@14:05:39~web1 | CHANGED | rc=0 >>
总用量 8
-rw-rw-rw- 1 root root 15 11月  9 14:05 name
-rw-rw-rw- 1 root root  8 11月  9 14:01 name.15224.2023-11-09@14:05:32~[root@ansible ~]# ansible web -m shell -a 'cat /data/name'
web2 | CHANGED | rc=0 >>
I am zhangxiao
web1 | CHANGED | rc=0 >>
I am zhangxiao
源文件被备份
5.file模块
模块主要用于设置文件的属性,比如创建文件、创建链接文件、删除文件
force#需要在两种情况下强制创建软链接,一种是源文件不存在,但之后会建立的情况下;另一种是目标软链接已存在,需要先取消之前的软链,然后创建新的软链,有两个选项:yes|no
group#定义文件/目录的属组。后面可以加上
mode:定义文件/目录的权限
owner#定义文件/目录的属主。后面必须跟上
path:定义文件/目录的路径
recurse#递归设置文件的属性,只对目录有效,后面跟上
src:被链接的源文件路径,只应用于state=link的情况
dest#被链接到的路径,只应用于state=link的情况
state#状态,有以下选项:
directory:如果目录不存在,就创建目录link:创建软链接hard:创建硬链接touch:如果文件不存在,则会创建一个新的文件,如果文件或目录已存在,则更新其最后修改时间absent:删除目录、文件或者取消链接文件
创建目录
[root@ansible ~]# ansible web -m file -a 'path=/data/app state=directory'
web2 | CHANGED => {"ansible_facts": {"discovered_interpreter_python": "/usr/bin/python"}, "changed": true, "gid": 0, "group": "root", "mode": "0755", "owner": "root", "path": "/data/app", "size": 6, "state": "directory", "uid": 0
}
web1 | CHANGED => {"ansible_facts": {"discovered_interpreter_python": "/usr/bin/python"}, "changed": true, "gid": 0, "group": "root", "mode": "0755", "owner": "root", "path": "/data/app", "size": 6, "state": "directory", "uid": 0
}
[root@ansible ~]# ansible web -m shell -a 'ls -l /data/'
web2 | CHANGED | rc=0 >>
总用量 8
drwxr-xr-x 2 root root  6 11月  9 14:14 app总用量 8
drwxr-xr-x 2 root root  6 11月  9 14:14 app
[root@ansible ~]# ansible web -m file -a 'path=/data/app state=directory'
web2 | CHANGED => {"ansible_facts": {"discovered_interpreter_python": "/usr/bin/python"}, "changed": true, "gid": 0, "group": "root", "mode": "0755", "owner": "root", "path": "/data/app", "size": 6, "state": "directory", "uid": 0
}
web1 | CHANGED => {"ansible_facts": {"discovered_interpreter_python": "/usr/bin/python"}, "changed": true, "gid": 0, "group": "root", "mode": "0755", "owner": "root", "path": "/data/app", "size": 6, "state": "directory", "uid": 0
}
[root@ansible ~]# ansible web -m shell -a 'ls -l /data/'
web2 | CHANGED | rc=0 >>
总用量 8
-rw-r--r-- 1 root root  0 11月  9 13:15 aaa.jpg
drwxr-xr-x 2 root root  6 11月  9 14:14 app
lrwxrwxrwx 1 root root 13 11月  9 13:15 bbb.jpg -> /data/aaa.jpg
-rw-r--r-- 1 root root  0 11月  9 13:36 file
-rw-rw-rw- 1 root root 15 11月  9 14:05 name
-rw-rw-rw- 1 root root  8 11月  9 14:02 name.12174.2023-11-09@14:05:39~
web1 | CHANGED | rc=0 >>
总用量 8
-rw-r--r-- 1 root root  0 11月  9 13:14 aaa.jpg
drwxr-xr-x 2 root root  6 11月  9 14:14 app
lrwxrwxrwx 1 root root 13 11月  9 13:15 bbb.jpg -> /data/aaa.jpg
-rw-r--r-- 1 root root  0 11月  9 13:36 file
-rw-rw-rw- 1 root root 15 11月  9 14:05 name
-rw-rw-rw- 1 root root  8 11月  9 14:01 name.15224.2023-11-09@14:05:32~
[root@ansible ~]# ansible web -m file -a 'path=/data/ccc.jpg src=/data/aaa.jpg state=link'
web2 | CHANGED => {"ansible_facts": {"discovered_interpreter_python": "/usr/bin/python"}, "changed": true, "dest": "/data/ccc.jpg", "gid": 0, "group": "root", "mode": "0777", "owner": "root", "size": 13, "src": "/data/aaa.jpg", "state": "link", "uid": 0
}
web1 | CHANGED => {"ansible_facts": {"discovered_interpreter_python": "/usr/bin/python"}, "changed": true, "dest": "/data/ccc.jpg", "gid": 0, "group": "root", "mode": "0777", "owner": "root", "size": 13, "src": "/data/aaa.jpg", "state": "link", "uid": 0
}[root@ansible ~]# ansible web -m shell -a 'ls -l /data/'
web2 | CHANGED | rc=0 >>
总用量 8
-rw-r--r-- 1 root root  0 11月  9 13:15 aaa.jpg
drwxr-xr-x 2 root root  6 11月  9 14:14 app
lrwxrwxrwx 1 root root 13 11月  9 14:20 ccc.jpg -> /data/aaa.jpg
-rw-r--r-- 1 root root  0 11月  9 13:36 file
-rw-rw-rw- 1 root root 15 11月  9 14:05 name
-rw-rw-rw- 1 root root  8 11月  9 14:02 name.12174.2023-11-09@14:05:39~
web1 | CHANGED | rc=0 >>
总用量 8
-rw-r--r-- 1 root root  0 11月  9 13:14 aaa.jpg
drwxr-xr-x 2 root root  6 11月  9 14:14 app
lrwxrwxrwx 1 root root 13 11月  9 14:20 ccc.jpg -> /data/aaa.jpg
-rw-r--r-- 1 root root  0 11月  9 13:36 file
-rw-rw-rw- 1 root root 15 11月  9 14:05 name
-rw-rw-rw- 1 root root  8 11月  9 14:01 name.15224.2023-11-09@14:05:32~
[root@ansible ~]# ansible web -m file -a 'path=/data/app state=absent'
web2 | CHANGED => {"ansible_facts": {"discovered_interpreter_python": "/usr/bin/python"}, "changed": true, "path": "/data/app", "state": "absent"
}
web1 | CHANGED => {"ansible_facts": {"discovered_interpreter_python": "/usr/bin/python"}, "changed": true, "path": "/data/app", "state": "absent"
}
6.fetch 模块
从远程某主机获取(复制)文件到本地
dest:用来存放文件的目录
src:在远程拉取的文件,并且必须是一个file,不能是目录
[root@ansible ~]# ansible web -m fetch -a 'src=/root/yum.repo.sh dest=/opt'
web2 | CHANGED => {"changed": true, "checksum": "35c324d53225248f3def18df5d12f21b0b74ac1d", "dest": "/opt/web2/root/yum.repo.sh", "md5sum": "d907be33e4cfa20622c4e8054a589685", "remote_checksum": "35c324d53225248f3def18df5d12f21b0b74ac1d", "remote_md5sum": null
}
web1 | CHANGED => {"changed": true, "checksum": "35c324d53225248f3def18df5d12f21b0b74ac1d", "dest": "/opt/web1/root/yum.repo.sh", "md5sum": "d907be33e4cfa20622c4e8054a589685", "remote_checksum": "35c324d53225248f3def18df5d12f21b0b74ac1d", "remote_md5sum": null
}
[root@ansible ~]# cd /opt
[root@ansible opt]# ll
总用量 0
drwxr-xr-x 3 root root 18 11月  9 14:27 web1
drwxr-xr-x 3 root root 18 11月  9 14:27 web2
cron模块
该模块适用于管理cron计划任务的。
其使用的语法跟我们的crontab文件中的语法一致
0
day=#日应该运行的工作( 1-31, , /2, )
hour=# 小时 ( 0-23, , /2, )
minute=#分钟( 0-59, , /2, )
month=# 月( 1-12, *, /2, )
weekday=# 周 ( 0-6 for Sunday-Saturday, )
job=#指明运行的命令是什么
name=#定时任务描述
reboot# 任务在重启时运行,不建议使用,建议使用special_time
special_time#特殊的时间范围,参数:reboot(重启时),annually(每年),monthly(每月),weekly(每周),daily(每天),hourly(每小时)
state#指定状态,present表示添加定时任务,也是默认设置,absent表示删除定时任务
user# 以哪个用户的身份执行
创建计划任务
[root@ansible ~]# ansible web -m cron -a 'name="ping baidu" minute=*/20 job="ping -w1 -c1 baidu.com &> /dev/null "'
web2 | CHANGED => {"ansible_facts": {"discovered_interpreter_python": "/usr/bin/python"}, "changed": true, "envs": [], "jobs": ["ping baidu"]
}
web1 | CHANGED => {"ansible_facts": {"discovered_interpreter_python": "/usr/bin/python"}, "changed": true, "envs": [], "jobs": ["ping baidu"]
}
[root@ansible ~]# ansible web -m shell -a 'crontab -l'
web2 | CHANGED | rc=0 >>
#Ansible: ping baidu
*/20 * * * * ping -w1 -c1 baidu.com &> /dev/null
web1 | CHANGED | rc=0 >>
#Ansible: ping baidu
*/20 * * * * ping -w1 -c1 baidu.com &> /dev/null
删除计划任务
[root@ansible ~]# ansible web -m cron -a 'name="ping baidu" minute=*/20 job="ping -w1 -c1 baidu.com &> /dev/null"'
web2 | CHANGED => {"ansible_facts": {"discovered_interpreter_python": "/usr/bin/python"}, "changed": true, "envs": [], "jobs": ["ping baidu"]
}
web1 | CHANGED => {"ansible_facts": {"discovered_interpreter_python": "/usr/bin/python"}, "changed": true, "envs": [], "jobs": ["ping baidu"]
}
7.yum模块
模块主要用于软件的安装
name=#所安装的包的名称
state=#present—>安装,latest—>安装最新的,absent—> 卸载软件。
update_cache#强制更新yum的缓存
conf_file#指定远程yum安装时所依赖的配置文件(安装本地已有的包)。
disable_gpg_check#是否禁止GPG checking,只用于presentorlatest。
disablerepo#临时禁止使用yum库。 只用于安装或更新时。
enablerepo#临时使用的yum库。只用于安装或更新时。
安装软件包
web1 | CHANGED => {"ansible_facts": {"discovered_interpreter_python": "/usr/bin/python"}, "changed": true, "changes": {"installed": ["httpd"]}, "msg": "", "rc": 0, "results": ["Loaded plugins: fastestmirror\nLoading mirror speeds from cached hostfile\nResolving Dependencies\n--> Running transaction check\n---> Package httpd.x86_64 0:2.4.6-99.el7.centos.1 will be installed\n--> Processing Dependency: httpd-tools = 2.4.6-99.el7.centos.1 for package: httpd-2.4.6-99.el7.centos.1.x86_64\n--> Processing Dependency: /etc/mime.types for package: httpd-2.4.6-99.el7.centos.1.x86_64\n--> Processing Dependency: libaprutil-1.so.0()(64bit) for package: httpd-2.4.6-99.el7.centos.1.x86_64\n--> Processing Dependency: libapr-1.so.0()(64bit) for package: httpd-2.4.6-99.el7.centos.1.x86_64\n--> Running transaction check\n---> Package apr.x86_64 0:1.4.8-7.el7 will be installed\n---> Package apr-util.x86_64 0:1.5.2-6.el7_9.1 will be installed\n---> Package httpd-tools.x86_64 0:2.4.6-99.el7.centos.1 will be installed\n---> Package mailcap.noarch 0:2.1.41-2.el7 will be installed\n--> Finished Dependency Resolution\n\nDependencies Resolved\n\n================================================================================\n Package          Arch        Version                      Repository      Size\n================================================================================\nInstalling:\n httpd            x86_64      2.4.6-99.el7.centos.1        myupdates      2.7 M\nInstalling for dependencies:\n apr              x86_64      1.4.8-7.el7                  mybase         104 k\n apr-util         x86_64      1.5.2-6.el7_9.1              myupdates       92 k\n httpd-tools      x86_64      2.4.6-99.el7.centos.1        myupdates       94 k\n mailcap          noarch      2.1.41-2.el7                 mybase          31 k\n\nTransaction Summary\n================================================================================\nInstall  1 Package (+4 Dependent packages)\n\nTotal download size: 3.0 M\nInstalled size: 10 M\nDownloading packages:\n--------------------------------------------------------------------------------\nTotal                                               23 MB/s | 3.0 MB  00:00     \nRunning transaction check\nRunning transaction test\nTransaction test succeeded\nRunning transaction\n  Installing : apr-1.4.8-7.el7.x86_64                                       1/5 \n  Installing : apr-util-1.5.2-6.el7_9.1.x86_64                              2/5 \n  Installing : httpd-tools-2.4.6-99.el7.centos.1.x86_64                     3/5 \n  Installing : mailcap-2.1.41-2.el7.noarch                                  4/5 \n  Installing : httpd-2.4.6-99.el7.centos.1.x86_64                           5/5 \n  Verifying  : httpd-2.4.6-99.el7.centos.1.x86_64                           1/5 \n  Verifying  : mailcap-2.1.41-2.el7.noarch                                  2/5 \n  Verifying  : apr-1.4.8-7.el7.x86_64                                       3/5 \n  Verifying  : httpd-tools-2.4.6-99.el7.centos.1.x86_64                     4/5 \n  Verifying  : apr-util-1.5.2-6.el7_9.1.x86_64                              5/5 \n\nInstalled:\n  httpd.x86_64 0:2.4.6-99.el7.centos.1                                          \n\nDependency Installed:\n  apr.x86_64 0:1.4.8-7.el7                    apr-util.x86_64 0:1.5.2-6.el7_9.1 \n  httpd-tools.x86_64 0:2.4.6-99.el7.centos.1  mailcap.noarch 0:2.1.41-2.el7     \n\nComplete!\n"]
}
web2 | CHANGED => {"ansible_facts": {"discovered_interpreter_python": "/usr/bin/python"}, "changed": true, "changes": {"installed": ["httpd"]}, "msg": "", "rc": 0, "results": ["Loaded plugins: fastestmirror\nLoading mirror speeds from cached hostfile\nResolving Dependencies\n--> Running transaction check\n---> Package httpd.x86_64 0:2.4.6-99.el7.centos.1 will be installed\n--> Processing Dependency: httpd-tools = 2.4.6-99.el7.centos.1 for package: httpd-2.4.6-99.el7.centos.1.x86_64\n--> Processing Dependency: /etc/mime.types for package: httpd-2.4.6-99.el7.centos.1.x86_64\n--> Processing Dependency: libaprutil-1.so.0()(64bit) for package: httpd-2.4.6-99.el7.centos.1.x86_64\n--> Processing Dependency: libapr-1.so.0()(64bit) for package: httpd-2.4.6-99.el7.centos.1.x86_64\n--> Running transaction check\n---> Package apr.x86_64 0:1.4.8-7.el7 will be installed\n---> Package apr-util.x86_64 0:1.5.2-6.el7_9.1 will be installed\n---> Package httpd-tools.x86_64 0:2.4.6-99.el7.centos.1 will be installed\n---> Package mailcap.noarch 0:2.1.41-2.el7 will be installed\n--> Finished Dependency Resolution\n\nDependencies Resolved\n\n================================================================================\n Package          Arch        Version                      Repository      Size\n================================================================================\nInstalling:\n httpd            x86_64      2.4.6-99.el7.centos.1        myupdates      2.7 M\nInstalling for dependencies:\n apr              x86_64      1.4.8-7.el7                  mybase         104 k\n apr-util         x86_64      1.5.2-6.el7_9.1              myupdates       92 k\n httpd-tools      x86_64      2.4.6-99.el7.centos.1        myupdates       94 k\n mailcap          noarch      2.1.41-2.el7                 mybase          31 k\n\nTransaction Summary\n================================================================================\nInstall  1 Package (+4 Dependent packages)\n\nTotal download size: 3.0 M\nInstalled size: 10 M\nDownloading packages:\n--------------------------------------------------------------------------------\nTotal                                               15 MB/s | 3.0 MB  00:00     \nRunning transaction check\nRunning transaction test\nTransaction test succeeded\nRunning transaction\n  Installing : apr-1.4.8-7.el7.x86_64                                       1/5 \n  Installing : apr-util-1.5.2-6.el7_9.1.x86_64                              2/5 \n  Installing : httpd-tools-2.4.6-99.el7.centos.1.x86_64                     3/5 \n  Installing : mailcap-2.1.41-2.el7.noarch                                  4/5 \n  Installing : httpd-2.4.6-99.el7.centos.1.x86_64                           5/5 \n  Verifying  : httpd-2.4.6-99.el7.centos.1.x86_64                           1/5 \n  Verifying  : mailcap-2.1.41-2.el7.noarch                                  2/5 \n  Verifying  : apr-1.4.8-7.el7.x86_64                                       3/5 \n  Verifying  : httpd-tools-2.4.6-99.el7.centos.1.x86_64                     4/5 \n  Verifying  : apr-util-1.5.2-6.el7_9.1.x86_64                              5/5 \n\nInstalled:\n  httpd.x86_64 0:2.4.6-99.el7.centos.1                                          \n\nDependency Installed:\n  apr.x86_64 0:1.4.8-7.el7                    apr-util.x86_64 0:1.5.2-6.el7_9.1 \n  httpd-tools.x86_64 0:2.4.6-99.el7.centos.1  mailcap.noarch 0:2.1.41-2.el7     \n\nComplete!\n"]
}
8.service 模块
该模块用于服务程序的管理。
arguments#命令行提供额外的参数
enabled#设置开机启动。
name=#服务名称
runlevel#开机启动的级别,一般不用指定。
sleep#在重启服务的过程中,是否等待。如在服务关闭以后等待2秒再启动。(定义在剧本中。)
state#有四种状态,分别为:started—>启动服务,stopped—>停止服务,restarted—>重启服务,reloaded—>重载配置
开启服务并设置开机自启
[root@ansible ~]# ansible web -m service -a 'name=httpd state=started enabled=true'
关闭服务
[root@ansible ~]# ansible web -m service -a 'name=httpd state=stopped'
[root@ansible ~]# curl -Ik 192.168.20.142
curl: (7) Failed connect to 192.168.20.142:80; 拒绝连接
[root@ansible ~]# curl -Ik 192.168.20.143
curl: (7) Failed connect to 192.168.20.143:80; 拒绝连接
9.USER模块
该模块主要是用来管理用户账号
comment # 用户的描述信息
createhome # 是否创建家目录
force # 在使用state=absent时, 行为与userdel –force一致.
group # 指定基本组
groups # 指定附加组,如果指定为(groups=)表示删除所有组
home # 指定用户家目录
move_home # 如果设置为home=时, 试图将用户主目录移动到指定的目录
name # 指定用户名
non_unique # 该选项允许改变非唯一的用户ID值
password # 指定用户密码,对密码加密可以使用python的crypt和passlib
remove # 在使用state=absent时, 行为是与userdel –remove一致
shell # 指定默认shell
state # 设置帐号状态,不指定为创建,指定值为absent表示删除
system # 当创建一个用户,设置这个用户是系统用户。这个设置不能更改现有用户
uid # 指定用户的uid
[root@ansible ~]# ansible web -m user -a 'name=king uid=6666'
web1 | CHANGED => {"ansible_facts": {"discovered_interpreter_python": "/usr/bin/python"}, "changed": true, "comment": "", "create_home": true, "group": 6666, "home": "/home/king", "name": "king", "shell": "/bin/bash", "state": "present", "system": false, "uid": 6666
}
web2 | CHANGED => {"ansible_facts": {"discovered_interpreter_python": "/usr/bin/python"}, "changed": true, "comment": "", "create_home": true, "group": 6666, "home": "/home/king", "name": "king", "shell": "/bin/bash", "state": "present", "system": false, "uid": 6666
}
[root@ansible ~]# ansible web -m shell -a 'id king'
web1 | CHANGED | rc=0 >>
uid=6666(king) gid=6666(king) 组=6666(king)
web2 | CHANGED | rc=0 >>
uid=6666(king) gid=6666(king) 组=6666(king)
删除用户
[root@ansible ~]# ansible web -m user -a 'name=king state=absent'
web2 | CHANGED => {"ansible_facts": {"discovered_interpreter_python": "/usr/bin/python"}, "changed": true, "force": false, "name": "king", "remove": false, "state": "absent"
}
web1 | CHANGED => {"ansible_facts": {"discovered_interpreter_python": "/usr/bin/python"}, "changed": true, "force": false, "name": "king", "remove": false, "state": "absent"
}
[root@ansible ~]# ansible web -m shell -a 'id king'
web2 | FAILED | rc=1 >>
id: king: no such usernon-zero return code
web1 | FAILED | rc=1 >>
id: king: no such usernon-zero return code
10.group模块
该模块主要用于添加或删除组
gid= #设置组的GID号
name= #指定组的名称
state= #指定组的状态,默认为创建,设置值为absent为删除 system= #设置值为yes,表示创建为系统组
创建组
[root@ansible ~]# ansible web -m group -a 'name=liuliu gid=3333'
web1 | CHANGED => {"ansible_facts": {"discovered_interpreter_python": "/usr/bin/python"}, "changed": true, "gid": 3333, "name": "liuliu", "state": "present", "system": false
}
web2 | CHANGED => {"ansible_facts": {"discovered_interpreter_python": "/usr/bin/python"}, "changed": true, "gid": 3333, "name": "liuliu", "state": "present", "system": false
}
[root@ansible ~]# ansible web -m shell -a 'grep '3333' /etc/group'
web2 | CHANGED | rc=0 >>
liuliu:x:3333:
web1 | CHANGED | rc=0 >>
liuliu:x:3333:
删除组
[root@ansible ~]# ansible web -m group -a 'name=liuliu state=absent'
web2 | CHANGED => {"ansible_facts": {"discovered_interpreter_python": "/usr/bin/python"}, "changed": true, "name": "liuliu", "state": "absent"
}
web1 | CHANGED => {"ansible_facts": {"discovered_interpreter_python": "/usr/bin/python"}, "changed": true, "name": "liuliu", "state": "absent"
}
[root@ansible ~]# ansible web -m shell -a 'grep '3333' /etc/group'
web2 | FAILED | rc=1 >>
non-zero return code
web1 | FAILED | rc=1 >>
non-zero return code
11.script模块
模块用于将本机的脚本在被管理端的机器上运行
[root@ansible ~]# ansible web -m script -a '/root/a.sh'
web2 | CHANGED => {"changed": true, "rc": 0, "stderr": "Shared connection to web2 closed.\r\n", "stderr_lines": ["Shared connection to web2 closed."], "stdout": "", "stdout_lines": []
}
web1 | CHANGED => {"changed": true, "rc": 0, "stderr": "Shared connection to web1 closed.\r\n", "stderr_lines": ["Shared connection to web1 closed."], "stdout": "", "stdout_lines": []
}
[root@ansible ~]# ansible web -m shell -a 'cat /tmp/disk_total.log'
web2 | CHANGED | rc=0 >>
2023年 11月 09日 星期四 18:20:15 CST
文件系统                 容量  已用  可用 已用% 挂载点
devtmpfs                 1.9G     0  1.9G    0% /dev
tmpfs                    1.9G     0  1.9G    0% /dev/shm
tmpfs                    1.9G   12M  1.9G    1% /run
tmpfs                    1.9G     0  1.9G    0% /sys/fs/cgroup
/dev/mapper/centos-root   35G  1.5G   34G    5% /
/dev/sda1               1014M  150M  865M   15% /boot
tmpfs                    378M     0  378M    0% /run/user/0
web1 | CHANGED | rc=0 >>
2023年 11月 09日 星期四 18:20:08 CST
文件系统                 容量  已用  可用 已用% 挂载点
devtmpfs                 1.9G     0  1.9G    0% /dev
tmpfs                    1.9G     0  1.9G    0% /dev/shm
tmpfs                    1.9G   12M  1.9G    1% /run
tmpfs                    1.9G     0  1.9G    0% /sys/fs/cgroup
/dev/mapper/centos-root   35G  1.6G   34G    5% /
/dev/sda1               1014M  150M  865M   15% /boot
tmpfs                    378M     0  378M    0% /run/user/0
12.setup模块
该模块主要用于收集信息,是通过调用facts组件来实现的。
 [root@ansible ~]# ansible web -m setup -a 'filter="*mem*"'
web2 | SUCCESS => {"ansible_facts": {"ansible_memfree_mb": 3015, "ansible_memory_mb": {"nocache": {"free": 3484, "used": 286}, "real": {"free": 3015, "total": 3770, "used": 755}, "swap": {"cached": 0, "free": 4095, "total": 4095, "used": 0}}, "ansible_memtotal_mb": 3770, "discovered_interpreter_python": "/usr/bin/python"}, "changed": false
}
web1 | SUCCESS => {"ansible_facts": {"ansible_memfree_mb": 3158, "ansible_memory_mb": {"nocache": {"free": 3489, "used": 281}, "real": {"free": 3158, "total": 3770, "used": 612}, "swap": {"cached": 0, "free": 4095, "total": 4095, "used": 0}}, "ansible_memtotal_mb": 3770, "discovered_interpreter_python": "/usr/bin/python"}, "changed": false
}
保存信息
[root@ansible ~]# ansible web -m setup -a 'filter="*mem*"' --tree /tmp/mess
web1 | SUCCESS => {"ansible_facts": {"ansible_memfree_mb": 3157, "ansible_memory_mb": {"nocache": {"free": 3489, "used": 281}, "real": {"free": 3157, "total": 3770, "used": 613}, "swap": {"cached": 0, "free": 4095, "total": 4095, "used": 0}}, "ansible_memtotal_mb": 3770, "discovered_interpreter_python": "/usr/bin/python"}, "changed": false
}
web2 | SUCCESS => {"ansible_facts": {"ansible_memfree_mb": 3014, "ansible_memory_mb": {"nocache": {"free": 3483, "used": 287}, "real": {"free": 3014, "total": 3770, "used": 756}, "swap": {"cached": 0, "free": 4095, "total": 4095, "used": 0}}, "ansible_memtotal_mb": 3770, "discovered_interpreter_python": "/usr/bin/python"}, "changed": false
}
[root@ansible tmp]# cd mess
[root@ansible mess]# ls
web1  web2
[root@ansible mess]# cat web1
{"ansible_facts": {"ansible_memfree_mb": 3157, "ansible_memory_mb": {"nocache": {"free": 3489, "used": 281}, "real": {"free": 3157, "total": 3770, "used": 613}, "swap": {"cached": 0, "free": 4095, "total": 4095, "used": 0}}, "ansible_memtotal_mb": 3770, "discovered_interpreter_python": "/usr/bin/python"}, "changed": false}[root@ansible mess]# cat web2
{"ansible_facts": {"ansible_memfree_mb": 3014, "ansible_memory_mb": {"nocache": {"free": 3483, "used": 287}, "real": {"free": 3014, "total": 3770, "used": 756}, "swap": {"cached": 0, "free": 4095, "total": 4095, "used": 0}}, "ansible_memtotal_mb": 3770, "discovered_interpreter_python": "/usr/bin/python"}, "changed": false}
[root@ansible ~]# vim a.yaml
hosts: web1remote_user: roottasks:- name: install nginxyum: name=nginx state=present- name: start nginxservice: name=nginx state=started
四、Ansible playbook简介
playbook是ansible用于配置,部署和管理被控节点的剧本
通过 playbook 的详细描述,执行其中的一系列 tasks ,可以让远端主机达到预期的状态。playbook 就像 Ansible 控制器给被控节点列出的的一系列 to-do-list ,而被控节点必须要完成。 也可以这么理解,playbook 字面意思,即剧本,现实中由演员按照剧本表演,在Ansible中,这次由计算机进行表演,由计算机安装,部署应用,提供对外服务,以及组织计算机处理各种各样的事情。
Ansible playbook使用场景
1.格式简介
以下为playbook常用到的YMAL格式:
1、文件的第一行应该以 “—” (三个连字符)开始,表明YMAL文件的开始。
2、在同一行中,#之后的内容表示注释,类似于shell,python和ruby。
3、YMAL中的列表元素以”-”开头然后紧跟着一个空格,后面为元素内容。
4、同一个列表中的元素应该保持相同的缩进。否则会被当做错误处理。
5、play中hosts,variables,roles,tasks等对象的表示方法都是键值中间以":“分隔表示,”:"后面还要增加一个空格。
例子:
---
- hosts: web1remote_user: roottasks:- name: install nginxyum: name=nginx state=present- name: start nginxservice: name=nginx state=started
host部分:使用 hosts 指示使用哪个主机或主机组来运行下面的 tasks ,每个 playbook 都必须指定 hosts ,hosts也可以使用通配符格式。主机或主机组在 inventory 清单中指定,可以使用系统默认的/etc/ansible/hosts,也可以自己编辑,在运行的时候加上-i选项,指定清单的位置即可。在运行清单文件的时候,–list-hosts选项会显示那些主机将会参与执行 task 的过程中。
remote_user:指定远端主机中的哪个用户来登录远端系统,在远端系统执行 task 的用户,可以任意指定,也可以使用 sudo,但是用户必须要有执行相应 task 的权限。
tasks:指定远端主机将要执行的一系列动作。tasks 的核心为 ansible 的模块,前面已经提到模块的用法。tasks 包含 name 和要执行的模块,name 是可选的,只是为了便于用户阅读,不过还是建议加上去,模块是必须的,同时也要给予模块相应的参数。
2、核心元素
Playbook的核心元素:
Hosts:主机组;Tasks:任务列表;Variables:变量,设置方式有四种;Templates:包含了模板语法的文本文件;Handlers:由特定条件触发的任务;
3、基本组件
Playbooks配置文件的基础组件:
Hosts:运行指定任务的目标主机
remote_user:在远程主机上执行任务的用户;
sudo_user:
tasks:任务列表
模块,模块参数:格式: (1) action: module arguments (2) module: arguments 注意:shell和command模块后面直接跟命令,而非key=value类的参数列表;
handlers:任务,在特定条件下触发;接收到其它任务的通知时被触发;
(1) 某任务的状态在运行后为changed时,可通过“notify”通知给相应的handlers;
(2) 任务可以通过“tags“打标签,而后可在ansible-playbook命令上使用-t指定进行调用;
运行三部曲
运行前三部曲
检查错误
ansible-playbook nginx.yml --syntax-check列出所有任务
ansible-playbook nginx.yml --list-task列出在那些机器执行
ansible-playbook nginx.yml --list-hosts运行
ansible-playbook nginx.yml
举例:部署wordpress
---
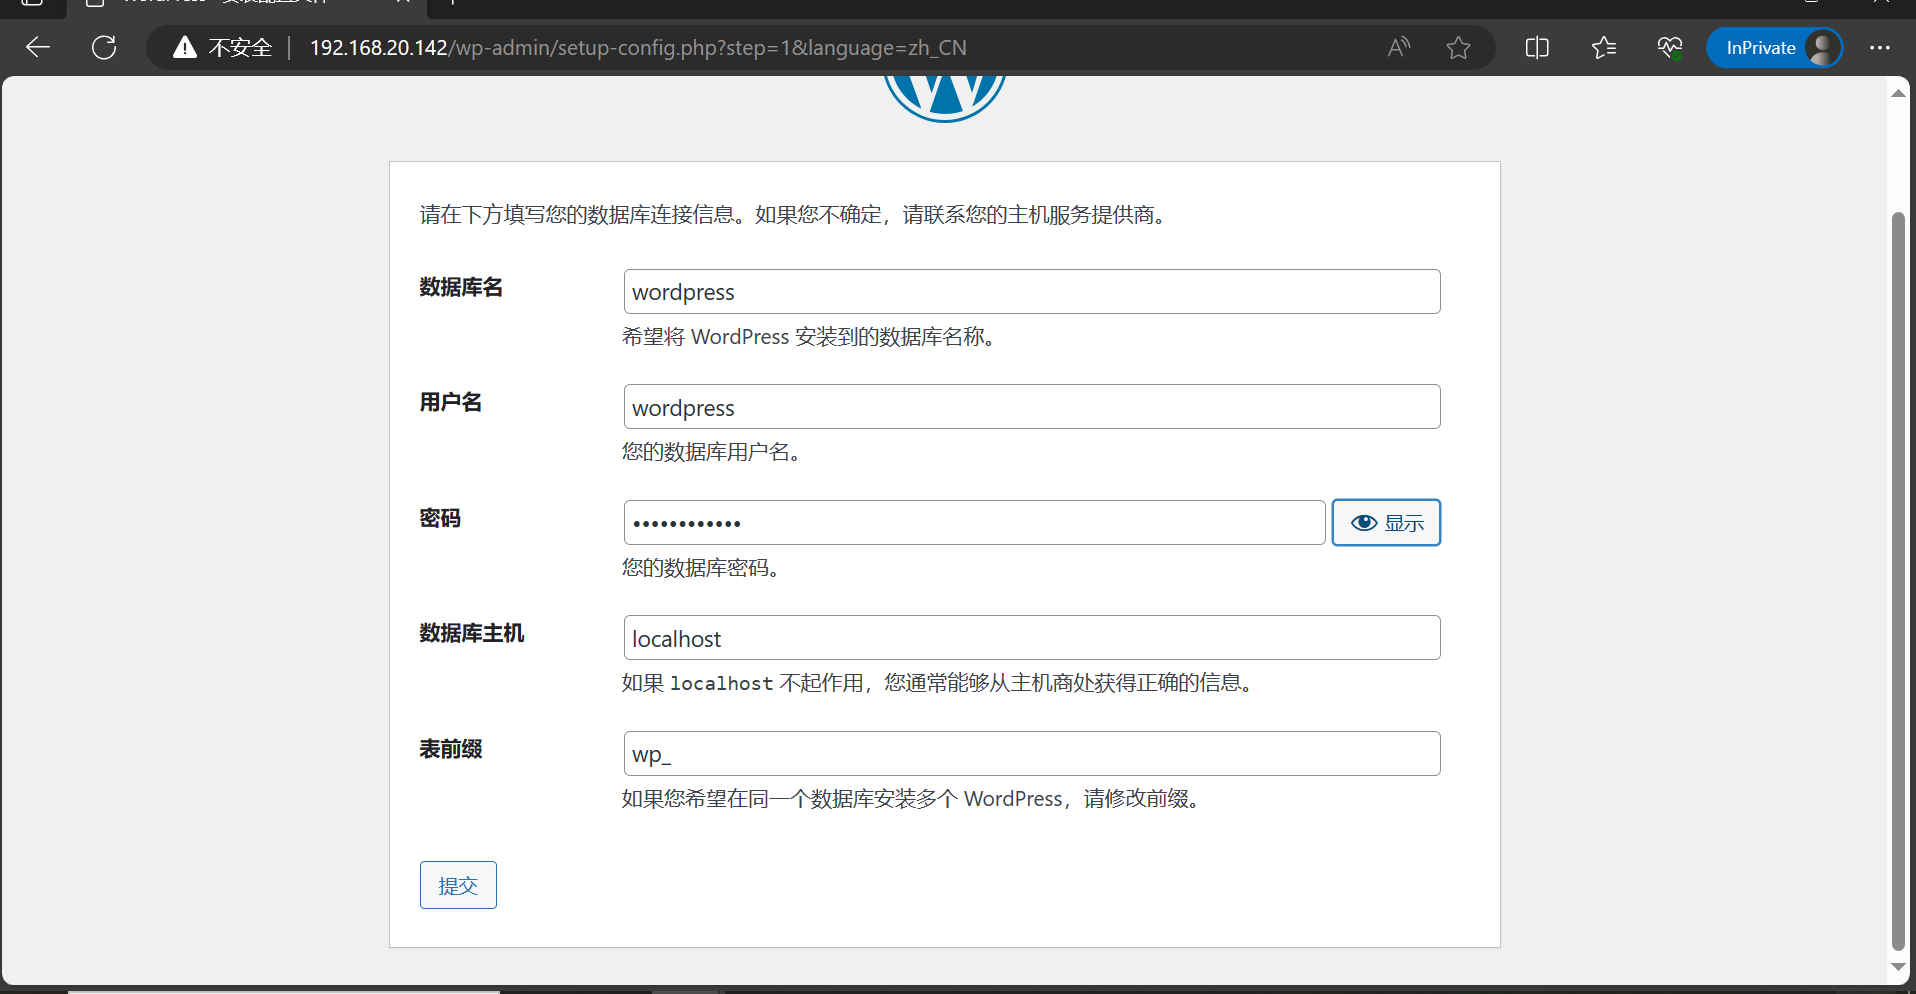
- hosts: web2vars:db_name: wordpressdb_password: Qianfeng@123remote_user: roottasks:- name: yum下载shell: curl -o /opt/yum.sh http://10.36.192.100/yum-server.sh- name: yum安装shell: sh /opt/yum.sh- name: 安装数据库yum: name=mariadb-server,mariadb state=present disablerepo=mysql-5.7-community- name: 启动数据库service: name=mariadb state=started- name: 配置数据库shell: mysql -e "create database {{ db_name }}; grant all on wordpress.* to 'wordpress'@'%' identified by '{{ db_password }}'; flush privileges"
---
- hosts: web1remote_user: rootvars:nginx_name: nginxnginx_port: 80tasks:- name: yum下载shell: curl -o /opt/yum.sh http://10.36.192.100/yum-server.sh- name: yum安装shell: cd /opt/ , sh yum.sh- name: nginx安装yum: name=nginx state=present- name: nginx 配置文件template: src=/root/nginx.conf dest=/etc/nginx/nginx.conf- name: nginx 开启service: name=nginx state=restarted- name: 安装PHPyum: name=php80-php-xsl,php80-php,php80-php-cli,php80-php-devel,php80-php-gd,php80-php-pdo,php80-php-mysql,php80-php-fpm state=present- name: 启动PHPservice: name=php80-php-fpm state=started enabled=true- name: 拷贝wordpress源代码unarchive: src=/root/wordpress-6.4.1-zh_CN.tar.gz dest=/usr/share/nginx/html
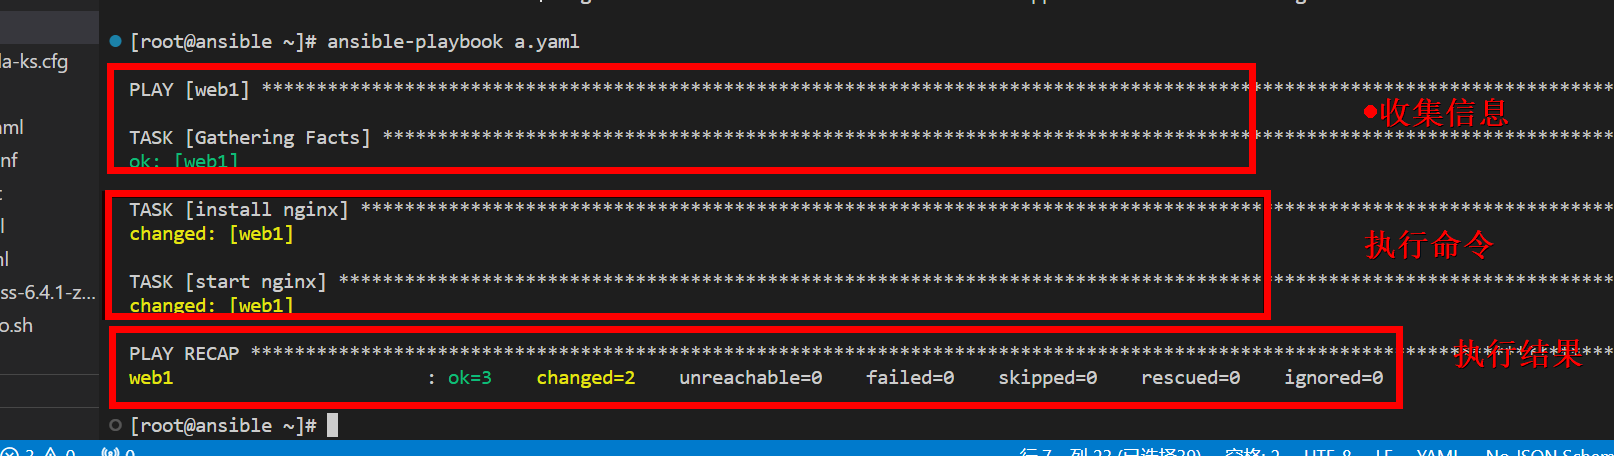
[root@ansible ~]# ansible-playbook web.yaml PLAY [web1] *******************************************************************************************************************************TASK [Gathering Facts] ********************************************************************************************************************
ok: [web1]TASK [yum下载] ******************************************************************************************************************************
[WARNING]: Consider using the get_url or uri module rather than running 'curl'.  If you need to use command because get_url or uri is
insufficient you can add 'warn: false' to this command task or set 'command_warnings=False' in ansible.cfg to get rid of this message.
changed: [web1]TASK [yum安装] ******************************************************************************************************************************
changed: [web1]TASK [nginx安装] ****************************************************************************************************************************
ok: [web1]TASK [nginx 配置文件] *************************************************************************************************************************
changed: [web1]TASK [nginx 开启] ***************************************************************************************************************************
changed: [web1]TASK [安装PHP] ******************************************************************************************************************************
ok: [web1]TASK [启动PHP] ******************************************************************************************************************************
ok: [web1]TASK [拷贝wordpress源代码] *********************************************************************************************************************
ok: [web1]PLAY RECAP ********************************************************************************************************************************
web1                       : ok=9    changed=4    unreachable=0    failed=0    skipped=0    rescued=0    ignored=0

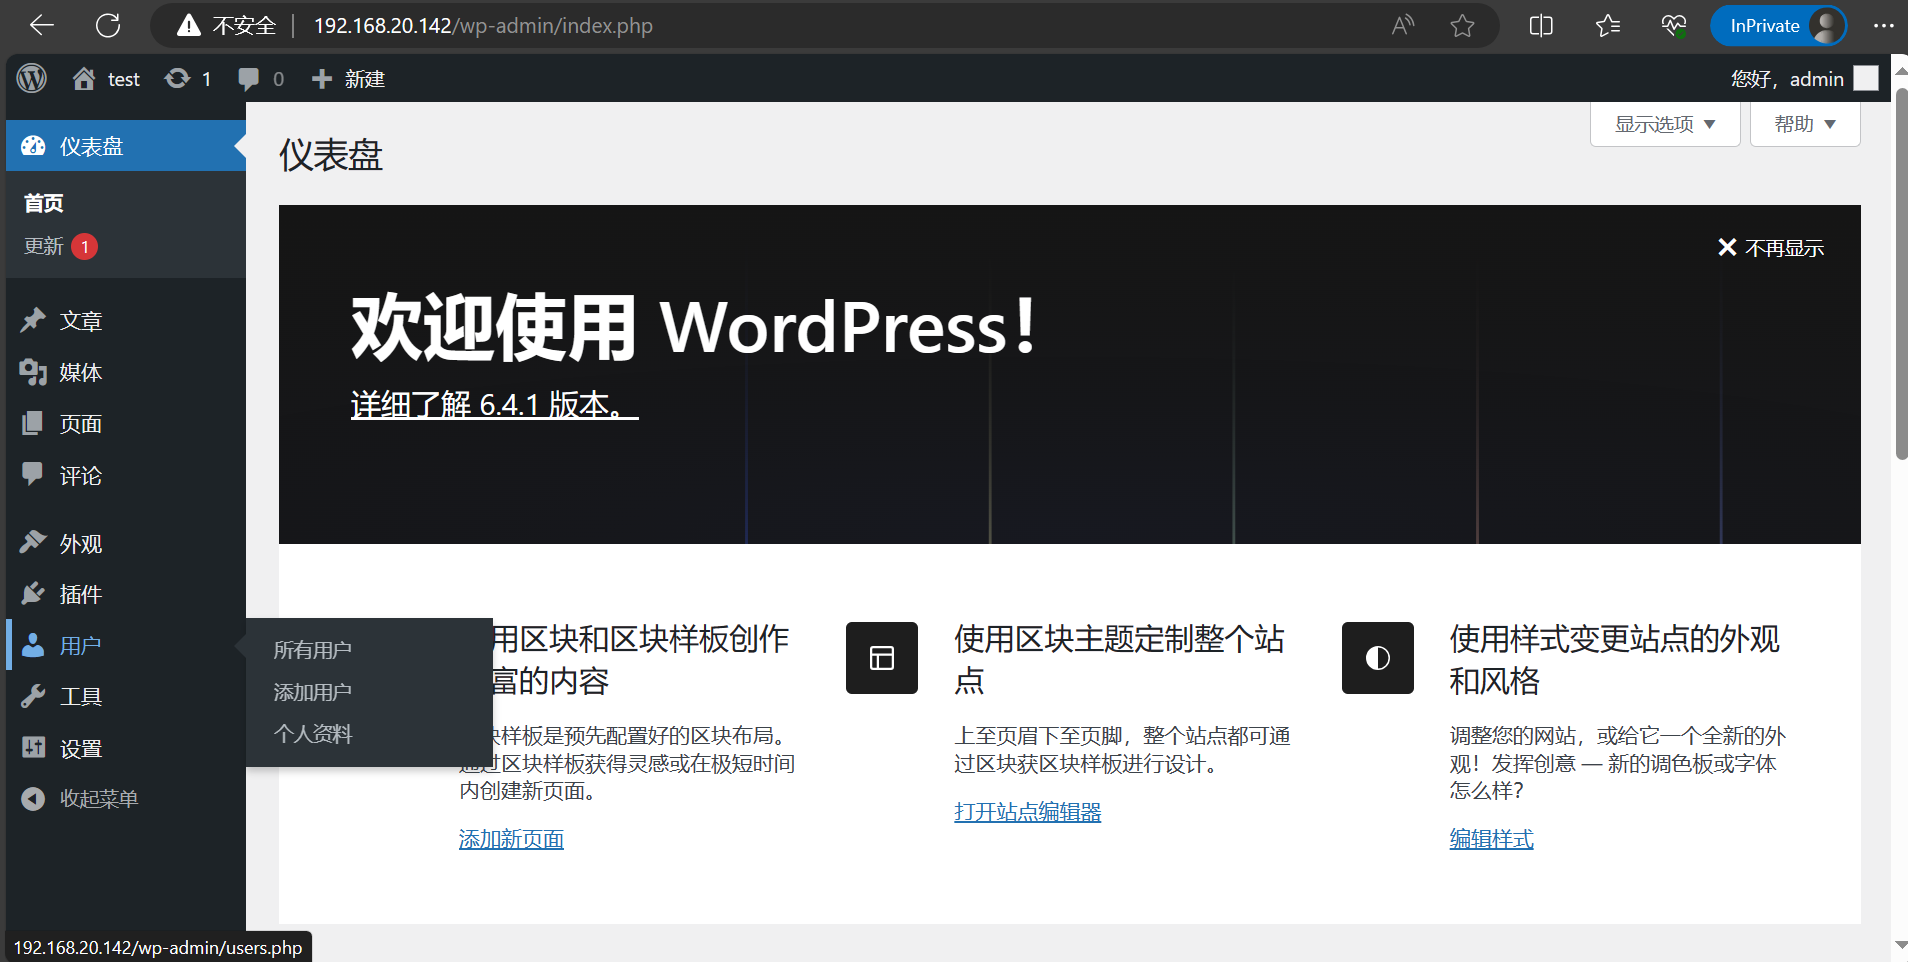
浏览器访问
五、角色订制:roles
① 简介
对于以上所有的方式有个弊端就是无法实现复用假设在同时部署Web、db、ha 时或不同服务器组合不同的应用就需要写多个yml文件。很难实现灵活的调用。 roles 用于层次性、结构化地组织playbook。roles 能够根据层次型结构自动装载变量文件、tasks以及handlers等。要使用roles只需要在playbook中使用include指令即可。简单来讲,roles就是通过分别将变量(vars)、文件(file)、任务(tasks)、模块(modules)及处理器(handlers)放置于单独的目录中,并可以便捷地include它们的一种机制。角色一般用于基于主机构建服务的场景中,但也可以是用于构建守护进程等场景中。
② 角色集合
角色集合:roles/ mysql/ httpd/ nginx/ files/:存储由copy或script等模块调用的文件; tasks/:此目录中至少应该有一个名为main.yml的文件,用于定义各task;其它的文件需要由main.yml进行“包含”调用; handlers/:此目录中至少应该有一个名为main.yml的文件,用于定义各handler;其它的文件需要由main.yml进行“包含”调用; vars/:此目录中至少应该有一个名为main.yml的文件,用于定义各variable;其它的文件需要由main.yml进行“包含”调用; templates/:存储由template模块调用的模板文本; meta/:此目录中至少应该有一个名为main.yml的文件,定义当前角色的特殊设定及其依赖关系;其它的文件需要由main.yml进行“包含”调用; default/:此目录中至少应该有一个名为main.yml的文件,用于设定默认变量;
③ 角色定制实例
1. 在roles目录下生成对应的目录结构
[root@server ansible]# cd roles/
[root@server roles]# ls
[root@server roles]# mkdir -pv ./{nginx,mysql,httpd}/{files,templates,vars,tasks,handlers,meta,default}
[root@server roles]# tree
.
├── httpd
│   ├── default
│   ├── files
│   ├── handlers
│   ├── meta
│   ├── tasks
│   ├── templates
│   └── vars
├── mysql
│   ├── default
│   ├── files
│   ├── handlers
│   ├── meta
│   ├── tasks
│   ├── templates
│   └── vars
└── nginx├── default├── files├── handlers├── meta├── tasks├── templates└── vars24 directories, 0 files
2. 定义配置文件 我们需要修改的配置文件为/tasks/main.yml,下面,我们就来修改一下:
[root@server roles]# vim nginx/tasks/main.yml
- name: cp rpm for nginxcopy: src=nginx-1.10.2-1.el7.ngx.x86_64.rpm dest=/tmp/nginx-1.10.2-1.el7.ngx.x86_64.rpm
- name: installyum: name=/tmp/nginx-1.10.2-1.el7.ngx.x86_64.rpm state=latest
- name: conftemplate: src=nginx.conf.j2 dest=/etc/nginx/nginx.conftags: nginxconfnotify: new conf to reload
- name: start serviceservice: name=nginx state=started enabled=true
http://nginx.org/packages/rhel/7/x86_64/RPMS/nginx-1.10.2-1.el7.ngx.x86_64.rpm
3. 放置我们所需要的文件到指定目录 因为我们定义的角色已经有了新的组成方式,所以我们需要把文件都放到指定的位置,这样,才能让配置文件找到这些并进行加载。 rpm包放在files目录下,模板放在templates目录下:
[root@server nginx]# cp /tmp/nginx-1.10.2-1.el7.ngx.x86_64.rpm ./files/
[root@server nginx]# cp /tmp/nginx.conf.j2 ./templates/
[root@server nginx]# tree
.
├── default
├── files
│   └── nginx-1.10.2-1.el7.ngx.x86_64.rpm
├── handlers
├── meta
├── tasks
│   └── main.yml
├── templates
│   └── nginx.conf.j2
└── vars7 directories, 3 files
4. 修改变量文件 我们在模板中定义的变量,也要去配置文件中加上:
[root@server nginx]# vim vars/main.yml
nginxprot: 9999
5. 定义handlers文件 我们在配置文件中定义了notify,所以我么也需要定义handlers,我们来修改配置文件:
[root@server nginx]# vim handlers/main.yml
- name: new conf to reloadservice: name=nginx state=restarted
6. 定义剧本文件 接下来,我们就来定义剧本文件,由于大部分设置我们都单独配置在了roles里面,所以,接下来剧本就只需要写一点点内容即可:
[root@server ansible]# vim roles/roles.yml
- hosts: webremote_user: rootroles:- nginx
完成后的目录结构
# tree ./
./
├── httpd
│   ├── default
│   ├── files
│   ├── handlers
│   ├── meta
│   ├── tasks
│   ├── templates
│   └── vars
├── mysql
│   ├── default
│   ├── files
│   ├── handlers
│   ├── meta
│   ├── tasks
│   ├── templates
│   └── vars
├── nginx
│   ├── default
│   ├── files
│   │   └── nginx-1.10.2-1.el7.ngx.x86_64.rpm
│   ├── handlers
│   │   └── main.yml
│   ├── meta
│   ├── tasks
│   │   └── main.yml
│   ├── templates
│   │   └── nginx.conf.j2
│   └── vars
│       └── main.yml
└── roles.yml
7. 启动服务 剧本定义完成以后,我们就可以来启动服务了:
[root@server ansible]# ansible-playbook roles.ymlPLAY [web] *********************************************************************TASK [setup] *******************************************************************
ok: [192.168.37.122]
ok: [192.168.37.133]TASK [nginx : cp] **************************************************************
ok: [192.168.37.122]
ok: [192.168.37.133]TASK [nginx : install] *********************************************************
changed: [192.168.37.122]
changed: [192.168.37.133]TASK [nginx : conf] ************************************************************
changed: [192.168.37.122]
changed: [192.168.37.133]TASK [nginx : start service] ***************************************************
changed: [192.168.37.122]
changed: [192.168.37.133]RUNNING HANDLER [nginx : new conf to reload] ***********************************
changed: [192.168.37.122]
changed: [192.168.37.133]PLAY RECAP *********************************************************************
192.168.37.122             : ok=6    changed=4    unreachable=0    failed=0
192.168.37.133             : ok=6    changed=4    unreachable=0    failed=0
启动过后照例查看端口号:
[root@server ansible]# ansible web -m shell -a "ss -ntulp |grep 9999"
192.168.37.122 | SUCCESS | rc=0 >>
tcp    LISTEN     0      128       *:9999                  *:*                   users:(("nginx",pid=7831,fd=6),("nginx",pid=7830,fd=6),("nginx",pid=7829,fd=6))192.168.37.133 | SUCCESS | rc=0 >>
tcp    LISTEN     0      128       *:9999                  *:*                   users:(("nginx",pid=9654,fd=6),("nginx",pid=9653,fd=6),("nginx",pid=9652,fd=6))
可以看出我们的剧本已经执行成功。
六、 Ansible 性能调优
Ansible 企业实战环境中,如果管理的服务器越来越多,Ansibe 执行效率会变得比较慢,可以通过优化 Ansible 提供工作效率,由于 Ansible 基于 SSH 协议通信,SSH 连接慢会导致整个基于 Ansible 执行变得缓慢,也需要对 Openssh 进行优化,具体优化的方法如下:
(1) Ansible SSH 关闭秘钥检测
默认以 SSH 登录远程客户端服务器,会检查远程主机的公钥(public key),并将该主机的公钥记录在~/.ssh/known_hosts 文件中。下次访问相同主机时,OpenSSH 会核对公钥,如果公钥不同,OpenSSH 会发出警告,如果公钥相同,则提示输入密码。
SSH对主机的public_key的检查等级是根据StrictHostKeyChecking变量来设定的StrictHostKeyChecking 检查级别包括:no(不检查)、ask(询问)、yes(每次都检查)、False(关闭检查)。
Ansible 配置文件中加入如下代码,即可关闭 StrictHostKeyChecking 检查:
host_key_checking = False
(2) OpenSSH 连接优化
使用 OpenSSH 服务时,默认服务器端配置文件 UseDNS=YES 状态,该选项会导致服务器根据客户端的 IP 地址进行 DNS PTR 反向解析,得到客户端的主机名,然后根据获取到的主机名进行 DNS 正向 A 记录查询,并验证该 IP 是否与原始 IP 一致。关闭 DNS 解析代码如下:
sed -i '/^GSSAPI/s/yes/no/g; /UseDNS/d; /Protocol/aUseDNS no' /etc/ssh/sshd_config
/etc/init.d/sshd restart
(3) SSH pipelining 加速 Ansible
SSH pipelining 是一个加速 Ansible 执行速度的简单方法,SSH pipelining 默认是关闭的,关闭是为了兼容不同的 sudo 配置,主要是 requiretty 选项。
如果不使用 Sudo 建议开启该选项,打开此选项可以减少 Ansible 执行没有文件传输时,SSH 在被控机器上执行任务的连接数。使用 Sudo 操作的时候, 必须在所有被管理的主机上将配置文件/etc/sudoers 中 requiretty 选项禁用。
sed -i '/^pipelining/s/False/True/g' /etc/ansible/ansible.cfg
(4)Ansible Facts 缓存优化
Ansible-playbook 在执行过程中,默认会执行 Gather facts,如果不需要获取客户端的 fact 数据的话,可以关闭获取 fact 数据功能,关闭之后可以加快 ansible-playbook的执行效率。如需关闭 fact 功能,在 playbook yaml 文件中加入如下代码即可:
gather_facts: nogather_facts: no
Ansible facts 组件主要用于收集客户端设备的基础静态信息,这些信息可以在做配置管理的时候方便引用。Facts 信息直接当做 Ansible Playbook 变量信息进行引用,通过定制 facts 以便收集我们想要的信息,同时可以通过 Facter 和 Ohai 来拓展 facts 信息,也可以将 facts 信息存入 Redis 缓存中,如下为 Facts 使用 Redis 缓存的步骤
在配置文件/etc/ansible/ansible.cfg 中 defaluts 段中加入代码,如果 redis 密码为 admin,则开启 admin 密码行:
# yum install -y python-pip
# pip install redis==3.0.0
gathering = smart
fact_caching = redis
fact_caching_timeout = 86400
fact_caching_connection = localhost:6379
#fact_caching_connection = localhost:6379:0:admin
也可以使用json来缓存信息
fact_caching = jsonfile
fact_caching_timeout = 86400
fact_caching_connection = /tmp

- STL之list)


求解 逆序对的数量 降低时间复杂度为 nlogn)


)


