2023年的深度学习入门指南(22) - 百川大模型13B的运行及量化
不知道上一讲的大段代码大家看晕了没有。但是如果你仔细看了会发现,其实代码还是不全的。比如分词器我们就没讲。
另外,13B比7B的改进点也没有讲。
再有,对于13B需要多少显存我们也没说。13B光是模型加载就需要26GB的显存,加上推理需要的消i耗,没有个28GB以上的显存是比较悬的。恰好24GB的3090和4090单卡不够用。
我们先从应用讲起。
百川13b的命令行交互
百川官方在13b的开源代码中给我们提供了命令行交互式的应用和Web服务的基本框架。
我们先来看看命令行交互式的应用。
import os
import torch
import platform
from colorama import Fore, Style
from transformers import AutoModelForCausalLM, AutoTokenizer
from transformers.generation.utils import GenerationConfigdef init_model():print("init model ...")model = AutoModelForCausalLM.from_pretrained("baichuan-inc/Baichuan-13B-Chat",torch_dtype=torch.float16,device_map="auto",trust_remote_code=True)model.generation_config = GenerationConfig.from_pretrained("baichuan-inc/Baichuan-13B-Chat")tokenizer = AutoTokenizer.from_pretrained("baichuan-inc/Baichuan-13B-Chat",use_fast=False,trust_remote_code=True)return model, tokenizerdef clear_screen():if platform.system() == "Windows":os.system("cls")else:os.system("clear")print(Fore.YELLOW + Style.BRIGHT + "欢迎使用百川大模型,输入进行对话,clear 清空历史,CTRL+C 中断生成,stream 开关流式生成,exit 结束。")return []def main(stream=True):model, tokenizer = init_model()messages = clear_screen()while True:prompt = input(Fore.GREEN + Style.BRIGHT + "\n用户:" + Style.NORMAL)if prompt.strip() == "exit":breakif prompt.strip() == "clear":messages = clear_screen()continueprint(Fore.CYAN + Style.BRIGHT + "\nBaichuan:" + Style.NORMAL, end='')if prompt.strip() == "stream":stream = not streamprint(Fore.YELLOW + "({}流式生成)\n".format("开启" if stream else "关闭"), end='')continuemessages.append({"role": "user", "content": prompt})if stream:position = 0try:for response in model.chat(tokenizer, messages, stream=True):print(response[position:], end='', flush=True)position = len(response)if torch.backends.mps.is_available():torch.mps.empty_cache()except KeyboardInterrupt:passprint()else:response = model.chat(tokenizer, messages)print(response)if torch.backends.mps.is_available():torch.mps.empty_cache()messages.append({"role": "assistant", "content": response})print(Style.RESET_ALL)if __name__ == "__main__":main()
调用模型的部分大家都比较熟悉了,这里唯一值得说一说的反而是显示格式相关的colorama库。

    print(Fore.YELLOW + Style.BRIGHT + "欢迎使用百川大模型,输入进行对话,clear 清空历史,CTRL+C 中断生成,stream 开关流式生成,exit 结束。")
...prompt = input(Fore.GREEN + Style.BRIGHT + "\n用户:" + Style.NORMAL)
系统提示为黄色,而用户输入为绿色,百川的回复为青色。
看起来百川的同学是写过前端的,都用一个颜色太乱忍不了。:)
安装时别忘了安装colorama库。或者按下面的列表装全了吧:
pip install transformers
pip install sentencepiece
pip install accelerate
pip install transformers_stream_generator
pip install colorama
pip install cpm_kernels
pip install streamlit
百川13b的Web服务demo
百川的Web demo里,关于模型的调用部分还是没啥可讲的。
但是,Streamlit的前端有必要简单说一下。
Streamlit封装了很多常用的前端组件,比如对话这样的高级组件,就是用st.chat_message()来实现的。
我们来看个例子:
import streamlit as stwith st.chat_message("assistant", avatar='🤖'):st.markdown("您好,我是百川大模型,很高兴为您服务🥰")
我们把上面的文件存为test1.py,然后在命令行运行:
streamlit run test1.py
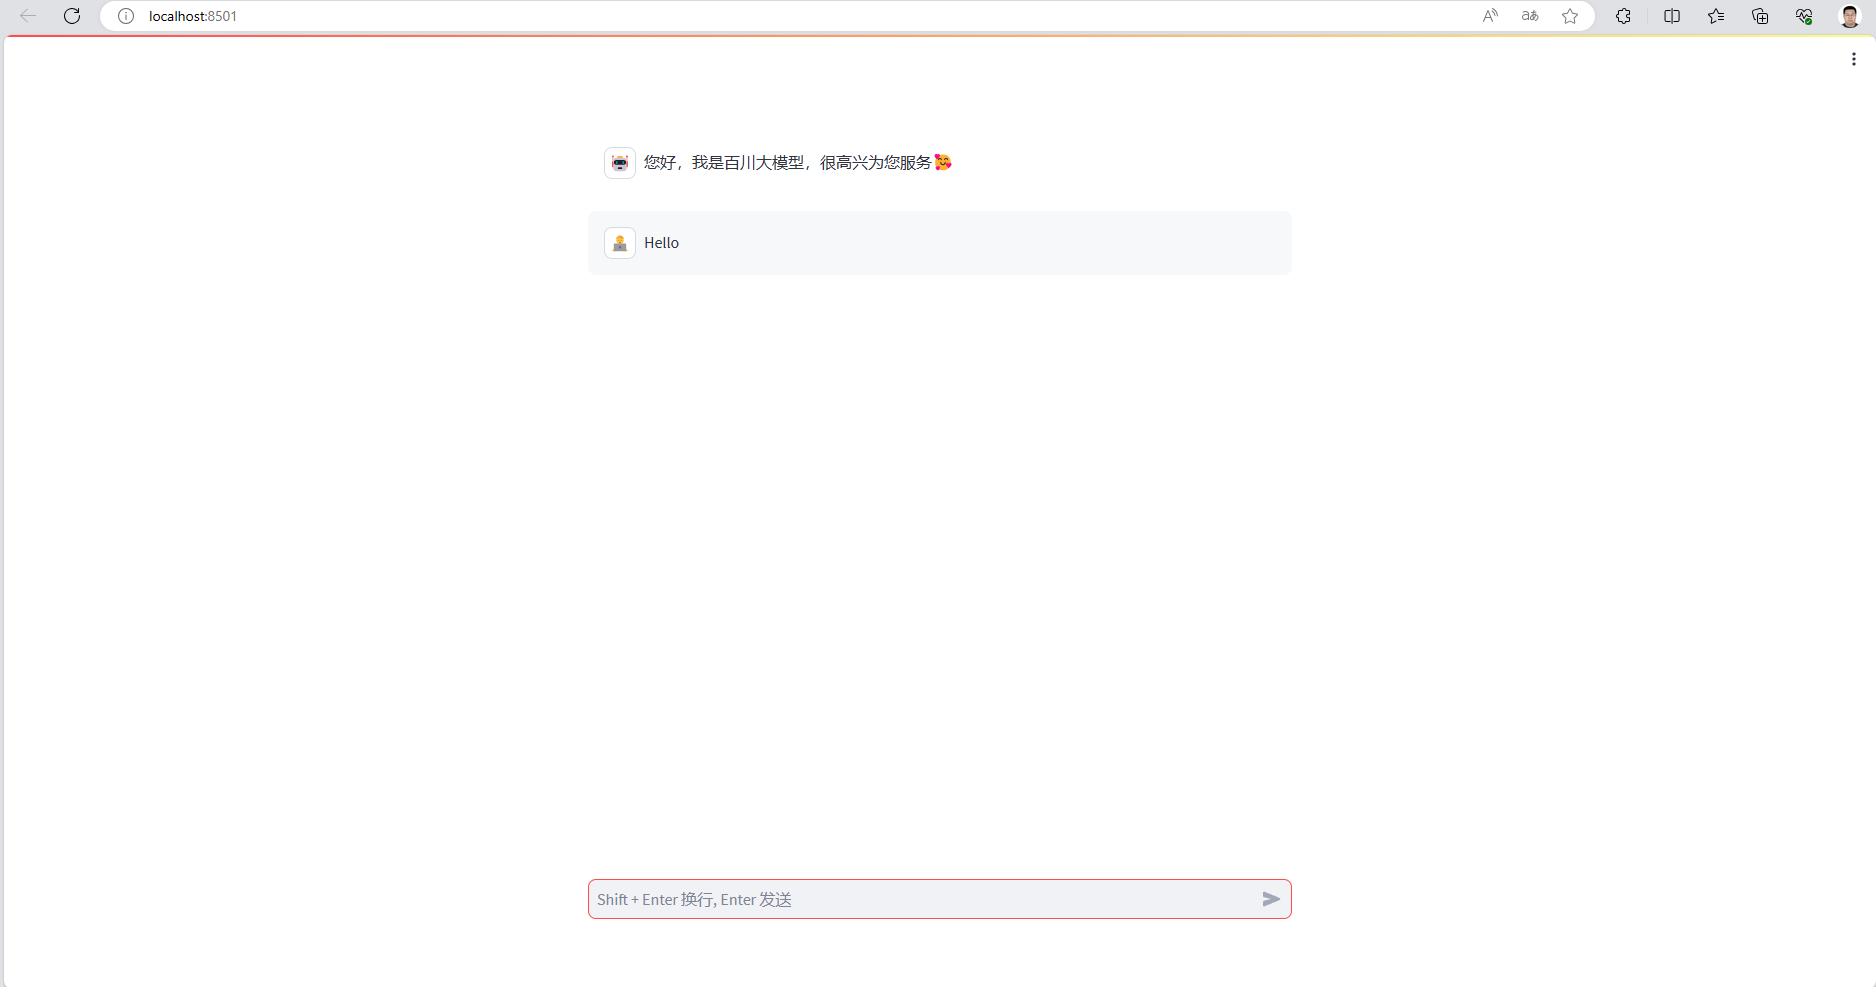
运行之后,会自动打开浏览器,看到如下界面:

with st.chat_message("assistant", avatar='🤖'):
这一行创建了一个聊天消息的上下文管理器,消息的发送者是 “assistant”,并且使用了一个机器人表情作为头像(‘🤖’)。
st.markdown("您好,我是百川大模型,很高兴为您服务🥰")
这行代码在上述的 “assistant” 聊天消息中添加了一段 Markdown 格式的文本。
好,下面我们把用户输入的功能加进来,使用st.chat_input()就可以实现,不需要写javascript代码:
import streamlit as stwith st.chat_message("assistant", avatar='🤖'):st.markdown("您好,我是百川大模型,很高兴为您服务🥰")if prompt := st.chat_input("Shift + Enter 换行, Enter 发送"):with st.chat_message("user", avatar='🧑💻'):st.markdown(prompt)
运行效果如下:

我们可以进一步给页面加上标题和属性:
import streamlit as stst.set_page_config(page_title="Baichuan-13B-Chat")
st.title("Baichuan-13B-Chat")with st.chat_message("assistant", avatar='🤖'):st.markdown("您好,我是百川大模型,很高兴为您服务🥰")if prompt := st.chat_input("Shift + Enter 换行, Enter 发送"):with st.chat_message("user", avatar='🧑💻'):st.markdown(prompt)
理解了上面的基础知识之后,我们就直接看百川的代码吧:
import json
import torch
import streamlit as st
from transformers import AutoModelForCausalLM, AutoTokenizer
from transformers.generation.utils import GenerationConfigst.set_page_config(page_title="Baichuan-13B-Chat")
st.title("Baichuan-13B-Chat")@st.cache_resource
def init_model():model = AutoModelForCausalLM.from_pretrained("baichuan-inc/Baichuan-13B-Chat",torch_dtype=torch.float16,device_map="auto",trust_remote_code=True)model.generation_config = GenerationConfig.from_pretrained("baichuan-inc/Baichuan-13B-Chat")tokenizer = AutoTokenizer.from_pretrained("baichuan-inc/Baichuan-13B-Chat",use_fast=False,trust_remote_code=True)return model, tokenizerdef clear_chat_history():del st.session_state.messagesdef init_chat_history():with st.chat_message("assistant", avatar='🤖'):st.markdown("您好,我是百川大模型,很高兴为您服务🥰")if "messages" in st.session_state:for message in st.session_state.messages:avatar = '🧑💻' if message["role"] == "user" else '🤖'with st.chat_message(message["role"], avatar=avatar):st.markdown(message["content"])else:st.session_state.messages = []return st.session_state.messagesdef main():model, tokenizer = init_model()messages = init_chat_history()if prompt := st.chat_input("Shift + Enter 换行, Enter 发送"):with st.chat_message("user", avatar='🧑💻'):st.markdown(prompt)messages.append({"role": "user", "content": prompt})print(f"[user] {prompt}", flush=True)with st.chat_message("assistant", avatar='🤖'):placeholder = st.empty()for response in model.chat(tokenizer, messages, stream=True):placeholder.markdown(response)if torch.backends.mps.is_available():torch.mps.empty_cache()messages.append({"role": "assistant", "content": response})print(json.dumps(messages, ensure_ascii=False), flush=True)st.button("清空对话", on_click=clear_chat_history)if __name__ == "__main__":main()
量化
如果想要在消费级的单卡上运行百川13b的推理,需要对模型进行量化。
百川13b支持8位和4位的量化。8位量化之后需要18.6G以上的显存。4位量化之后需要11.5GB以上的显存。同时,CPU在实现量化的时候需要36.1G的内存,32G的不太够用。
我们先看下8位量化的例子:
import torch
from transformers import AutoModelForCausalLM, AutoTokenizer
from transformers.generation.utils import GenerationConfig
tokenizer = AutoTokenizer.from_pretrained("baichuan-inc/Baichuan-13B-Chat", use_fast=False, trust_remote_code=True)
model = AutoModelForCausalLM.from_pretrained("baichuan-inc/Baichuan-13B-Chat", torch_dtype=torch.float16, trust_remote_code=True)
model.generation_config = GenerationConfig.from_pretrained("baichuan-inc/Baichuan-13B-Chat")
model = model.quantize(8).cuda()
messages = []
messages.append({"role": "user", "content":"亚历山大的骑兵为什么强大?"})
response = model.chat(tokenizer, messages)
print(response)
输出如下:
亚历山大大帝的骑兵之所以强大,主要有以下几个原因:1. 马匹质量高:亚历山大所处的马其顿地区盛产优质战马,这些马匹体型高大、速度快、耐力强,非常适合进行战斗。这使得他的骑兵在战场上具有很高的机动性和冲击力。2. 训练有素:亚历山大的骑兵经过严格的训练,能够熟练地使用武器和战术。他们不仅擅长冲锋陷阵,还能够在战场上灵活地进行迂回、包抄等行动,对敌军造成严重打击。3. 装备精良:亚历山大的骑兵装备了当时最先进的武器和护具,如长矛、弓箭、盾牌等。这些武器既能有效保护士兵,又能给予敌人沉重的打击。此外,他们还配备了马镫,使骑士在马背上更加稳定,提高了战斗效率。4. 严密的组织和指挥:亚历山大的骑兵在战场上有严密的组织和指挥体系。他们通过旗帜、号角等方式进行通信,确保部队之间的协同作战。同时,亚历山大本人作为统帅,对骑兵战术有着深刻的理解,能够根据战场情况制定合适的战略。5. 强大的心理素质:亚历山大的骑兵拥有极高的心理素质,他们在战场上勇敢无畏,敢于面对任何困难。这种精神力量使得他们在战斗中始终保持旺盛的斗志,成为一支不可小觑的力量。综上所述,亚历山大的骑兵之所以强大,是因为他们拥有高质量的马匹、训练有素的士兵、精良的装备、严密的组织和卓越的领导。这些因素共同铸就了一支强大的骑兵部队,使得亚历山大大帝能够征服整个已知世界。
效果看来仍然不错哈。
如果想要使用4位量化,将model = model.quantize(8).cuda()改为model = model.quantize(4).cuda()即可:
import torch
from transformers import AutoModelForCausalLM, AutoTokenizer
from transformers.generation.utils import GenerationConfig
tokenizer = AutoTokenizer.from_pretrained("baichuan-inc/Baichuan-13B-Chat", use_fast=False, trust_remote_code=True)
model = AutoModelForCausalLM.from_pretrained("baichuan-inc/Baichuan-13B-Chat", torch_dtype=torch.float16, trust_remote_code=True)
model.generation_config = GenerationConfig.from_pretrained("baichuan-inc/Baichuan-13B-Chat")
model = model.quantize(4).cuda()
messages = []
messages.append({"role": "user", "content":"亚历山大大帝的骑兵为什么强大?"})
response = model.chat(tokenizer, messages)
print(response)
输出如下:
亚历山大(Alexander the Great)的骑兵之所以强大,主要原因有以下几点:1. 训练和纪律:亚历山大的军队以严格的训练和高水平的纪律著称。他的士兵接受了高度专业的军事训练,特别是在马术、射击技巧和战场战术方面。这使得他们在战场上具有很高的机动性和战斗力。2. 马匹质量:亚历山大的骑兵使用的是高品质的战马,这些马匹经过精挑细选,具备出色的速度、耐力和力量。这些马匹在战场上的表现优于其他国家的马匹,使他们能够快速移动并有效地执行任务。3. 装备精良:亚历山大的骑兵配备了先进的武器和盔甲,如长矛、弓箭和护胸甲等。这些装备不仅提高了他们的战斗力,还降低了伤亡率。4. 战略优势:亚历山大的骑兵在战争中发挥了重要作用,尤其是在对付敌军步兵时。他们的高速度和机动性使他们能够迅速突破敌人的防线,为步兵提供支援。此外,骑兵还可以用于侦查敌情、切断补给线以及进行骚扰作战。5. 领导力:亚历山大的领导才能和卓越指挥使他的军队士气高涨。他的士兵们对他充满信心,愿意为他出生入死。这种紧密的团队精神和忠诚使得亚历山大的骑兵在战场上具有强大的凝聚力和战斗力。综上所述,亚历山大的骑兵之所以强大,是因为他们拥有高素质的士兵、优良的马匹、精良的装备、有效的战略以及卓越的领导力。这些因素共同铸就了他们无与伦比的战斗力,使他们在历史上留下了深刻的印记。
看起来也还不错哈。
量化的实现
我们来看下量化的实现,在modeling_baichuan.py中的quantize其实就是把W,o和mlp的每一层都量化掉。
def quantize(self, bits: int):try:from .quantizer import QLinearexcept ImportError:raise ImportError(f"Needs QLinear to run quantize.")for layer in self.model.layers:layer.self_attn.W_pack = QLinear(bits=bits,weight=layer.self_attn.W_pack.weight,bias = None,)layer.self_attn.o_proj = QLinear(bits=bits,weight=layer.self_attn.o_proj.weight,bias = None,)layer.mlp.gate_proj = QLinear(bits=bits,weight=layer.mlp.gate_proj.weight,bias = None,)layer.mlp.down_proj = QLinear(bits=bits,weight=layer.mlp.down_proj.weight,bias = None,)layer.mlp.up_proj = QLinear(bits=bits,weight=layer.mlp.up_proj.weight,bias = None,)return self
我们继续看下QLinear的实现,其实就是把权重和偏置量化掉,然后在forward的时候,把输入也量化掉,然后再做矩阵乘法,最后再反量化回去。
在构造函数中,首先将 bits 参数保存到 self.quant_bits 属性中。然后计算量化所需的缩放因子 self.scale。这个缩放因子是通过将权重矩阵的绝对值取最大值,然后除以 (2 ** (bits - 1)) - 1) 来计算的。接下来,根据量化位数的不同,使用不同的方法对权重矩阵进行量化。如果量化位数为 4,则调用 quant4 函数进行量化;如果量化位数为 8,则使用四舍五入方法进行量化。最后,将偏置项设置为 None。
class QLinear(torch.nn.Module):def __init__(self, bits: int, weight: torch.Tensor, bias=None):super().__init__()self.quant_bits = bitsself.scale = weight.abs().max(dim=-1).values / ((2 ** (bits - 1)) - 1)self.scale = self.scale.to(torch.float32)if self.quant_bits == 4:self.weight = quant4(weight, self.scale)elif self.quant_bits == 8:self.weight = torch.round(weight.to(self.scale.dtype) / self.scale[:, None]).to(torch.int8)if self.quant_bits == 8:self.weight = self.weight.Tself.bias = None
这个类还定义了一个名为 forward 的方法,它接受一个名为 input 的参数。这个方法首先检查输入张量的数据类型是否符合要求,并将权重矩阵和缩放因子转移到输入张量所在的设备上。然后根据量化位数的不同,使用不同的方法对权重矩阵进行反量化,并与输入张量进行矩阵乘法运算。如果偏置项不为 None,则将其加到输出张量上。最后返回输出张量。
def forward(self, input):if self.quant_bits == 4:assert(input.dtype == torch.bfloat16 or input.dtype == torch.float16) if self.weight.device != input.device:self.weight = self.weight.to(input.device)self.scale = self.scale.to(input.device)if self.quant_bits == 4:self.scale = self.scale.to(input.dtype)rweight = dequant4(self.weight, self.scale, input).Toutput = torch.matmul(input, rweight)elif self.quant_bits == 8:rweight = self.weight.to(input.dtype) * self.scale.to(input.dtype)output = torch.matmul(input, rweight)if self.bias is not None:output = output + self.biasreturn output
量化的原理我们之前已经讲过了,我们来看4位量化的实现,我还是把注释写在代码行里:
def quant4(weight: torch.Tensor, scale: torch.Tensor):stream = torch.cuda.current_stream()num_row = weight.size(0)num_chan_fp16 = weight.size(1)# 4bitnum_chan_int = num_chan_fp16 // 8qweight = torch.zeros((num_row, num_chan_int), dtype=torch.int32, device=weight.device)intweight = torch.empty(num_row, num_chan_fp16, dtype = torch.int32)# 将权重张量除以比例因子、四舍五入、裁剪在 [-16, 15] 范围内,然后转换为 32 位整数intweight = torch.clip(torch.round(weight.to(scale.dtype) / scale[:, None]),-16, 15).to(dtype=torch.int32) # 使用位操作(位移和位与)将 8 个 4 位整数打包到一个 32 位整数中for j in range(num_chan_int):qweight[:, j] = ((intweight[:, j*8+7] & 0x0f) << 28) \| ((intweight[:, j*8+6] & 0x0f) << 24) \| ((intweight[:, j*8+5] & 0x0f) << 20) \| ((intweight[:, j*8+4] & 0x0f) << 16) \| ((intweight[:, j*8+3] & 0x0f) << 12) \| ((intweight[:, j*8+2] & 0x0f) << 8) \| ((intweight[:, j*8+1] & 0x0f) << 4) \| ((intweight[:, j*8] & 0x0f))return qweight
小结
这一节我们进一步了解了百川13b大模型运行和量化的方法,以及简要介绍了量化的原理。


)
)


