目录
1 自动梯度计算和预定义算子
1.1 利用预定义算子重新实现前馈神经网络
1.2 完善Runner类
1.3 模型训练
1.4 性能评价
1.5 增加一个3个神经元的隐藏层,再次实现二分类,并与1.1.1做对比.
1.6 自定义隐藏层层数和每个隐藏层中的神经元个数,尝试找到最优超参数完成二分类。可以适当修改数据集,便于探索超参数
2 优化问题
2.1 参数初始化
2.2 梯度消失问题
2.2.1 模型构建
2.2.2 使用Sigmoid型函数进行训练
2.2.3 使用Relu型函数进行训练
可视化图像问题
2.3 死亡 ReLU 问题
2.3.1 使用ReLU进行模型训练
2.3.2 使用Leaky ReLU进行模型训练
总结
参考文献
1 自动梯度计算和预定义算子
虽然我们能够通过模块化的方式比较好地对神经网络进行组装,但是每个模块的梯度计算过程仍然十分繁琐且容易出错。在深度学习框架中,已经封装了自动梯度计算的功能,我们只需要聚焦模型架构,不再需要耗费精力进行计算梯度。
Pytorch提供了torch.nn.Moudle类,来方便快速的实现自己的层和模型。模型和层都可以基于torch.nn.Module扩充实现,模型只是一种特殊的层。
torch.nn.Module所有方法总结及其使用举例_torch.nn.module cuda-CSDN博客
引用一个很好的Module官方文件解释的文档
torch.nn.Moudle
torch.nn.Module是PyTorch中一个非常重要的模块,它是构建神经网络的基本单元。torch.nn.Module封装了神经网络中常用的层(如卷积层、全连接层等)以及其他常用函数,使得我们可以方便地搭建和训练神经网络。
每个继承自torch.nn.Module的类都必须实现forward方法,该方法定义了输入数据在神经网络中的传播方式。在forward方法中,我们可以调用其他已经实现的模块和函数,也可以自己定义一些计算逻辑,从而实现自定义的神经网络结构。
此外,torch.nn.Module还提供了许多有用的功能,比如参数共享、权重初始化、梯度计算等。其中,参数共享指的是同一个模块可以被多次调用,而其内部的参数是共享的,这样可以大大减少模型的参数量,节省内存和计算资源。
1.1 利用预定义算子重新实现前馈神经网络
下面我们使用Pytorch的预定义算子来重新实现二分类任务。主要使用到的预定义算子为torch.nn.Linear:
torch.nn.Linear()详解
torch.nn.Linear是PyTorch中的一个类,用于定义线性变换(全连接层)的操作。它将输入数据与可学习的权重矩阵和偏置向量相乘,并输出变换后的结果。
构造函数如下:torch.nn.Linear(in_features, out_features, bias=True)
其中:
- in_features表示输入特征的数量。
- out_features表示输出特征的数量。
- bias表示是否使用偏置,默认为True。
在实际使用中,我们首先需要创建一个Linear对象,然后可以将其作为模型的子模块添加到torch.nn.Module中。模型在训练过程中会自动学习并更新Linear对象中的权重和偏置。
Linear对象有两个主要方法:
- forward(input):该方法定义了线性变换的前向传播计算。给定输入input,Linear对象会将输入与权重矩阵相乘,并加上偏置,得到输出结果。
- parameters():该方法返回Linear对象中所有需要学习的参数,包括权重和偏置。这些参数可以通过优化器进行更新。
class Model_MLP_L2_V2(nn.Module):def __init__(self, input_size, hidden_size, output_size):super(Model_MLP_L2_V2, self).__init__()self.fc1 = nn.Linear(input_size, hidden_size)self.fc2 = nn.Linear(hidden_size, output_size)self.act_fn = nn.Sigmoid()# 初始化权重参数nn.init.normal_(self.fc1.weight, mean=0., std=1.)nn.init.constant_(self.fc1.bias, 0.0)nn.init.normal_(self.fc2.weight, mean=0., std=1.)nn.init.constant_(self.fc2.bias, 0.0)def forward(self, inputs):z1 = self.fc1(inputs)a1 = self.act_fn(z1)z2 = self.fc2(a1)a2 = self.act_fn(z2)return a21.2 完善Runner类
基于上一个实验实现的 RunnerV2_1 类,本节的 RunnerV2_2 类在训练过程中使用自动梯度计算;模型保存时,使用state_dict方法获取模型参数;模型加载时,使用load_state_dict方法加载模型参数.
class RunnerV2_2(object):def __init__(self, model, optimizer, metric, loss_fn, **kwargs):self.model = modelself.optimizer = optimizerself.loss_fn = loss_fnself.metric = metric# 记录训练过程中的评估指标变化情况self.train_scores = []self.dev_scores = []# 记录训练过程中的评价指标变化情况self.train_loss = []self.dev_loss = []def train(self, train_set, dev_set, **kwargs):# 将模型切换为训练模式self.model.train()# 传入训练轮数,如果没有传入值则默认为0num_epochs = kwargs.get("num_epochs", 0)# 传入log打印频率,如果没有传入值则默认为100log_epochs = kwargs.get("log_epochs", 100)# 传入模型保存路径,如果没有传入值则默认为"best_model.pdparams"save_path = kwargs.get("save_path", "best_model.pdparams")# log打印函数,如果没有传入则默认为"None"custom_print_log = kwargs.get("custom_print_log", None)# 记录全局最优指标best_score = 0# 进行num_epochs轮训练for epoch in range(num_epochs):X, y = train_set# 获取模型预测logits = self.model(X.to(torch.float32))# 计算交叉熵损失trn_loss = self.loss_fn(logits, y)self.train_loss.append(trn_loss.item())# 计算评估指标trn_score = self.metric(logits, y).item()self.train_scores.append(trn_score)# 自动计算参数梯度trn_loss.backward()if custom_print_log is not None:# 打印每一层的梯度custom_print_log(self)# 参数更新self.optimizer.step()# 清空梯度self.optimizer.zero_grad() # reset gradientdev_score, dev_loss = self.evaluate(dev_set)# 如果当前指标为最优指标,保存该模型if dev_score > best_score:self.save_model(save_path)print(f"[Evaluate] best accuracy performence has been updated: {best_score:.5f} --> {dev_score:.5f}")best_score = dev_scoreif log_epochs and epoch % log_epochs == 0:print(f"[Train] epoch: {epoch}/{num_epochs}, loss: {trn_loss.item()}")@torch.no_grad()def evaluate(self, data_set):# 将模型切换为评估模式self.model.eval()X, y = data_set# 计算模型输出logits = self.model(X)# 计算损失函数loss = self.loss_fn(logits, y).item()self.dev_loss.append(loss)# 计算评估指标score = self.metric(logits, y).item()self.dev_scores.append(score)return score, loss# 模型测试阶段,使用'torch.no_grad()'控制不计算和存储梯度@torch.no_grad()def predict(self, X):# 将模型切换为评估模式self.model.eval()return self.model(X)# 使用'model.state_dict()'获取模型参数,并进行保存def save_model(self, saved_path):torch.save(self.model.state_dict(), saved_path)# 使用'model.set_state_dict'加载模型参数def load_model(self, model_path):state_dict = torch.load(model_path)self.model.load_state_dict(state_dict)1.3 模型训练
实例化RunnerV2类,并传入训练配置,代码实现如下:
input_size = 2
hidden_size = 5
output_size = 1
model = Model_MLP_L2_V2(input_size=input_size, hidden_size=hidden_size, output_size=output_size)# 设置损失函数
loss_fn = F.binary_cross_entropy# 设置优化器
learning_rate = 0.2 #5e-2
optimizer = torch.optim.SGD(model.parameters(),lr=learning_rate)# 设置评价指标
metric = accuracy# 其他参数
epoch = 2000
saved_path = 'best_model.pdparams'# 实例化RunnerV2类,并传入训练配置
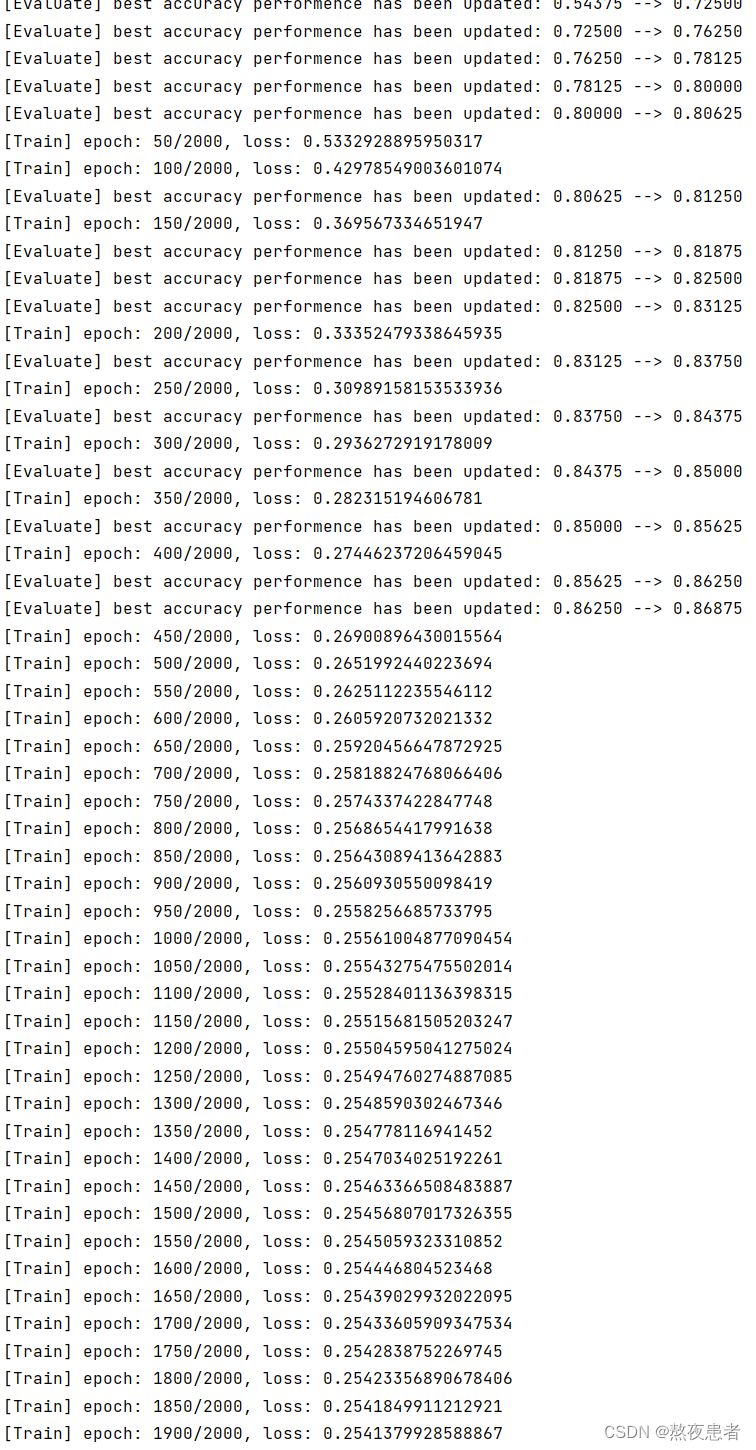
runner = RunnerV2_2(model, optimizer, metric, loss_fn)runner.train([X_train, y_train], [X_dev, y_dev], num_epochs = epoch, log_epochs=50, save_path="best_model.pdparams")
结果如下:
将训练过程中训练集与验证集的准确率变化情况进行可视化,调用plot函数
# 可视化观察训练集与验证集的指标变化情况
def plot(runner, fig_name):plt.figure(figsize=(10,5))epochs = [i for i in range(len(runner.train_scores))]plt.subplot(1,2,1)plt.plot(epochs, runner.train_loss, color='#e4007f', label="Train loss")plt.plot(epochs, runner.dev_loss, color='#f19ec2', linestyle='--', label="Dev loss")# 绘制坐标轴和图例plt.ylabel("loss", fontsize='large')plt.xlabel("epoch", fontsize='large')plt.legend(loc='upper right', fontsize='x-large')plt.subplot(1,2,2)plt.plot(epochs, runner.train_scores, color='#e4007f', label="Train accuracy")plt.plot(epochs, runner.dev_scores, color='#f19ec2', linestyle='--', label="Dev accuracy")# 绘制坐标轴和图例plt.ylabel("score", fontsize='large')plt.xlabel("epoch", fontsize='large')plt.legend(loc='lower right', fontsize='x-large')plt.savefig(fig_name)plt.show()plot(runner, 'fw-acc.pdf')
结果如下: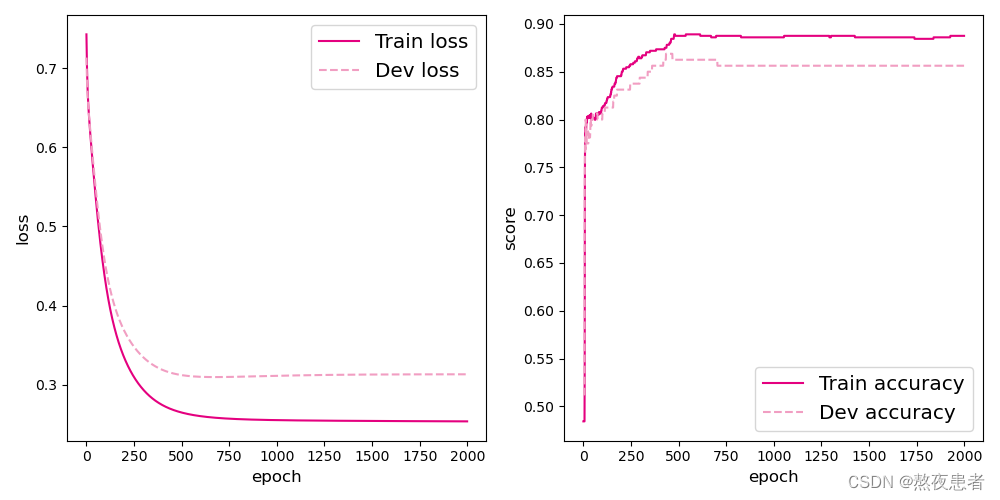
1.4 性能评价
runner.load_model("best_model.pdparams")
score, loss = runner.evaluate([X_test, y_test])
print("[Test] score/loss: {:.4f}/{:.4f}".format(score, loss))![]()
1.5 增加一个3个神经元的隐藏层,再次实现二分类,并与1.1.1做对比.
因为只需要增加一个隐藏层,所以在1.1的代码基础上修改
class Model_MLP_L2_V2(nn.Module):def __init__(self, input_size, hidden_size, hidden_size2, output_size):super(Model_MLP_L2_V2, self).__init__()self.fc1 = nn.Linear(input_size, hidden_size)self.fc2 = nn.Linear(hidden_size, hidden_size2)self.fc3 = nn.Linear(hidden_size2, output_size)self.act_fn = nn.Sigmoid()# 初始化权重参数nn.init.normal_(self.fc1.weight, mean=0., std=1.)nn.init.constant_(self.fc1.bias, 0.0)nn.init.normal_(self.fc2.weight, mean=0., std=1.)nn.init.constant_(self.fc2.bias, 0.0)nn.init.normal_(self.fc3.weight, mean=0., std=1.)nn.init.constant_(self.fc3.bias, 0.0)def forward(self, inputs):z1 = self.fc1(inputs.to(torch.float32))a1 = self.act_fn(z1)z2 = self.fc2(a1)a2 = self.act_fn(z2)z3 = self.fc3(a2)a3 = self.act_fn(z3)return a3因为模型定义发生改变,所以实例化也需要做出对应的调整
修改如下这一部分即可,运行程序:
# 设置模型
input_size = 2
hidden_size = 5
hidden_size2 = 3
output_size = 1
model = Model_MLP_L2_V2(input_size=input_size, hidden_size=hidden_size, hidden_size2=hidden_size2, output_size=output_size)
训练过程如下: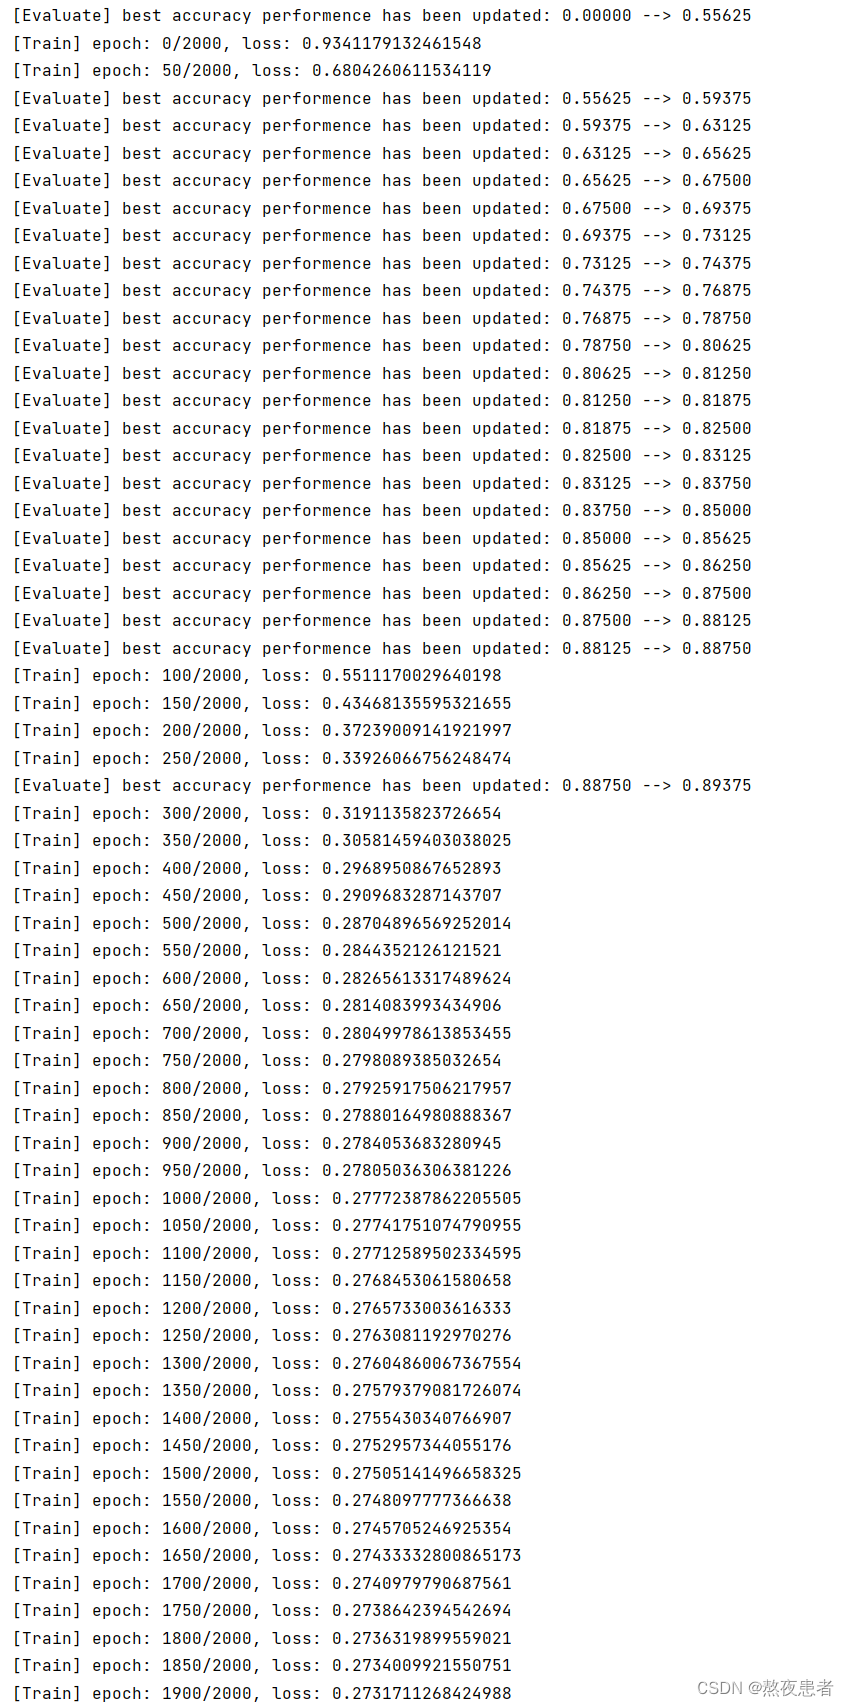
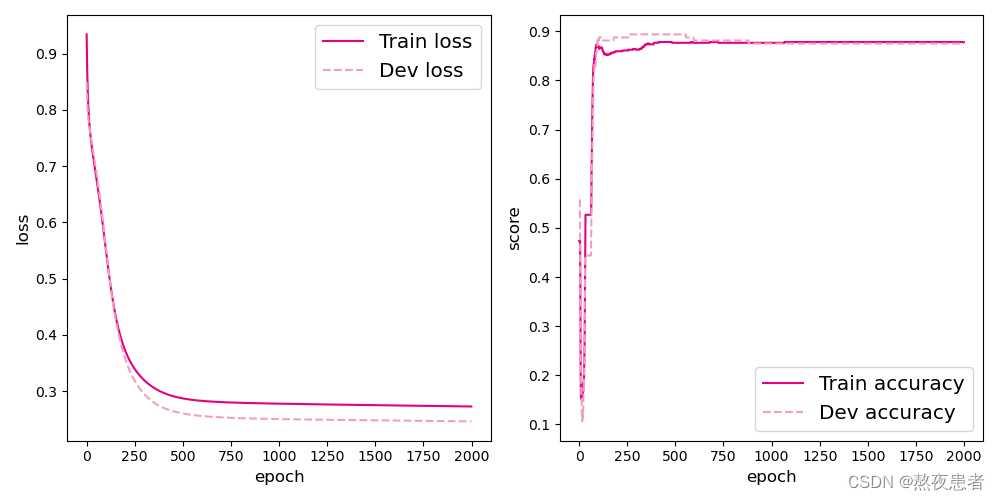 最后测试的结果
![]()
我们发现当加入一个隐藏层时对最后的得分影响不大,甚至还有一点点降低这是为什么,经过半天搜索我猜想可能是由于学习率过低,因为层数增加,导致参数梯度大大减小,趋近于正确值的速度减小所以同样的训练次数,多了一个隐藏层的效果不明显,让我们测试一下:
lr = 5
不加新隐藏层的结果
![]()
加入新隐藏层的结果
![]()
我们发现这么看起来确实加了一个隐藏层的正确率是优于不加的,这也就印证了神经网络的模型越深,模型越拟合数据的说法,那如果当学习率都为0.2不变时提升训练次数,效果会是什么样子。
![]()
我们发现测试结果也提高了很多,所以我们发现神经网络层数越多越好,但是伴随而来的参数的量也是大量增加,需要更多的训练次数才能配得上我不断加入的新的隐藏层,所以我们神经网络的学习就是在寻找一个模型的最合适的超参数,也就是训练次数,学习率等等。
1.6 自定义隐藏层层数和每个隐藏层中的神经元个数,尝试找到最优超参数完成二分类。可以适当修改数据集,便于探索超参数
对于隐藏层的数量,我发现一个博客中讲的说法特别好:
- 没有隐藏层:仅能表示线性可分离函数或决策。
- 1 可以近似任何包含从一个有限空间到另一个有限空间的连续映射的函数。
- 2 可以使用有理激活函数将任意决策边界表示为任意精度,并且可以将任何平滑映射近似到任何精度。
- >2 可以学习的复杂特征。
由此我觉得本次实验采取的隐藏层数量为2即可,隐藏层数量太多,反而增加过拟合风险,不是我们想要的结果。
这里从大佬博客取得的经验总结来说,对于神经元的数量我们采取的原则是隐藏神经元的数量应为输入层大小的2/3加上输出层大小的2/3。通常,对所有隐藏层使用相同数量的神经元就足够了。
输入层 * 2/3 + 输出层 * 2/3 = 2 * 2/3 + 1 * 2/3 = 2
总结:隐藏层神经元数量为2,隐藏层的数量为2,但是第一个隐藏层因为神经元数量越多越可以获得一些低级特征,所以假定第二隐藏层的神经元数量为2不变,采取第一个隐藏层神经元发生变化。
通过遍历调节第一层神经元的数量为2~10我们寻找最优的神经元数量,代码和可视化结果如下:
import matplotlib.pyplot as plt
import numpy as np
import torch.nn as nn
import torch.nn.functional as F
import torch
from nndl.tools import plot
from nndl.dataset import make_moons
from nndl.metric import accuracy
from nndl.runner import RunnerV2_2
n_samples = 1000
X, y = make_moons(n_samples=n_samples, shuffle=True, noise=0.15)num_train = 640
num_dev = 160
num_test = 200X_train, y_train = X[:num_train], y[:num_train]
X_dev, y_dev = X[num_train:num_train + num_dev], y[num_train:num_train + num_dev]
X_test, y_test = X[num_train + num_dev:], y[num_train + num_dev:]y_train = y_train.reshape([-1,1])
y_dev = y_dev.reshape([-1,1])
y_test = y_test.reshape([-1,1])class Model_MLP_L2_V2(nn.Module):def __init__(self, input_size, hidden_size, hidden_size2, output_size):super(Model_MLP_L2_V2, self).__init__()self.fc1 = nn.Linear(input_size, hidden_size)self.fc2 = nn.Linear(hidden_size, hidden_size2)self.fc3 = nn.Linear(hidden_size2, output_size)self.act_fn = nn.Sigmoid()# 初始化权重参数nn.init.normal_(self.fc1.weight, mean=0., std=1.)nn.init.constant_(self.fc1.bias, 0.0)nn.init.normal_(self.fc2.weight, mean=0., std=1.)nn.init.constant_(self.fc2.bias, 0.0)nn.init.normal_(self.fc3.weight, mean=0., std=1.)nn.init.constant_(self.fc3.bias, 0.0)def forward(self, inputs):z1 = self.fc1(inputs.to(torch.float32))a1 = self.act_fn(z1)z2 = self.fc2(a1)a2 = self.act_fn(z2)z3 = self.fc3(a2)a3 = self.act_fn(z3)return a3# 设置模型
cnt1 = 0
cnt2 = 0
maxn = 0
score_all = []
number = [i for i in range(2,11)]
epochs = [i * 1000 for i in number]
for i in number:score_temp = []for k in epochs:input_size = 2hidden_size = ihidden_size2 = 2output_size = 1model = Model_MLP_L2_V2(input_size=input_size, hidden_size=hidden_size, hidden_size2=hidden_size2, output_size=output_size)# 设置损失函数loss_fn = F.binary_cross_entropy# 设置优化器learning_rate = 5 #5e-2optimizer = torch.optim.SGD(model.parameters(),lr=learning_rate)# 设置评价指标metric = accuracy# 其他参数epoch = ksaved_path = 'model/FNN_2/best_model.pdparams'# 实例化RunnerV2类,并传入训练配置runner = RunnerV2_2(model, optimizer, metric, loss_fn)runner.train([X_train, y_train], [X_dev, y_dev], num_epochs = epoch, log_epochs=50, save_path=saved_path)# plot(runner, 'model/FNN_3/fw-acc.pdf')#模型评价runner.load_model(saved_path)score, loss = runner.evaluate([X_test, y_test])# print("[Test] score/loss: {:.4f}/{:.4f}".format(score, loss))score_temp.append(score)if maxn < score:maxn = scorecnt1 = icnt2 = kscore_all.append(score_temp)fig = plt.figure()
ax = fig.add_subplot(111, projection='3d')number, epochs = np.meshgrid(np.array(number), np.array(epochs))
ax.plot_surface(number, epochs, np.array(score_all),cmap='rainbow')
ax.set_xlabel('first_hidden_Layers',labelpad=10)
ax.set_ylabel('epoch',labelpad=10)
ax.set_zlabel('score',labelpad=10)
plt.show()
print('最优情况下第一个隐藏层的神经元数量为{},对应的训练次数为{}'.format(i,k))
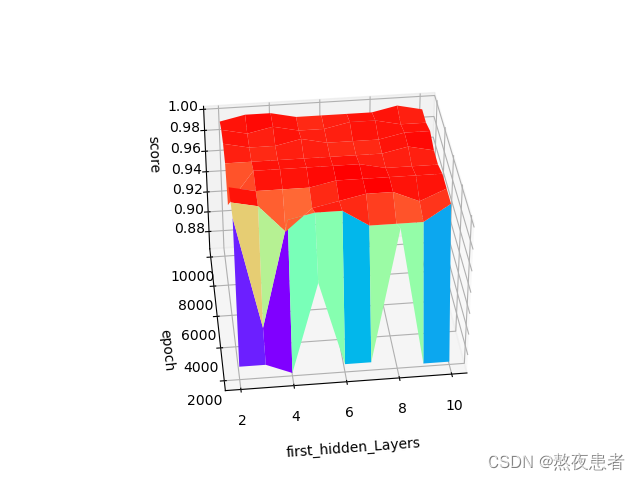
![]()
输出没调整好,凑合看,这里通过对这个输出我们发现当神经元数量为10,训练次数为10000次的时候此模型达到最优解
当hidden_size = 10, epoch = 10000的时候,我们去寻找当lr = ?最优,代码如下:
import matplotlib.pyplot as plt
import numpy as np
import torch.nn as nn
import torch.nn.functional as F
import torch
from nndl.tools import plot
from nndl.dataset import make_moons
from nndl.metric import accuracy
from nndl.runner import RunnerV2_2
n_samples = 1000
X, y = make_moons(n_samples=n_samples, shuffle=True, noise=0.15)num_train = 640
num_dev = 160
num_test = 200X_train, y_train = X[:num_train], y[:num_train]
X_dev, y_dev = X[num_train:num_train + num_dev], y[num_train:num_train + num_dev]
X_test, y_test = X[num_train + num_dev:], y[num_train + num_dev:]y_train = y_train.reshape([-1,1])
y_dev = y_dev.reshape([-1,1])
y_test = y_test.reshape([-1,1])class Model_MLP_L2_V2(nn.Module):def __init__(self, input_size, hidden_size, hidden_size2, output_size):super(Model_MLP_L2_V2, self).__init__()self.fc1 = nn.Linear(input_size, hidden_size)self.fc2 = nn.Linear(hidden_size, hidden_size2)self.fc3 = nn.Linear(hidden_size2, output_size)self.act_fn = nn.Sigmoid()# 初始化权重参数nn.init.normal_(self.fc1.weight, mean=0., std=1.)nn.init.constant_(self.fc1.bias, 0.0)nn.init.normal_(self.fc2.weight, mean=0., std=1.)nn.init.constant_(self.fc2.bias, 0.0)nn.init.normal_(self.fc3.weight, mean=0., std=1.)nn.init.constant_(self.fc3.bias, 0.0)def forward(self, inputs):z1 = self.fc1(inputs.to(torch.float32))a1 = self.act_fn(z1)z2 = self.fc2(a1)a2 = self.act_fn(z2)z3 = self.fc3(a2)a3 = self.act_fn(z3)return a3# 设置模型
max_lr = 0
maxn = 0
score_all = []lrs = [0.01, 0.05, 0.1, 0.5, 1, 5, 10, 50]
for lr in lrs:input_size = 2hidden_size = 10hidden_size2 = 2output_size = 1model = Model_MLP_L2_V2(input_size=input_size, hidden_size=hidden_size, hidden_size2=hidden_size2, output_size=output_size)# 设置损失函数loss_fn = F.binary_cross_entropy# 设置优化器learning_rate = lr #5e-2optimizer = torch.optim.SGD(model.parameters(),lr=learning_rate)# 设置评价指标metric = accuracy# 其他参数epoch = 10000saved_path = 'model/FNN_2/best_model.pdparams'# 实例化RunnerV2类,并传入训练配置runner = RunnerV2_2(model, optimizer, metric, loss_fn)runner.train([X_train, y_train], [X_dev, y_dev], num_epochs = epoch, log_epochs=50, save_path=saved_path)# plot(runner, 'model/FNN_3/fw-acc.pdf')#模型评价runner.load_model(saved_path)score, loss = runner.evaluate([X_test, y_test])# print("[Test] score/loss: {:.4f}/{:.4f}".format(score, loss))if maxn < score:max_lr = lrscore_all.append(score)
plt.plot(lrs, score_all)
print('最好的学习率为{}'.format(max_lr))
plt.show()
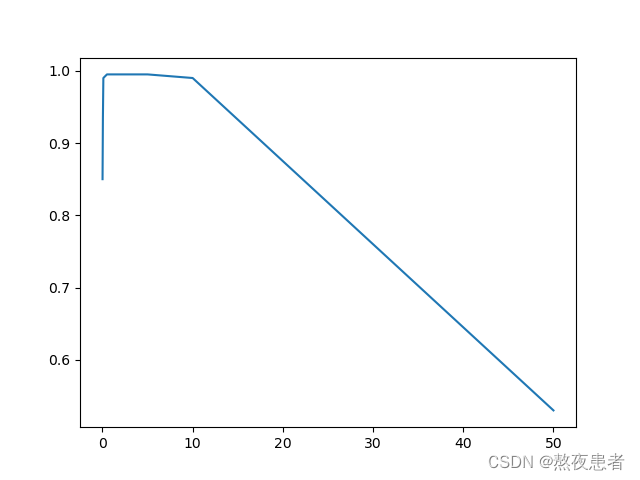
![]()
综上我们通过分布求最优找到了当第一个隐藏层神经元为10,训练次数为10000,学习率为0.5的时候,模型的得分最高!
PS:因为是分布求的最优,但不一定是全局最优,需要注意亿下!!!
2 优化问题
2.1 参数初始化
实现一个神经网络前,需要先初始化模型参数。如果对每一层的权重和偏置都用0初始化,那么通过第一遍前向计算,所有隐藏层神经元的激活值都相同;在反向传播时,所有权重的更新也都相同,这样会导致隐藏层神经元没有差异性,出现对称权重现象。
接下来,将模型参数全都初始化为0,看实验结果。这里重新定义了一个类,两个线性层的参数全都初始化为0,代码如下(手动实现的sublayers函数,当然有更快的处理方式,如果不想附加一个方法,则可以在函数本身修改,详细见2.2.2)
named_modules:
named_modules()方法是nn.Module类中的一个方法,用于返回一个生成器对象,该对象可以遍历模块及其子模块的所有层(layer)。通过调用named_modules()方法,可以查看模型中所有层的名称和参数。
import torch.nn as nn
import torch.nn.functional as F
import torch
from nndl.tools import plot
from nndl.dataset import make_moons
from nndl.metric import accuracy
from nndl.runner import RunnerV2_2n_samples = 1000
X, y = make_moons(n_samples=n_samples, shuffle=True, noise=0.15)num_train = 640
num_dev = 160
num_test = 200X_train, y_train = X[:num_train], y[:num_train]
X_dev, y_dev = X[num_train:num_train + num_dev], y[num_train:num_train + num_dev]
X_test, y_test = X[num_train + num_dev:], y[num_train + num_dev:]y_train = y_train.reshape([-1,1])
y_dev = y_dev.reshape([-1,1])
y_test = y_test.reshape([-1,1])class Model_MLP_L2_V4(nn.Module):def __init__(self, input_size, hidden_size, output_size):super(Model_MLP_L2_V4, self).__init__()self.fc1 = nn.Linear(input_size, hidden_size)self.fc2 = nn.Linear(hidden_size, output_size)self.act_fn = nn.Sigmoid()# 初始化权重参数nn.init.constant_(self.fc1.weight, 0.0)nn.init.constant_(self.fc1.bias, 0.0)nn.init.constant_(self.fc2.weight, 0.0)nn.init.constant_(self.fc2.bias, 0.0)def forward(self, inputs):z1 = self.fc1(inputs)a1 = self.act_fn(z1)z2 = self.fc2(a1)a2 = self.act_fn(z2)return a2def sublayers(self):# 返回所有子层的列表layers = []for name, module in self.named_modules():if isinstance(module, nn.Module) and name != "":layers.append(module)return layersdef print_weights(runner):print('The weights of the Layers:')for item in runner.model.sublayers():if item.name == 'Sigmoid':continueprint(item.name)for param in item.parameters():print(param.detach().numpy().T)
利用Runner类训练模型
input_size = 2
hidden_size = 5
output_size = 1
model = Model_MLP_L2_V4(input_size=input_size, hidden_size=hidden_size, output_size=output_size)# 设置损失函数
loss_fn = F.binary_cross_entropy# 设置优化器
learning_rate = 0.2 #5e-2
optimizer = torch.optim.SGD(model.parameters(),lr=learning_rate)# 设置评价指标
metric = accuracy# 其他参数
epoch = 5
saved_path = 'model/FNN_3/best_model.pdparams'# 实例化RunnerV2类,并传入训练配置
runner = RunnerV2_2(model, optimizer, metric, loss_fn)runner.train([X_train, y_train], [X_dev, y_dev], num_epochs = epoch, log_epochs=50, save_path=saved_path,custom_print_log=print_weights)
打印的权重结果如下:
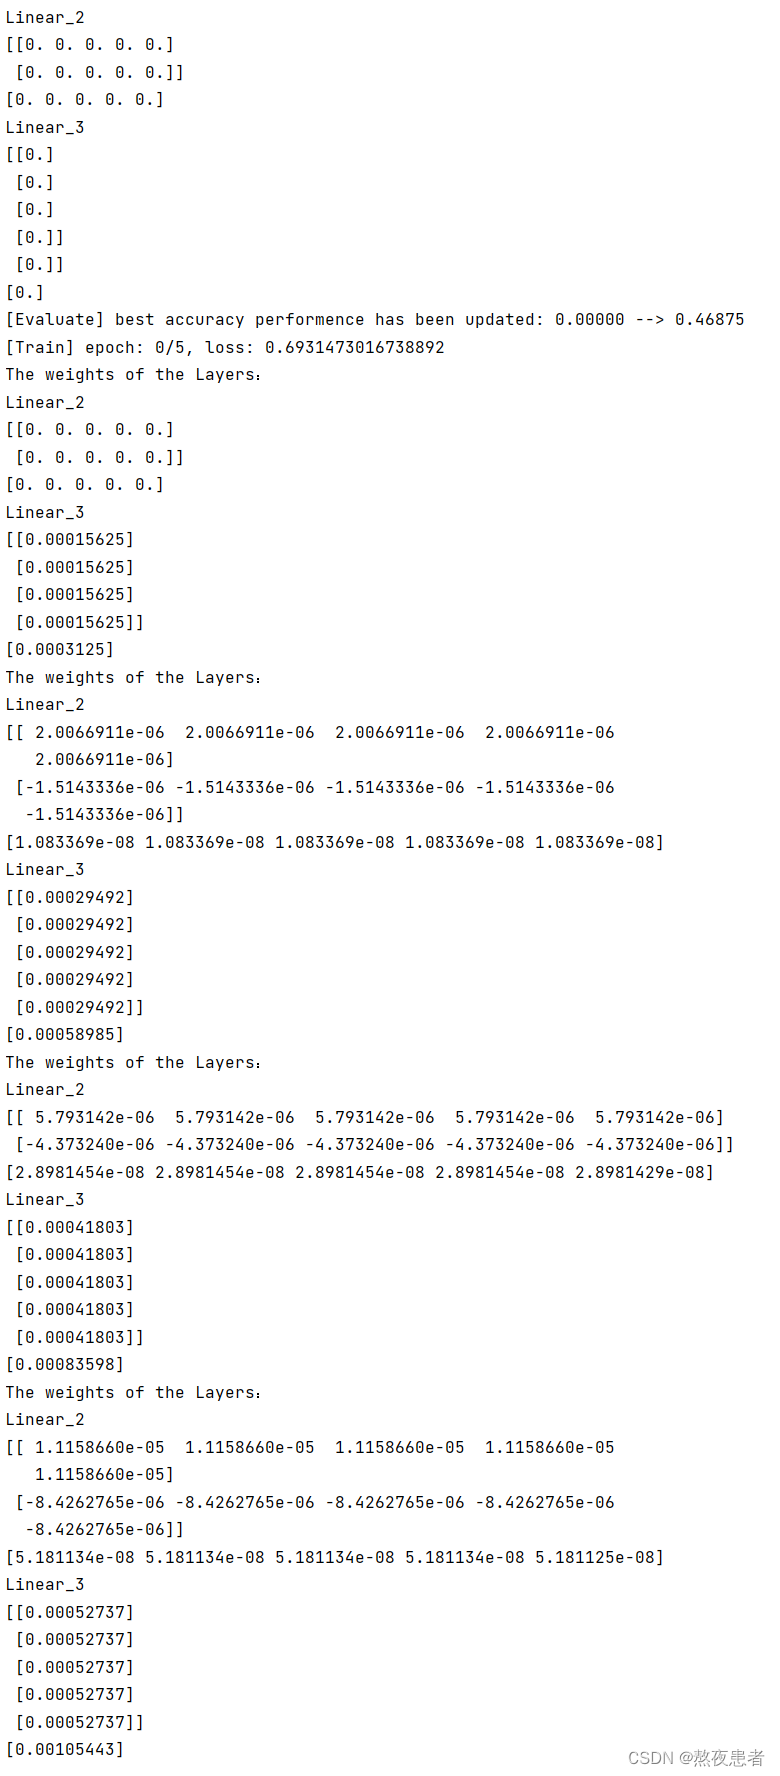
可视化训练和验证集上的主准确率和loss变化:
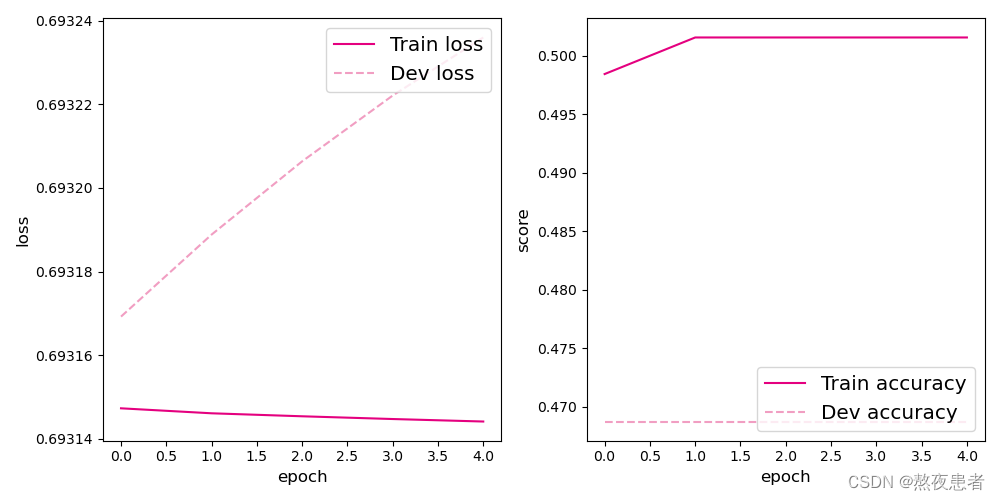
从输出结果看,二分类准确率为50%左右,说明模型没有学到任何内容。训练和验证loss几乎没有怎么下降。
为了避免对称权重现象,可以使用高斯分布或均匀分布初始化神经网络的参数。
高斯分布和均匀分布采样的实现和可视化代码如下:
import torch
import matplotlib.pyplot as plt# 使用'torch.normal'实现高斯分布采样,其中'mean'为高斯分布的均值,'std'为高斯分布的标准差,'shape'为输出形状
gausian_weights = torch.randn(10000)
# 使用'torch.uniform'实现在[min,max)范围内的均匀分布采样,其中'shape'为输出形状
uniform_weights = torch.FloatTensor(10000).uniform_(-1, 1)# 绘制两种参数分布
plt.figure()
plt.subplot(1,2,1)
plt.title('Gausian Distribution')
plt.hist(gausian_weights, bins=200, density=True, color='#f19ec2')
plt.subplot(1,2,2)
plt.title('Uniform Distribution')
plt.hist(uniform_weights, bins=200, density=True, color='#e4007f')
plt.savefig('fw-gausian-uniform.pdf')
plt.show()
2.2 梯度消失问题
在神经网络的构建过程中,随着网络层数的增加,理论上网络的拟合能力也应该是越来越好的。但是随着网络变深,参数学习更加困难,容易出现梯度消失问题。
由于Sigmoid型函数的饱和性,饱和区的导数更接近于0,误差经过每一层传递都会不断衰减。当网络层数很深时,梯度就会不停衰减,甚至消失,使得整个网络很难训练,这就是所谓的梯度消失问题。
在深度神经网络中,减轻梯度消失问题的方法有很多种,一种简单有效的方式就是使用导数比较大的激活函数,如:ReLU。
下面通过一个简单的实验观察前馈神经网络的梯度消失现象和改进方法。
2.2.1 模型构建
定义一个前馈神经网络,包含4个隐藏层和1个输出层,通过传入的参数指定激活函数。代码实现如下:
class Model_MLP_L5(nn.Module):def __init__(self, input_size, output_size, act='sigmoid'):super(Model_MLP_L5, self).__init__()self.fc1 = torch.nn.Linear(input_size, 3)self.fc2 = torch.nn.Linear(3, 3)self.fc3 = torch.nn.Linear(3, 3)self.fc4 = torch.nn.Linear(3, 3)self.fc5 = torch.nn.Linear(3, output_size)# 定义网络使用的激活函数if act == 'sigmoid':self.act = F.sigmoidelif act == 'relu':self.act = F.reluelif act == 'lrelu':self.act = F.leaky_reluelse:raise ValueError("Please enter sigmoid relu or lrelu!")# 初始化线性层权重和偏置参数self.init_weights()# 初始化线性层权重和偏置参数def init_weights(self):# 使用'named_sublayers'遍历所有网络层for name, moudle in self.named_children():# 如果是线性层,则使用指定方式进行参数初始化if isinstance(moudle, nn.Linear):nn.init.normal_(moudle.weight, 0.0, 0.01)nn.init.constant_(moudle.bias, 1.0)def forward(self, inputs):outputs = self.fc1(inputs)outputs = self.act(outputs)outputs = self.fc2(outputs)outputs = self.act(outputs)outputs = self.fc3(outputs)outputs = self.act(outputs)outputs = self.fc4(outputs)outputs = self.act(outputs)outputs = self.fc5(outputs)outputs = F.sigmoid(outputs)return outputs2.2.2 使用Sigmoid型函数进行训练
使用Sigmoid型函数作为激活函数,为了便于观察梯度消失现象,只进行一轮网络优化。代码实现如下:
pirnt_grads讲解
torch.norm(list(module.parameters())[0].grad, p=2.).item()
module.parameters()是返回模型的参数
list()将输入变为list类型
参数的[0]返回的是参数w
w.grad返回的是传播的参数
torch.norm( , p = 2.)返回的L2范数
.item()返回的是值
# 定义梯度打印函数
def print_grads(runner):# 打印每一层的权重的模print('The gradient of the Layers:')grad = []for name,module in runner.model.named_children():if name != 'act':print(name, torch.norm(list(module.parameters())[0].grad, p=2.).item())grad.append(torch.norm(list(module.parameters())[0].grad, p=2.).item())grad = grad[::-1]plt.plot(['fc1', 'fc2', 'fc3', 'fc4', 'fc5'], grad)
# 定义模型的基本信息
# 学习率大小
lr = 0.01# 定义网络,激活函数使用sigmoid
model = Model_MLP_L5(input_size=2, output_size=1, act='sigmoid')# 定义优化器
optimizer = torch.optim.SGD(model.parameters(),lr=lr)# 定义损失函数,使用交叉熵损失函数
loss_fn = F.binary_cross_entropy# 定义评价指标
metric = accuracy# 指定梯度打印函数
custom_print_log=print_grads实例化RunnerV2_2类,并传入训练配置。代码实现如下:
runner = RunnerV2_2(model, optimizer, metric, loss_fn) 模型训练,打印网络每层梯度值的范数。代码实现如下:
runner.train([X_train, y_train], [X_dev, y_dev],num_epochs=1, log_epochs=None,save_path="model/FNN_4/best_model_Sigmoid.pdparams",custom_print_log=custom_print_log)实验结果如下:

观察实验结果可以发现,梯度经过每一个神经层的传递都会不断衰减,最终传递到第一个神经层时,梯度几乎完全消失。
2.2.3 使用Relu型函数进行训练
lr = 0.01  # 学习率大小# 定义网络,激活函数使用relu
model =  Model_MLP_L5(input_size=2, output_size=1, act='relu')# 定义优化器
optimizer = torch.optim.SGD(model.parameters(),lr=lr)# 定义损失函数
# 定义损失函数,这里使用交叉熵损失函数
loss_fn = F.binary_cross_entropy# 定义评估指标
metric = accuracy# 实例化Runner
runner = RunnerV2_2(model, optimizer, metric, loss_fn)# 启动训练
runner.train([X_train, y_train], [X_dev, y_dev],num_epochs=1, log_epochs=None,save_path="model/FNN_4/best_model_Relu.pdparams",custom_print_log=custom_print_log)
可视化图像问题
简单的写了个可视化的图像,但是贼丑咳咳,搜了好久还是没搞明白怎么画出来《神经网络与深度学习》实验书中,邱老师的那种图,害,插个眼,等有时间回来一定看
xticks = [1, 0.1, 0.01, 0.001, 0.0001, 0.00001, 0.000001, 0.0000001, 1E-8, 1E-9, 1E-10, 1E-11]
plt.xticks(xticks)
plt.yscale('symlog')
plt.show() 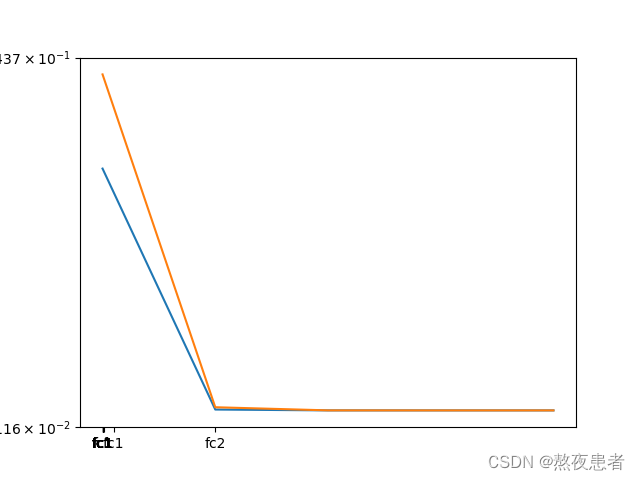
放一下邱老师的图
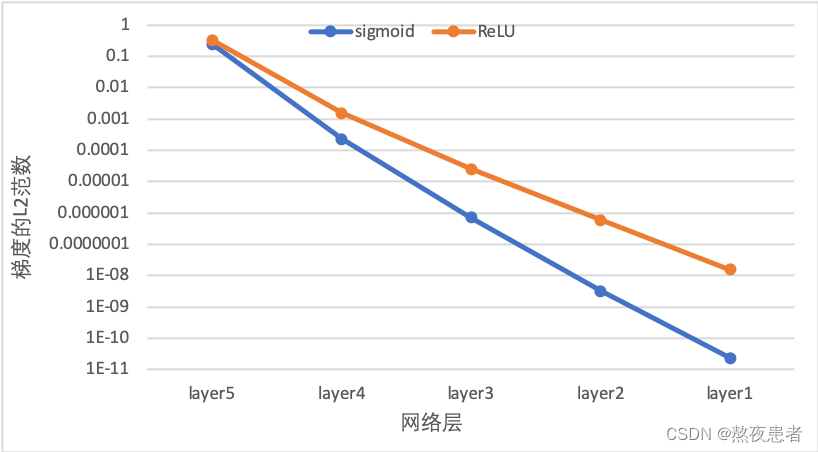
邱老师的图展示了使用不同激活函数时,网络每层梯度值的范数情况。从结果可以看到,5层的全连接前馈神经网络使用Sigmoid型函数作为激活函数时,梯度经过每一个神经层的传递都会不断衰减,最终传递到第一个神经层时,梯度几乎完全消失。改为ReLU激活函数后,梯度消失现象得到了缓解,每一层的参数都具有梯度值。
2.3 死亡 ReLU 问题
2.3.1 使用ReLU进行模型训练
多层全连接前馈网络进行实验,使用ReLU作为激活函数,观察死亡ReLU现象和优化方法。当神经层的偏置被初始化为一个相对于权重较大的负值时,可以想像,输入经过神经层的处理,最终的输出会为负值,从而导致死亡ReLU现象。
model = Model_MLP_L5(input_size=2, output_size=1, act='relu') 实例化RunnerV2类,启动模型训练,打印网络每层梯度值的范数。代码实现如下:
# 定义优化器
optimizer = torch.optim.SGD(model.parameters(),lr=lr)# 定义损失函数,使用交叉熵损失函数
loss_fn = F.binary_cross_entropy# 定义评价指标
metric = accuracy# 指定梯度打印函数
custom_print_log=print_gradsrunner = RunnerV2_2(model, optimizer, metric, loss_fn)runner.train([X_train, y_train], [X_dev, y_dev],num_epochs=1, log_epochs=None,save_path="model/FNN_5/best_model_Relu.pdparams",custom_print_log=custom_print_log)
结果如下:
从输出结果可以发现,使用 ReLU 作为激活函数,当满足条件时,会发生死亡ReLU问题,网络训练过程中 ReLU 神经元的梯度始终为0,参数无法更新。
针对死亡ReLU问题,一种简单有效的优化方式就是将激活函数更换为Leaky ReLU、ELU等ReLU 的变种。接下来,观察将激活函数更换为 Leaky ReLU时的梯度情况。
2.3.2 使用Leaky ReLU进行模型训练
将激活函数更换为Leaky ReLU进行模型训练,观察梯度情况。代码实现如下:
# 重新定义网络,使用Leaky ReLU激活函数
model =  Model_MLP_L5(input_size=2, output_size=1, act='lrelu')# 实例化Runner类
runner = RunnerV2_2(model, optimizer, metric, loss_fn)# 启动训练
runner.train([X_train, y_train], [X_dev, y_dev],num_epochs=1, log_epochps=None,save_path="model/FNN_5/best_model_lrelu.pdparams",custom_print_log=custom_print_log)
从输出结果可以看到,将激活函数更换为Leaky ReLU后,死亡ReLU问题得到了改善,梯度恢复正常,参数也可以正常更新。但是由于 Leaky ReLU 中, 时的斜率默认只有0.01,所以反向传播时,随着网络层数的加深,梯度值越来越小。如果想要改善这一现象,将 Leaky ReLU 中,
时的斜率调大即可。
总结
总体来说有上一个实验的基础,这个实验还是比较容易的,通过对torch.nn.Module搜索,对代码的书写有了更深的理解,1.6自定义隐藏层和神经元个数的实验,首先我通过遍历数据找到了在lr = 0.2条件下的最优隐藏层神经元个数和训练次数,然后通过最优的两个参数反推最优的学习率,属于分布找最优大的一个思维,我估计应该不是全局最优的,但是跑优隐藏层神经元个数和训练次数,跑一次就需要跑15~20分钟,所以还是没敢三个变量一起跑,电脑带不动啊模型的下载和使用也和以往不一样,留意一下函数的不同即可,总之,每次实验我感觉最大的收获还是代码的技术越来越娴熟,继续努力!
参考文献
torch.nn.Module所有方法总结及其使用举例_torch.nn.module cuda-CSDN博客
torch.nn — PyTorch master documentation
NNDL 实验五 前馈神经网络(2)自动梯度计算&优化问题_笼子里的薛定谔的博客-CSDN博客
如何确定神经网络的层数和隐藏层神经元数量 - 知乎 (zhihu.com)


)
--内核初始化)
)


真题解析#中国电子学会#全国青少年软件编程等级考试)


)
