目录
安装vitepress
目录结构
文档首页
Home Page
Hero 部分
Features 部分
导航栏配置
logo
导航链接
侧边栏
基本使用
多个侧边栏
使用组件
在 markdown 中导入组件
在 theme 中注册全局组件
部署到Github Pages
前提
第一步
第二步
第三步
同步gitee pages
一、在Gitee中新建仓库并将Github代码导入Gitee
二、强制更新
三、开启giteePages
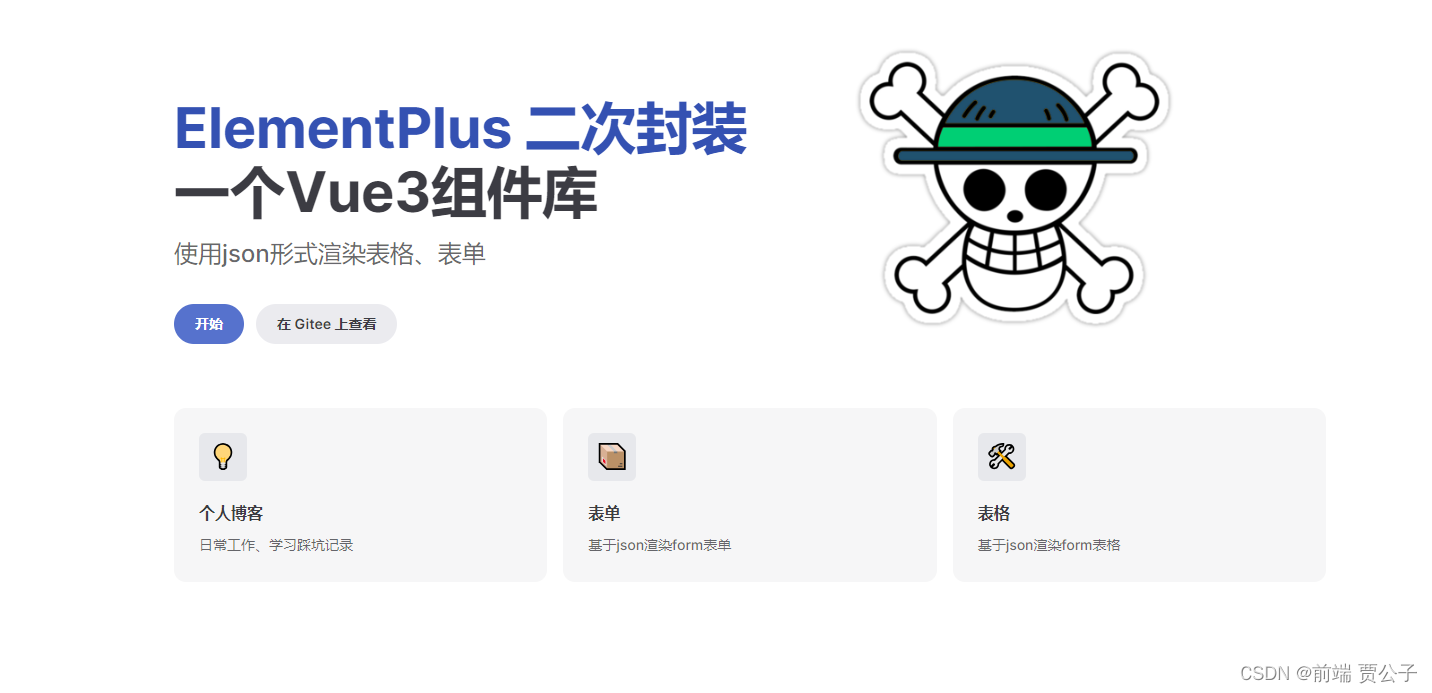
每个组件库都有它们自己的文档。所以当我们开发完成我们自己的组件库必须也需要一个组件库文档。,所以下面就以element-plus作为示例来搭建一个文档吧。
vitepress中文官网:VitePress | 由Vite、Vue驱动的静态网站生成器Vite & Vue powered static site generator.![]() https://process1024.github.io/vitepress/
https://process1024.github.io/vitepress/
安装vitepress
安装vitepress
pnpm add vitepress -D在 package.json添加一些script
"scripts": {"docs:dev": "vitepress dev docs","docs:build": "vitepress build docs","docs:serve": "vitepress serve docs"}目录结构
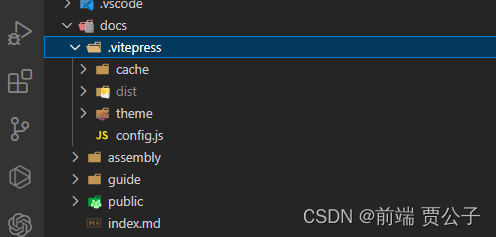
-
.vitepress/config.js为配置文件
-
public是公共文件目录
-
index.md则是组件库文档的首页
-
guide放我们组件指南文档
-
assembly放组件文档
Public 文件
有时你可能需要提供一些 Markdown 或主题组件中未直接引用的静态资源(例如,网站图标和 PWA 图标)。 项目根目录下的
public目录(如果你正在运行vitepress build docs,则为docs文件夹)将会保留,用以提供源代码中从未引用的静态资源(例如robots.txt)和需要保留完全相同的文件名(不生成哈希)的资源。放在
public中的资源将会直接复制到 dist 的根目录。注意,你应该使用根绝对路径引用放在
public中的文件 - 例如,public/icon.png在源代码中应始终引用为/icon.png。
文档首页
首先我们按照官网的样式给我们组件库整个首页,在index.md文件中写入
---
layout: homehero:name: ElementPlus 二次封装text: 一个Vue3组件库tagline: 使用json形式渲染表格、表单image:src: /logo.pngalt: 贾公子actions:- theme: brandtext: 开始link: /guide/form- theme: alttext: 在 Gitee 上查看link: https://gitee.com/childe-jiafeatures:- icon: 💡title: 个人博客details: 日常工作、学习踩坑记录link: https://blog.csdn.net/qq_63358859- icon: 📦title: 表单details: 基于json渲染form表单link: https://gitee.com/childe-jia/form-render- icon: 🛠️title: 表格details: 基于json渲染form表格link: https://gitee.com/childe-jia/table-vue3
---
Home Page
VitePress 默认主题提供主页布局,您也可以在 本站主页 上看到使用的主页布局。 您可以通过在任何页面 通过 frontmatter 中指定 layout: home 使用它。
但是,仅此选项不会有太大作用。 您可以通过设置额外的其他选项(例如hero 和 features)将几个不同的预模板“部分”添加到主页。
---
layout: home
---
Hero 部分
Hero 部分位于主页的顶部。 以下是配置 Hero 部分的方法。
interface Hero {// `text' 的字符串所示。带有品牌颜色,通常会很短,例如项目名称。name?: string// hero 部分的文本。这将被定义成`h1`标签text: string// Tagline 会展示在 `text` 下面.tagline?: string// action 按钮显示在 hero 区域。actions?: HeroAction[]
}interface HeroAction {// 按钮的的主题颜色,默认为 `brand`.theme?: 'brand' | 'alt'// 按钮的文案.text: string// 按钮链接.link: string
}
Features 部分
interface Feature {// 在 feature 框里展示icon,目前只支持emojiicon?: string// feature 标题.title: string// feature 详情.details: string
}
然后pnpm run docs:dev启动我们的项目,我们就可以看到这样的画面
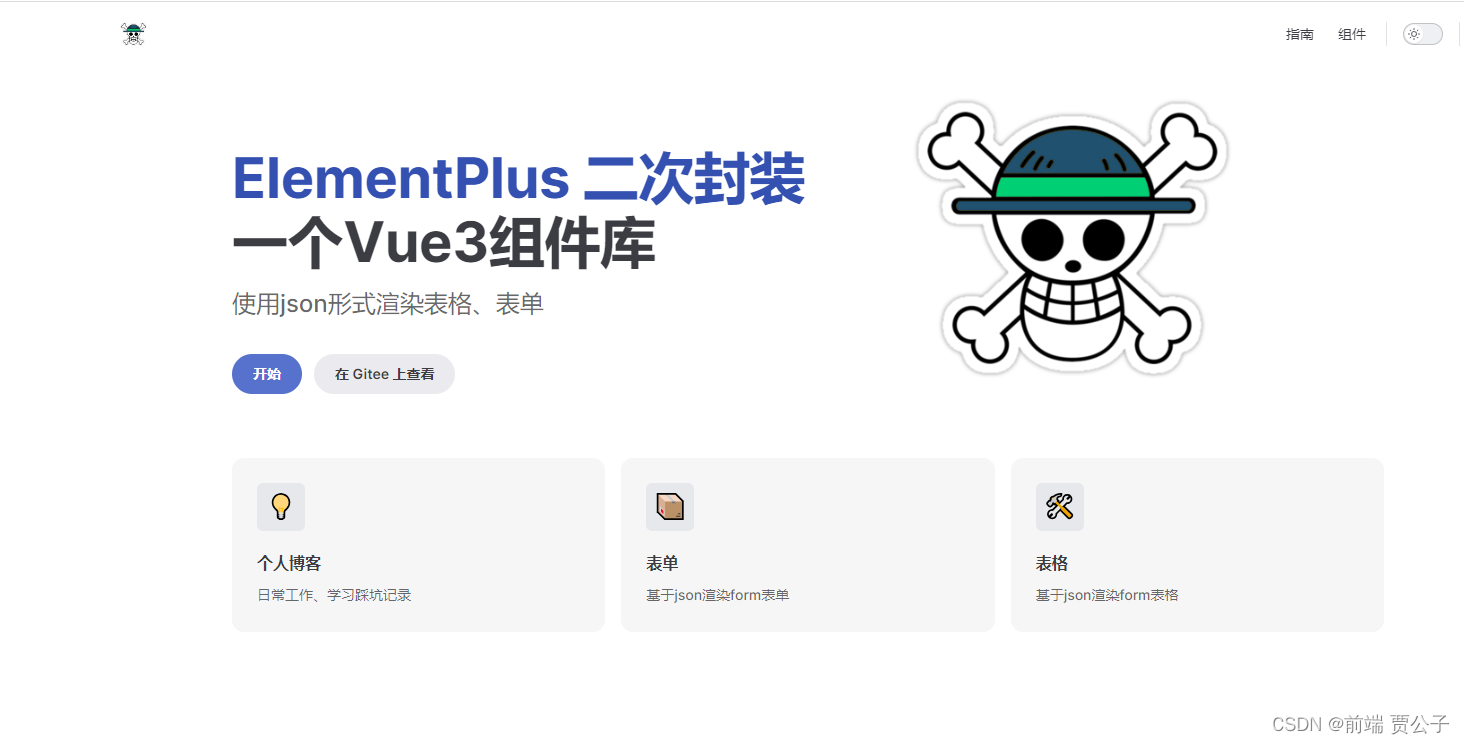
是不是感觉已经有点组件库文档的意思了。接下来对导航栏以及我们们文档的侧边栏进行一个配置
导航栏配置
我们在config.js中配置我们的logo、导航栏以及社交链接。此时我们的导航栏便配置完成
base为部署配置必须跟仓库名一样

export default {themeConfig: {base: "/jiayc4215/",siteTitle: false,logo: "/logo.png",nav: [{ text: "指南", link: "/guide/form" },{ text: "组件", link: "/assembly/form/basic" },],socialLinks: [{ icon: "github", link: "https://gitee.com/childe-jia" }],},
};
logo
可以通过配置logo来展示网站的logo,logo应该直接放在 public 中,并定义为绝对路径。
export default {themeConfig: {logo: '/my-logo.svg'}
}
添加logo后将会与网站标题一起显示。如果只想要展示logo而隐藏标题,请将 siteTitle 设置为 false。
export default {themeConfig: {logo: '/my-logo.svg',siteTitle: false}
}
导航链接
你可以通过定义 themeConfig.nav 选项来添加链接到导航。
export default {themeConfig: {nav: [{ text: 'Guide', link: '/guide' },{ text: 'Configs', link: '/configs' },{ text: 'Changelog', link: 'https://github.com/...' }]}
}
text 是 nav 中显示的实际文本,link 是单击文本时将导航到的链接。链接的路径设置为不带 .md 前缀的实际文件,并始终以 / 开头。
socialLinks
您可以定义此选项以在导航中展示带有图标的社交帐户链接。
export default {themeConfig: {socialLinks: [{ icon: 'github', link: 'https://github.com/vuejs/vitepress' },{ icon: 'twitter', link: '...' },// 你也可以自定义svg的icon:{icon: {svg: '<svg role="img" viewBox="0 0 24 24" xmlns="http://www.w3.org/2000/svg"><title>Dribbble</title><path d="M12...6.38z"/></svg>'},link: '...'}]}
}
侧边栏
首先我们对指南的侧边栏做一个配置
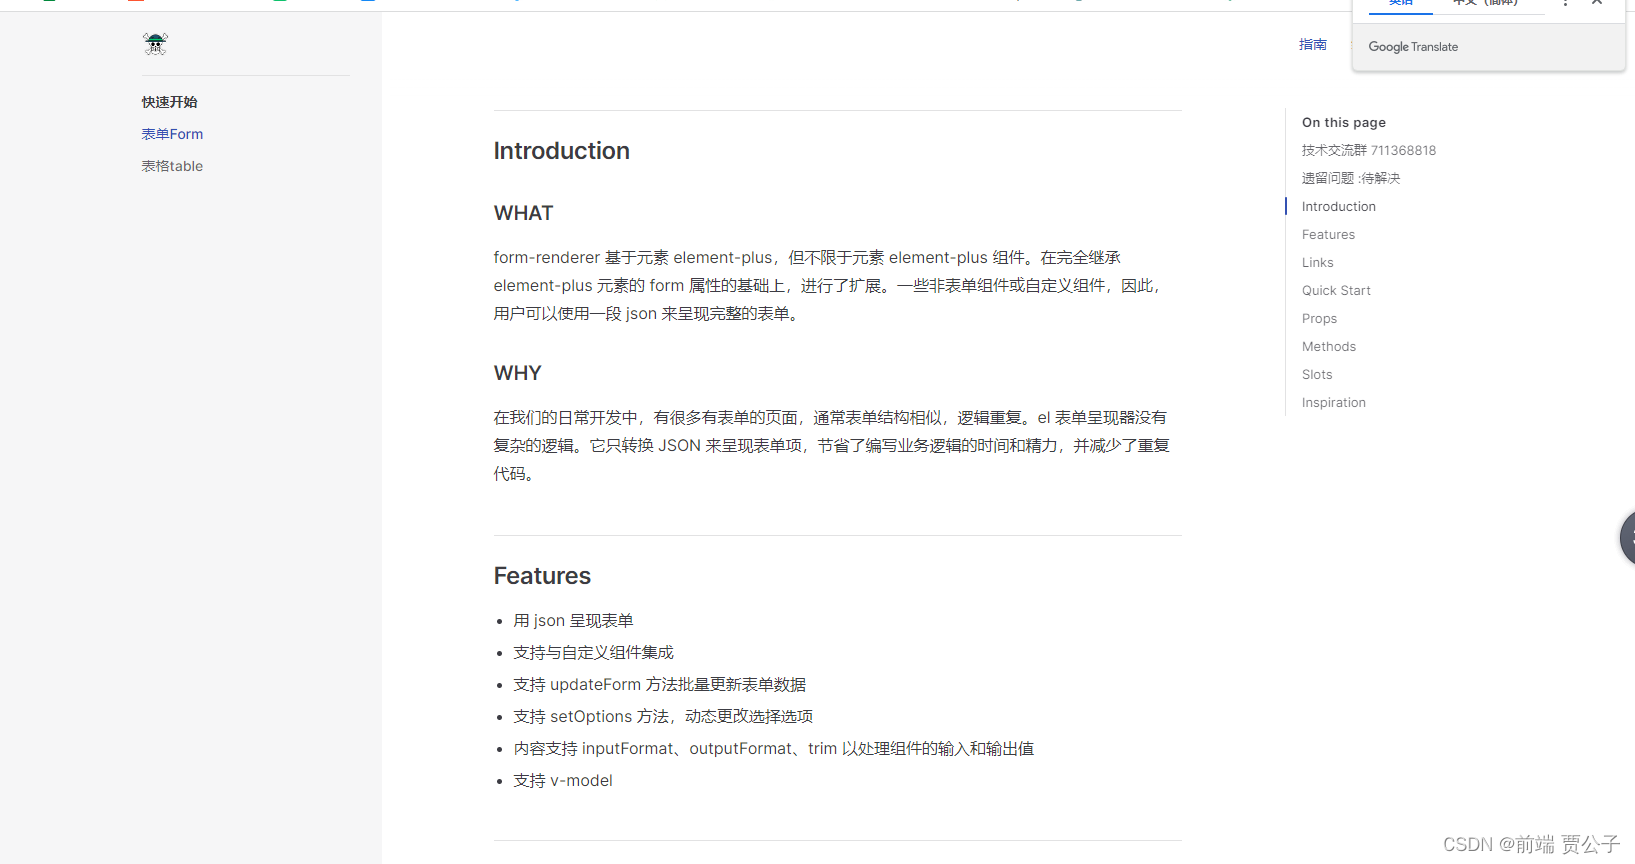
sidebar: {"/guide/": [{text: "快速开始",items: [{text: "表单Form",link: "/guide/form",},{text: "表格table",link: "/guide/table",},],},],"/assembly/": [{text: "表单Form",items: [{ text: "base", link: "/assembly/form/basic" },{ text: "checkbox-group", link: "/assembly/form/checkbox-group" },{ text: "content", link: "/assembly/form/content" },{ text: "date-picker", link: "/assembly/form/date-picker" },{ text: "deprecated", link: "/assembly/form/deprecated" },{ text: "disabled", link: "/assembly/form/disabled" },{ text: "el", link: "/assembly/form/el" },{text: "get-component-by-id",link: "/assembly/form/get-component-by-id",},{ text: "get-form-value", link: "/assembly/form/get-form-value" },{ text: "hidden", link: "/assembly/form/hidden" },{ text: "next-tick", link: "/assembly/form/next-tick" },{ text: "on", link: "/assembly/form/on" },{ text: "radio-group", link: "/assembly/form/radio-group" },{ text: "readonly", link: "/assembly/form/readonly" },{ text: "remote", link: "/assembly/form/remote" },{ text: "rules-plus", link: "/assembly/form/rules-plus" },{ text: "rules", link: "/assembly/form/rules" },{ text: "set-options", link: "/assembly/form/set-options" },{ text: "slot-label", link: "/assembly/form/slot-label" },{ text: "slot", link: "/assembly/form/slot" },{ text: "update-form", link: "/assembly/form/update-form" },{ text: "v-model", link: "/assembly/form/v-model" },{ text: "value-format", link: "/assembly/form/value-format" },],},{text: "表格table",items: [{ text: "表格", link: "/assembly/table/table" }],},{text: "进阶",items: [{ text: "form自定义组件", link: "/assembly/advanced/customForm" },{text: "form自定义组件设置自定义校验规则",link: "/assembly/advanced/customFormRoules",},],},],},例子
docs\guide\form.md文件
## 技术交流群 711368818<img src="/qq.jpg"  width="200" />## 遗留问题 :待解决select 为 multiple 多选时 必须初始化空数组(在 elementplus v-model 初始化 updateValue 时 为空数组会触发校验)## Introduction### WHATform-renderer 基于元素 element-plus,但不限于元素 element-plus 组件。在完全继承 element-plus 元素的 form 属性的基础上,进行了扩展。一些非表单组件或自定义组件,因此,用户可以使用一段 json 来呈现完整的表单。### WHY在我们的日常开发中,有很多有表单的页面,通常表单结构相似,逻辑重复。el 表单呈现器没有复杂的逻辑。它只转换 JSON 来呈现表单项,节省了编写业务逻辑的时间和精力,并减少了重复代码。## Features- 用 json 呈现表单
- 支持与自定义组件集成
- 支持 updateForm 方法批量更新表单数据
- 支持 setOptions 方法,动态更改选择选项
- 内容支持 inputFormat、outputFormat、trim 以处理组件的输入和输出值
- 支持 v-model## Links- [$attrs 和 $listeners (vue2&&vue3)](https://blog.csdn.net/qq_63358859/article/details/133699476?spm=1001.2014.3001.5501)
- [vue2 与 vue3 函数式组件](https://blog.csdn.net/qq_63358859/article/details/133635120?spm=1001.2014.3001.5501)
- [vue 2 与 vue3 获取模版引用 (ref)的区别](https://blog.csdn.net/qq_63358859/article/details/133532229?spm=1001.2014.3001.5501)
- [vue2 与 vue3 v-model 的区别](https://blog.csdn.net/qq_63358859/article/details/133484380?spm=1001.2014.3001.5501)
- [vue2 版本](https://blog.csdn.net/qq_63358859/article/details/130442636?ops_request_misc=%257B%2522request%255Fid%2522%253A%2522169684271816800180612618%2522%252C%2522scm%2522%253A%252220140713.130102334.pc%255Fblog.%2522%257D&request_id=169684271816800180612618&biz_id=0&utm_medium=distribute.pc_search_result.none-task-blog-2~blog~first_rank_ecpm_v1~rank_v31_ecpm-7-130442636-null-null.nonecase&utm_term=render&spm=1018.2226.3001.4450)
- [中文文档](https://gitee.com/childe-jia/form-render/wikis/%E6%96%87%E6%A1%A3/%E4%BB%8B%E7%BB%8D)
- [element-plus table 的封装](https://gitee.com/childe-jia/table-vue3)## Quick Start```ts
pnpm i el-form-renderer-vue3
``````ts
import elFormRenderer from "el-form-renderer-vue3";
app.use(elFormRenderer);
``````ts
<template><el-form-rendererlabel-width="100px":content="content"v-model:FormData="FormData"ref="form"><el-button @click="resetForm">reset</el-button><el-button @click="setValue">设置名字为小明</el-button><pre>{{ FormData }}</pre></el-form-renderer>
</template><script setup>
import { reactive, ref } from "vue";const form = ref();
let FormData = reactive({name: "",type: [],startDate: "2019-01-01",endDate: "2019-01-02",region: [],date: ["2019-01-01", "2019-01-02"],
});
const content = reactive([{type: "input",id: "name",label: "name",attrs: { "data-name": "form1" },el: {size: "default",placeholder: "test placeholder",},rules: [{ required: true, message: "miss name", trigger: "blur" },{ min: 3, max: 5, message: "length between 3 to 5", trigger: "blur" },],},{type: "select",id: "region",label: "region",options: [{label: "shanghai",value: "shanghai",},{label: "beijing",value: "beijing",},{label: "guangzhou",value: "guangzhou",},],el: { filterable: true, multiple: true, multipleLimit: 2 },rules: [{ required: true, message: "miss area", trigger: "change" }],},{type: "date-picker",id: "date",label: "date",el: {type: "daterange",valueFormat: "yyyy-MM-dd",},rules: [{ required: true, message: "miss date", trigger: "change" }],inputFormat: (row) => {if (row.startDate && row.endDate) {return [row.startDate, row.endDate];}},outputFormat: (val) => {if (!val) {return { startDate: "", endDate: "" };}return {startDate: val[0],endDate: val[1],};},},{type: "switch",id: "delivery",label: "delivery",},{type: "checkbox-group",id: "type",label: "type",default: [],options: [{label: "typeA",},{label: "typeB",},{label: "typeC",},],rules: [{ type: "array", required: true, message: "miss type", trigger: "change" }],},{type: "radio-group",id: "resource",label: "resource",options: [{label: "resourceA",value: "A",},{label: "resourceB",value: "B",},],rules: [{ required: true, message: "miss resource", trigger: "change" }],},{type: "input",id: "desc",label: "desc",el: {type: "textarea",},rules: [{ required: true, message: "miss desc", trigger: "blur" }],},
]);
const resetForm = () => {form.value.methods.resetFields();
};
const setValue = () => {FormData.name = "小明";
};
</script>```## Props```ts
export default {// ...props: {/*** support all el-form's props* @see: https://element.eleme.io/#/zh-CN/component/form#form-attributes*//*** 表单项的配置数组,每个表单项代表一个原子表单项* the form config's array, each item represents a form-item*/content: {type: Array, // type:Content[], check Content's definition belowrequired: true},/*** disable all form-items*/disabled: {type: Boolean,default: false}}
}/*** 表单项的typescript定义* 支持所有el-form-item's props。表单项组件本身的props定义在el上* definition of form-item written in typescript.* support all el-form-item's props. The component's props need to be set at prop el*/
interface Content {// 每一个原子都存在 id,用于存储该原子的值,不能重复// key of form-item value in form value. Must be uniqueid: string/*** 可以是element提供的所有表单组件类型,如传入'input',则渲染出'el-input'* 当type="group"时,可以创造复杂对象类型的表单数据,配合items使用。此时getFormValue()返回的是对象类型的数据,对象的每个属性对应items里的每一项* support all element's form component, e.g., type 'input' will render as 'el-input'.* you can create nested form value with type 'group' and use items to define that form value's shape. The type of this form value will be 'object'*/type: string/*** 当type="group"时使用* items内依然遵循同一层级的id不重复的原则* using with type 'group'* the `id` in each item of items must be unique*/items: Content[]/*** 默认值* FIXME: 别用关键字做 key*/default?: any/*** 当 type === 'input' 时展示文本值* 当 type === 'select' 时展示对应 label* 对于其他组件等同于 disabled = true*/readonly = false/*** @deprecated*/enableWhen?: object | string/*** 传入一个方法,并返回 boolean,返回 true 时则隐藏该表单项* formValue 为当前 form 的值,item 为当前表单项的定义* hide the form-item when return true* formValue is same as what getFormValue returns, and item is the config of this form-item*/hidden?: (formValue: Object, item: Content) => boolean/*** 具有选择功能的原子表单可用此定义可选项* use with type: select, radio-group, radio-button, checkbox-group, checkbox-button*/options?: {label: string; value?: any}[]/*** 配置remote.url,即可远程配置组件的某个prop!* remote接受以下属性:* url: 远程接口的地址* prop: 要注入的 prop 的名称,默认为 options* request: 可选,请求方法* dataPath: 可选,data在响应体中的路径* onResponse: 可选,处理请求回来的数据* onError: 可选,处理请求出错的情况* 另外,针对 select、radio-group、checkbox-group,远程数据能自动映射成 el-option 选项!以下属性仅在此情况使用* label: 可选,可直接配置远程数据中用作 label 的key* value: 可选,可直接配置远程数据中用作 value 的key* @see https://zhuanlan.zhihu.com/p/97827063** use remote to set one prop! remote accept following props:* url: remote api address* prop: prop name that data inject* request: optional, customize how to get your options* dataPath: optional, data's path in response* onResponse: optional, deal with your response* onError: optional, deal with request error* and, we treat select、radio-group、checkbox-group specially and the resp will be map as an el-option's group! following props only suitable for this case* label: optional, label key in resp* value: optional, value key in resp*/remote?: {url: stringrequest = () => this.$axios.get(url).then(resp => resp.data)prop = 'options'dataPath = ''onResponse = resp => {if (dataPath) resp = _get(resp, dataPath)switch (this.data.type) {case 'select':case 'checkbox-group':case 'radio-group':return resp.map(item => ({label: item[label],value: item[value]}))default:return resp}}onError = error => console.error(error.message)label = 'label'value = 'value'}attrs?: object // html attributes/*** 用于定义具体原子表单(如el-input)的属性,比如定义el-input的placeholder* use to define props of the actual component of this form-item, such as placeholder of el-input*/el?: object/*** 使用自定义组件* component适用于渲染局部注册组件和自定义组件,而type适用于带el-前缀的全局组件* custom component* use it when element's form components are not enough*/component?: Vue/*** 是否覆盖自定义组件内置的校验规则* `true` 为覆盖, 默认为 `false`* whether to override the validation rules written in custom components* `true` to override, default `false`*/overrideRules: booleanlabel?: string //set el-form-item's labeltrim = true // trim value at change event// 用于处理输入值,输入的值包括:1. default;2. v-model;3. updateForm。参数为整个表单的值对象或 updateForm 传入的对象// 如果 inputFormat 返回 undefined,则不会更新此表单项// obj is param you passed to updateForm. You can use this function to hijack this process and customize the form valueinputFormat?: (obj: any) => any// 用于处理输出值,参数为对应组件返回值// 如果处理后的值是对象类型,会覆盖(Object.assign)到整个表单的值上// used to hijack the getFormValue's process and customize the return valueoutputFormat?: (val: any) => any// set el-form-item's rulesrules?: object// @deprecatedatChange?: (id: string, value: any) => void/*** 监听表单项发出的事件* listen to any events emitted by component of form item* @param {any[]} args - what that event emits* @param {function} updateForm - same as methods.updateForm*/on?: {[eventName: string]: (args: any[], updateForm: function) => void}
}/*** a tour of typescript*/
interface obj {a: string // type stringb?: string // type string, optionalc = true // type boolean, optional, default trued: string[] // type array, each item must be stringe: any // could be any valid js typef: (a: number) => void // type function, which receives a param 'a' as number and return nothingh: Vue // instance of Vuei: {[a: string]: number} // type object, whose key is type string, and value is type number
}
```## Methodssupport all [el-form's methods](https://element.eleme.io/#/zh-CN/component/form#form-methods)## Slots| Slot     | Description                                 |
| -------- | ------------------------------------------- |
| default  | insert at bottom                            |
| id:hello | insert before form-item whose id is 'hello' |## Inspirationthanks to [el-form-renderer](https://github.com/femessage/el-form-renderer/)
基本使用
侧边栏菜单的最简单形式是传入一个链接数组。 第一级项目定义了侧边栏部分。 它应该包含text,即该部分的标题,以及 items ,即实际的导航链接。
export default {themeConfig: {sidebar: [{text: 'Section Title A',items: [{ text: 'Item A', link: '/item-a' },{ text: 'Item B', link: '/item-b' },...]},{text: 'Section Title B',items: [{ text: 'Item C', link: '/item-c' },{ text: 'Item D', link: '/item-d' },...]}]}
}
每个 link 都应该指定以 / 开头的实际文件的路径。 如果在链接末尾添加斜杠,它将显示相应目录的index.md。
export default {themeConfig: {sidebar: [{text: 'Guide',items: [// This shows `/guide/index.md` page.{ text: 'Introduction', link: '/guide/' }]}]}
}
多个侧边栏
您可能会根据页面路径显示不同的侧边栏。 例如,如本网站所示,您可能希望在文档中创建单独的内容部分,例如“指南”页面和“配置”页面。
为此,首先将你的页面放到所在的目录中:
.
├─ guide/
│  ├─ index.md
│  ├─ one.md
│  └─ two.md
└─ config/├─ index.md├─ three.md└─ four.md
然后,更新配置以定义每个部分的侧边栏,不同的是,这次配置的是一个对象而不是数组。
export default {themeConfig: {sidebar: {// 当用户在 `指南` 目录页面下将会展示这个侧边栏'/guide/': [{text: 'Guide',items: [// This shows `/guide/index.md` page.{ text: 'Index', link: '/guide/' }, // /guide/index.md{ text: 'One', link: '/guide/one' }, // /guide/one.md{ text: 'Two', link: '/guide/two' } // /guide/two.md]}],// 当用户在 `配置` 目录页面下将会展示这个侧边栏'/config/': [{text: 'Config',items: [// This shows `/config/index.md` page.{ text: 'Index', link: '/config/' }, // /config/index.md{ text: 'Three', link: '/config/three' }, // /config/three.md{ text: 'Four', link: '/config/four' } // /config/four.md]}]}}
}
使用组件
vitepress中markdown文件中是可以直接使用vue组件的,我们先在theme/index全局引入element-plus
// .vitepress/theme/index.jsimport DefaultTheme from "vitepress/theme";
import "element-plus/dist/index.css";
import elementplus from "element-plus";
import * as ElementPlusIconsVue from "@element-plus/icons-vue";
export default {...DefaultTheme,enhanceApp: async ({ app, router, siteData }) => {// app is the Vue 3 app instance from `createApp()`. router is VitePress'// custom router. `siteData`` is a `ref`` of current site-level metadata.for (const [key, component] of Object.entries(ElementPlusIconsVue)) {app.component(key, component);}app.use(elementplus);},
};
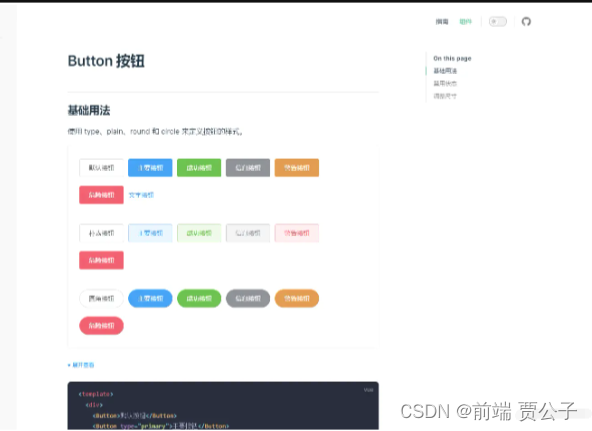
这里我们拿Button做一个演示,在button/index.md中我们可以直接这样使用Button组件
<el-button>默认按钮</el-button>
<br/><br/>
<el-button>默认按钮</el-button>
<br/><br/>
<el-button type="primary">主要按钮</el-button>
<br/><br/>
<el-button type="success">成功按钮</el-button>
<br/><br/>
<el-button type="info">信息按钮</el-button>
此时我们页面即可展示我们的Button按钮
在 markdown 中导入组件
如果你的组件仅在少数地方使用,推荐的使用方法是在使用它的文件中导入组件。
<script setup>
import CustomComponent from '../components/CustomComponent.vue'
</script># DocsThis is a .md using a custom component<CustomComponent />## More docs...
在 theme 中注册全局组件
如果要在文档中的多个页面中使用组件,则可以在主题中全局注册它们(或作为默认 VitePress 主题扩展的一部分)。查看 主题指南 了解更多信息。
在 .vitepress/theme/index.js 中,enhanceApp 函数接收 Vue app 实例,因此您可以在常规的 Vue 应用程序中 注册组件 。
import DefaultTheme from 'vitepress/theme'export default {...DefaultTheme,enhanceApp({ app }) {app.component('VueClickAwayExample', VueClickAwayExample)}
}
然后就可以在 markdown 文件里使用组件
# Vue Click Away<VueClickAwayExample />
部署到Github Pages
网上搜了很多教程,包括官网的教程,但是还是费了一番功夫,
如果你使用自动化部署脚本部署不成功的话,可以参考我的这个笨方法
这是部署后的效果
前提
我假设你本地运行OK, 已经准备好要部署了
第一步
你的 vuepress 项目是否已经在github上的仓库下
如果是,请跳到第二步
如果不是,想在GitHub新建一个仓库,如图所示:
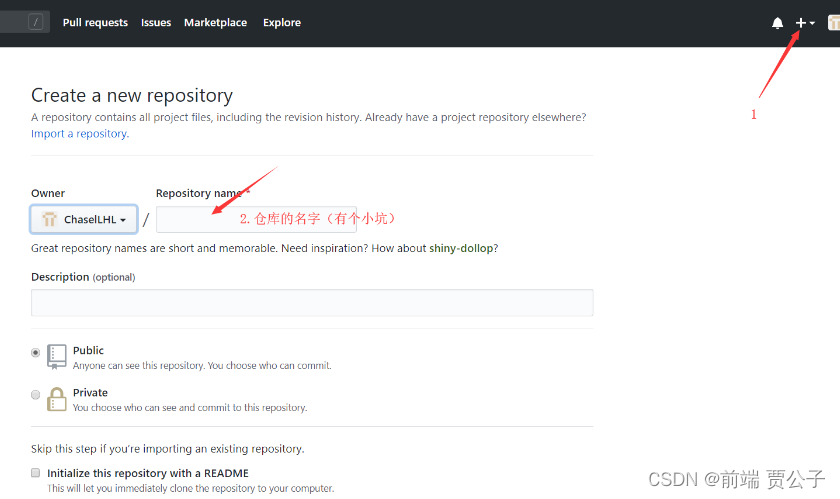
## 小坑
仓库名字要和config.js 里 的 base 属性值一样比如你的仓库名字叫jiayc4215
base就是/jiayc4215/
第二步
执行 "docs:build": "vitepress build docs",
把打包好的文件拿出来创建一个新的文件夹初始化仓库
git init
git add .
git commit -m "first commit"
git branch -M main
git remote add origin https://github.com/jiayc4215/form-render.github.io.git
git push -u origin main
第三步
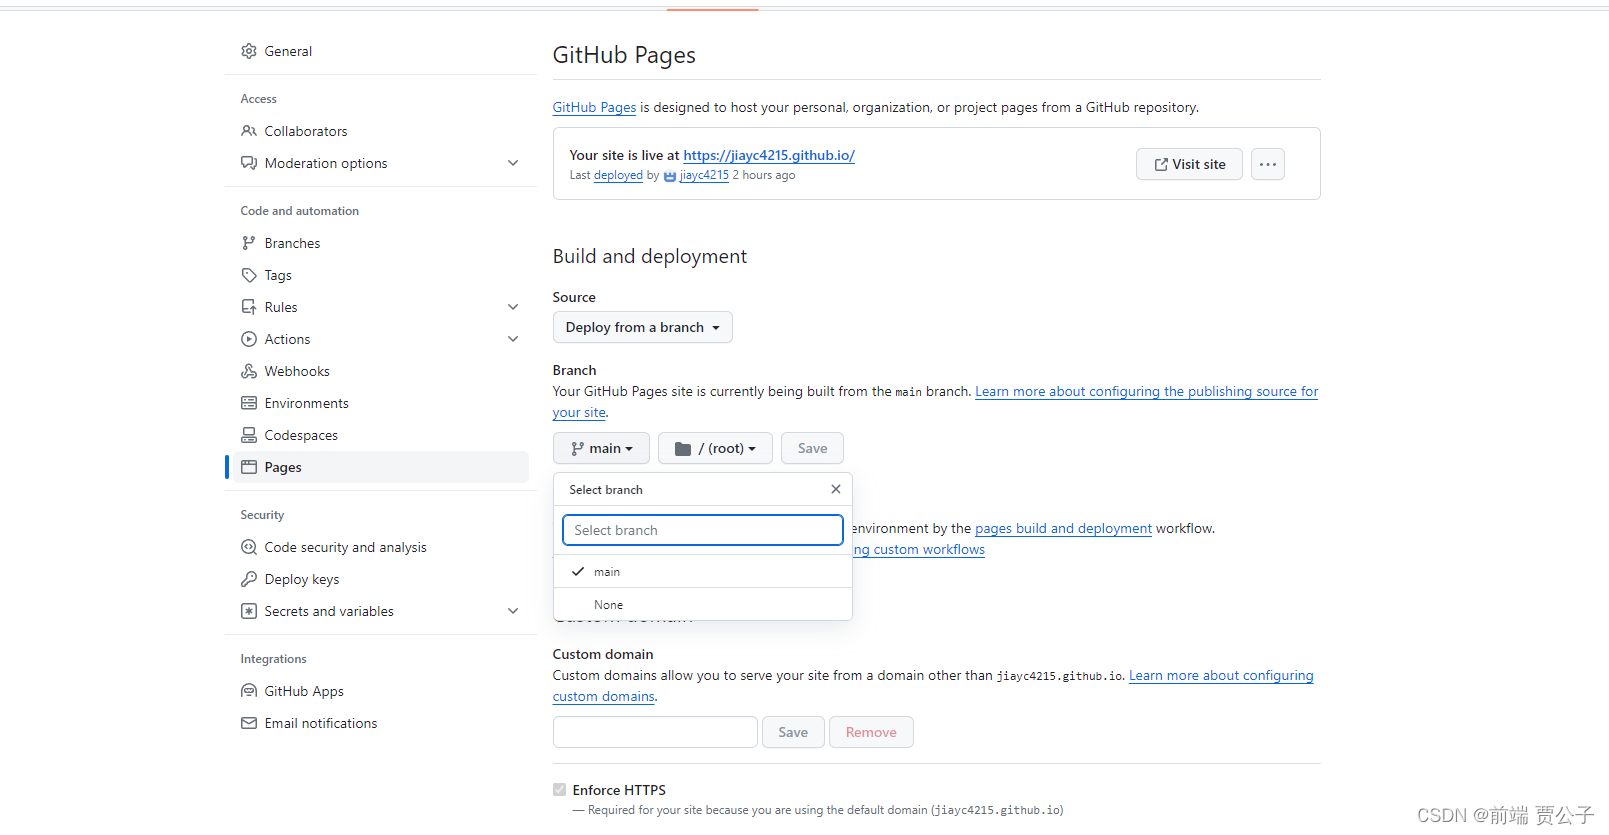
点击 Settings--》pages---》切换分支为main /root--》点击save
成功之后上边会有链接查看网页
同步gitee pages
一、在Gitee中新建仓库并将Github代码导入Gitee
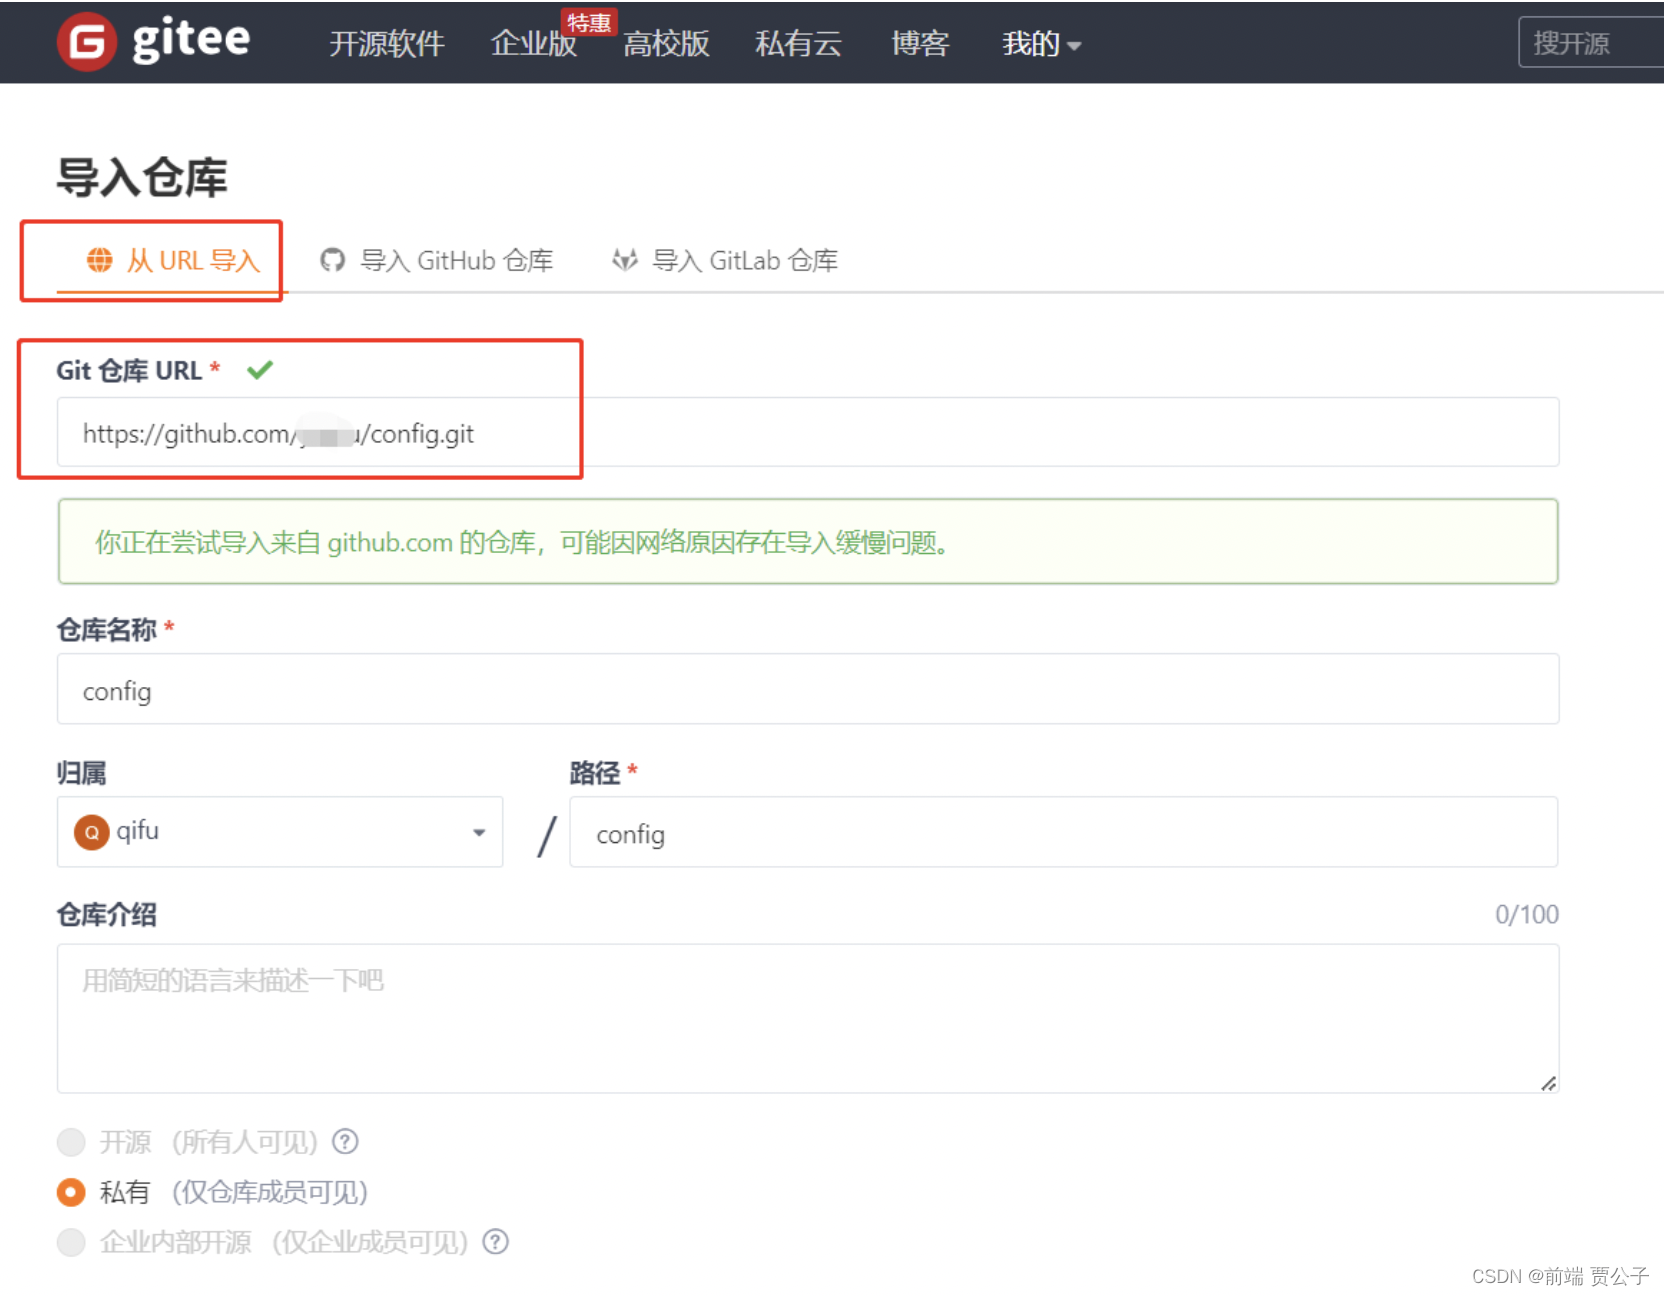
在Gitee上登录后在右上角点击“+”图标,选择新建仓库,在新建仓库中选择“点击导入”跳转到导入仓库界面。
注意创建的仓库名要和gitee用户名一致

 在导入仓库界面可选择“从Git URL” 和 “导入Github仓库”。单个项目选择从Git URL就可以了,输入地址后会自动填写相关信息,然后点击导入即可。
二、强制更新
如果项目在Github上更新了,那么我们可以在Gitee上打开仓库,点击更新图标进行同步更新。
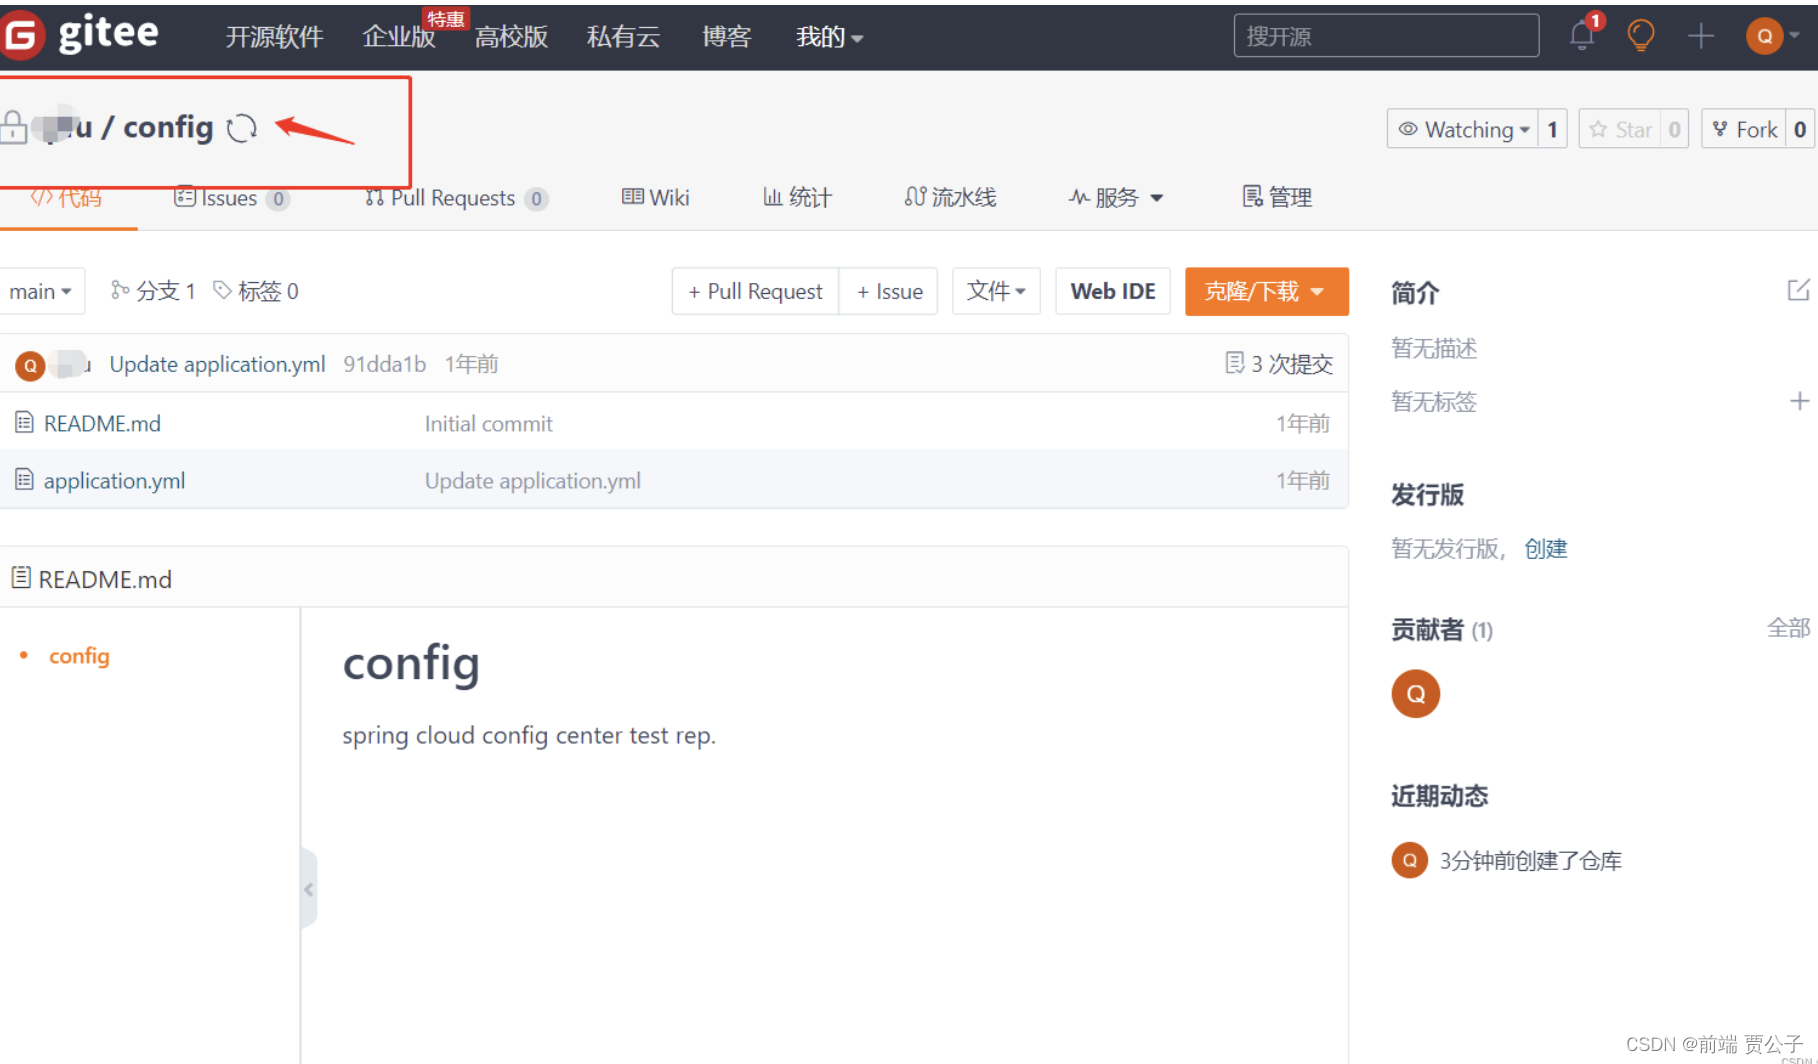
三、开启giteePages
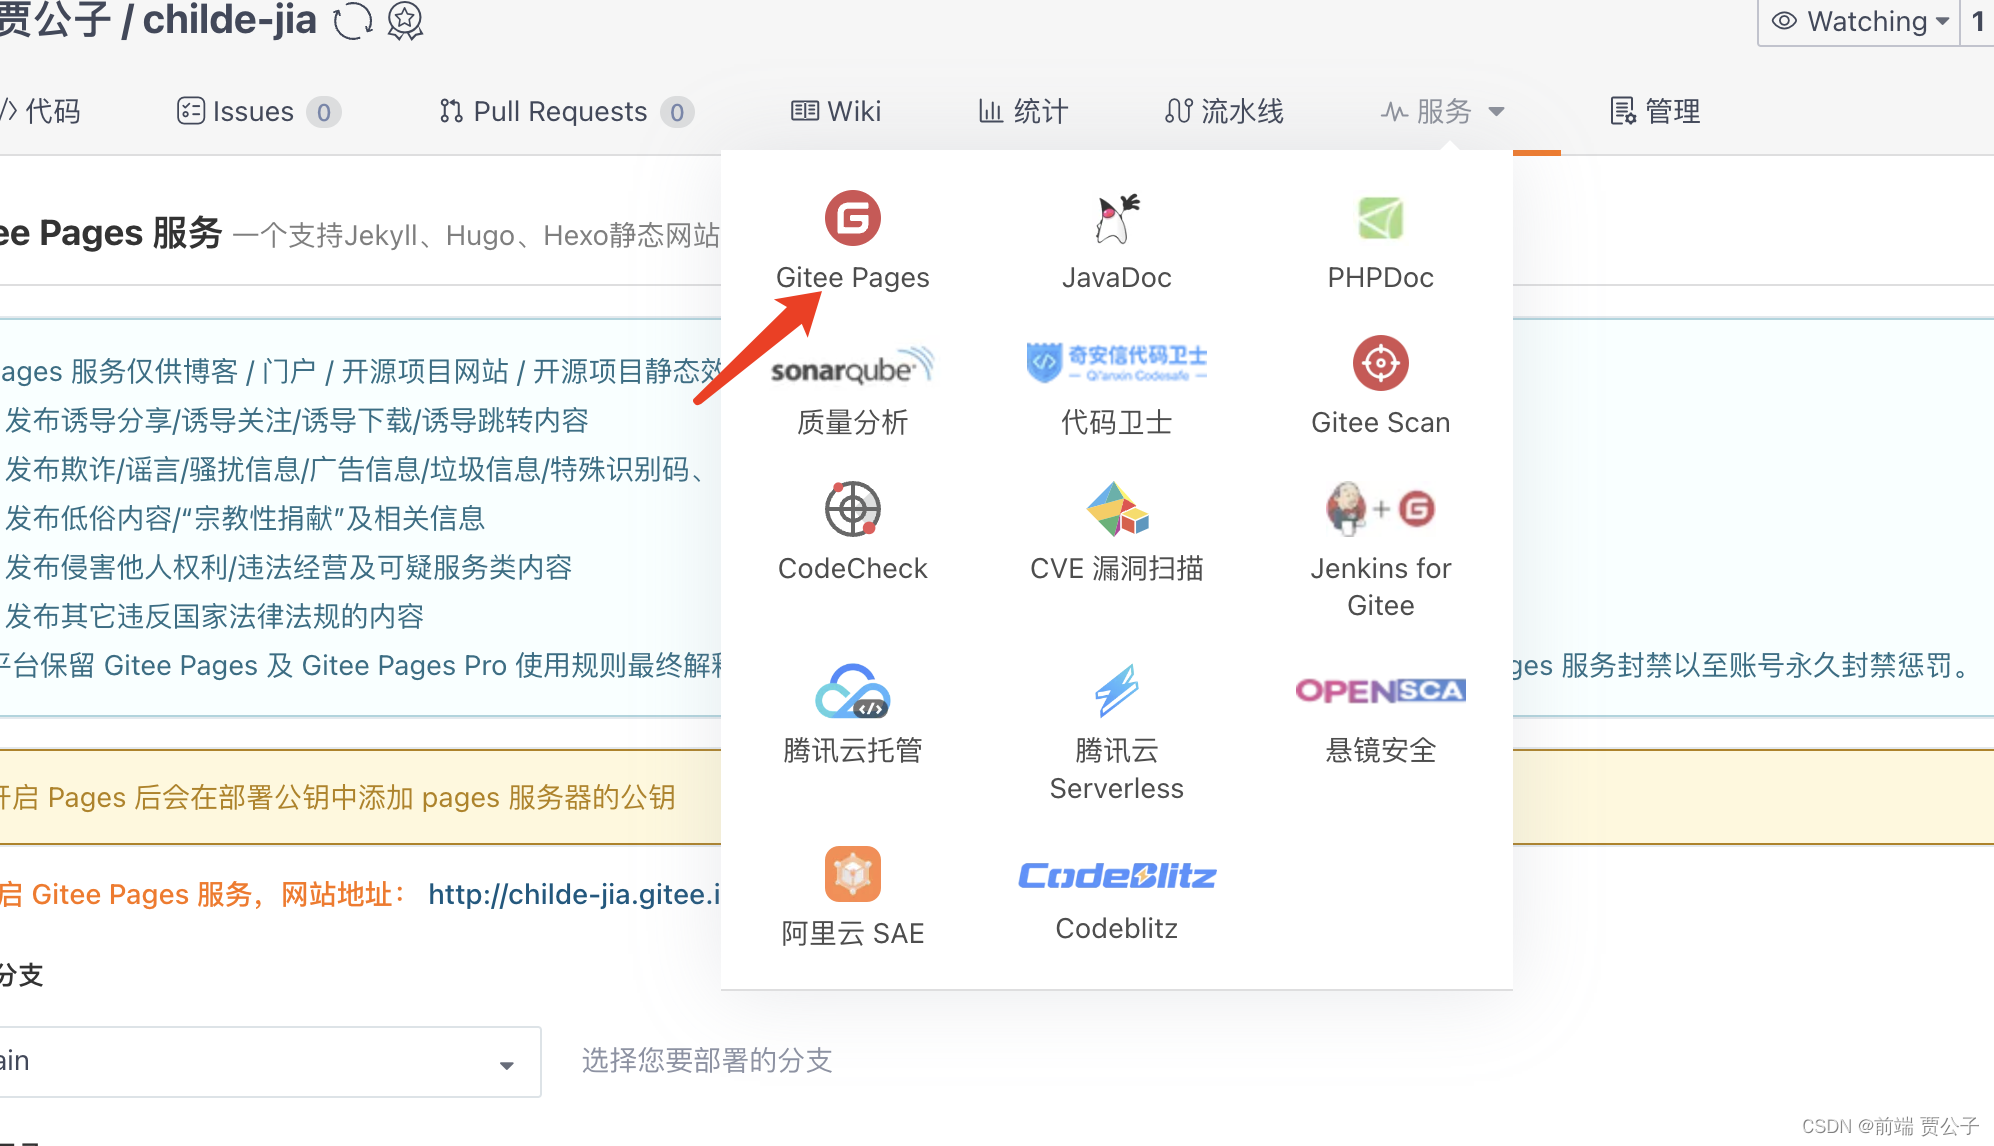
点击服务--》gitee pages
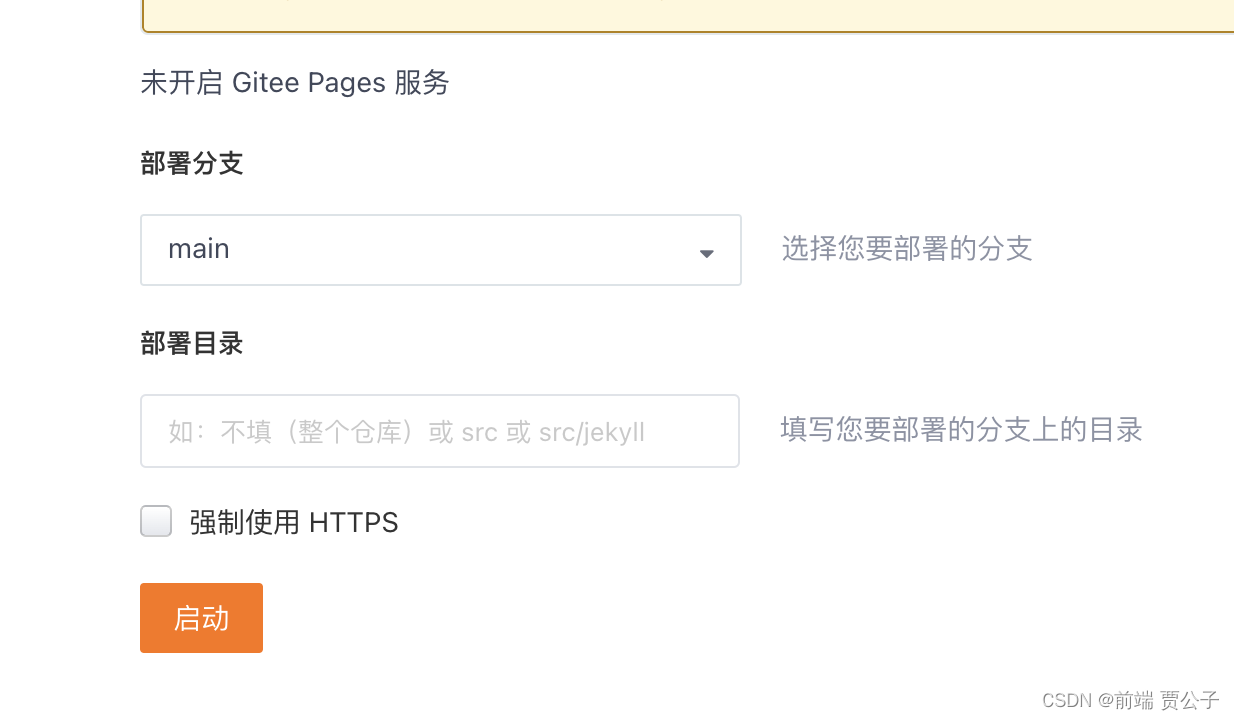
启动

![[ poi-表格导出 ] java.lang.NoClassDefFoundError: org/apache/poi/POIXMLTypeLoader](http://pic.xiahunao.cn/[ poi-表格导出 ] java.lang.NoClassDefFoundError: org/apache/poi/POIXMLTypeLoader)


docker:为mysql和java jar运行环境创建同一网络,容器互联)
)
)
![[MT8766][Android12] USB共享网络固定子网掩码跟网关并且默认开启USB共享网络](http://pic.xiahunao.cn/[MT8766][Android12] USB共享网络固定子网掩码跟网关并且默认开启USB共享网络)


