目录
一、MyBatis Generator 的使用
1.1、生成类和映射文件
1.1.1、在 pom.xml 中引入依赖
1.1.2、根据 configurationFile 标签中配置的路径 创建 generatorConfig.xml 文件
1.1.3、自动生成类 和 映射文件
1.1.4、在 Insert 标签中添加获取主键值的选项
1.1.5、扫描配置:添加 @Mapper 注解 / 添加扫描注解
1.1.6、配置 mybatis
1.1.7、测试
一、MyBatis Generator 的使用
1.1、生成类和映射文件
1.1.1、在 pom.xml 中引入依赖
在 properties 标签中加入版本号.
<mybatis-generator-plugin-version>1.4.1</mybatis-generator-plugin-version>在 build => plugins 标签中加入如下配置
<!-- mybatis ⽣成器插件 --><plugin><groupId>org.mybatis.generator</groupId><artifactId>mybatis-generator-maven-plugin</artifactId><version>${mybatis-generator-plugin-version}</version><executions><execution><id>Generate MyBatis Artifacts</id><phase>deploy</phase><goals><goal>generate</goal></goals></execution></executions><!-- 相关配置 --><configuration><!-- 打开⽇志 --><verbose>true</verbose><!-- 允许覆盖 --><overwrite>true</overwrite><!-- 配置⽂件路径 --><configurationFile>src/main/resources/mybatis/generatorConfig.xml</configurationFile></configuration></plugin>
上述配置中需要注意的是 “配置文件路径”,这个路径就是用来生成 实体类和映射文件 配置规则的位置.
1.1.2、根据 configurationFile 标签中配置的路径 创建 generatorConfig.xml 文件
这个文件就是用来描述生成规则的.
根据路径(src/main/resources/mybatis),在 mybatis 目录下创建 generatorConfig.xml 文件.
Ps:下述配置文件中需要修改的有 数据库连接、实体类和映射文件的路径、数据库表名
<?xml version="1.0" encoding="UTF-8"?>
<!DOCTYPE generatorConfigurationPUBLIC "-//mybatis.org//DTD MyBatis Generator Configuration 1.0//EN""http://mybatis.org/dtd/mybatis-generator-config_1_0.dtd"><generatorConfiguration><!-- 驱动包路径,location中路径替换成⾃⼰本地路径 --><classPathEntry location="D:\class\source\mysql-connector-java-5.1.49.jar"/><context id="DB2Tables" targetRuntime="MyBatis3"><!-- 禁⽤⾃动⽣成的注释 --><commentGenerator><property name="suppressAllComments" value="true"/><property name="suppressDate" value="true"/></commentGenerator><!-- 连接配置 --><jdbcConnection driverClass="com.mysql.jdbc.Driver"connectionURL="jdbc:mysql://127.0.0.1:3306/javanav_db?
characterEncoding=utf8&useSSL=false"userId="root"password="1111"></jdbcConnection><javaTypeResolver><!-- ⼩数统⼀转为BigDecimal --><property name="forceBigDecimals" value="false"/></javaTypeResolver><!-- 实体类⽣成位置 --><javaModelGenerator targetPackage="com.example.cyk.model"targetProject="src/main/java"><property name="enableSubPackages" value="true"/><property name="trimStrings" value="true"/></javaModelGenerator><!-- mapper.xml⽣成位置 --><sqlMapGenerator targetPackage="mapper"targetProject="src/main/resources"><property name="enableSubPackages" value="true"/></sqlMapGenerator><!-- mapper 接口⽣成位置 --><javaClientGenerator type="XMLMAPPER"targetPackage="com.example.cyk.mapper" targetProject="src/main/java"><property name="enableSubPackages" value="true"/></javaClientGenerator><!-- 配置⽣成表与实例, 只需要修改表名tableName, 与对应类名domainObjectName 即可--><table tableName="j_article" domainObjectName="Article"enableSelectByExample="false"enableDeleteByExample="false" enableDeleteByPrimaryKey="false"enableCountByExample="false"enableUpdateByExample="false"><!-- 类的属性⽤数据库中的真实字段名做为属性名, 不指定这个属性会⾃动转换 _ 为驼峰命名规则--><property name="useActualColumnNames" value="true"/></table><table tableName="j_article_reply" domainObjectName="ArticleReply"enableSelectByExample="false"enableDeleteByExample="false" enableDeleteByPrimaryKey="false"enableCountByExample="false"enableUpdateByExample="false"><property name="useActualColumnNames" value="true"/></table><table tableName="j_board" domainObjectName="Board"enableSelectByExample="false" enableDeleteByExample="false"enableDeleteByPrimaryKey="false" enableCountByExample="false"enableUpdateByExample="false"><property name="useActualColumnNames" value="true"/></table><table tableName="j_message" domainObjectName="Message"enableSelectByExample="false"enableDeleteByExample="false" enableDeleteByPrimaryKey="false"enableCountByExample="false"enableUpdateByExample="false"><property name="useActualColumnNames" value="true"/></table><table tableName="j_user" domainObjectName="User"enableSelectByExample="false" enableDeleteByExample="false"enableDeleteByPrimaryKey="false" enableCountByExample="false"enableUpdateByExample="false"><property name="useActualColumnNames" value="true"/></table></context>
</generatorConfiguration>
注意:
驱动包路径是自己本地仓库的路径

但一定注意!! 需要在非中文的目录下,因此你可以把这个驱动包拷贝出来,放到一个非中文的目录中即可.

1.1.3、自动生成类 和 映射文件
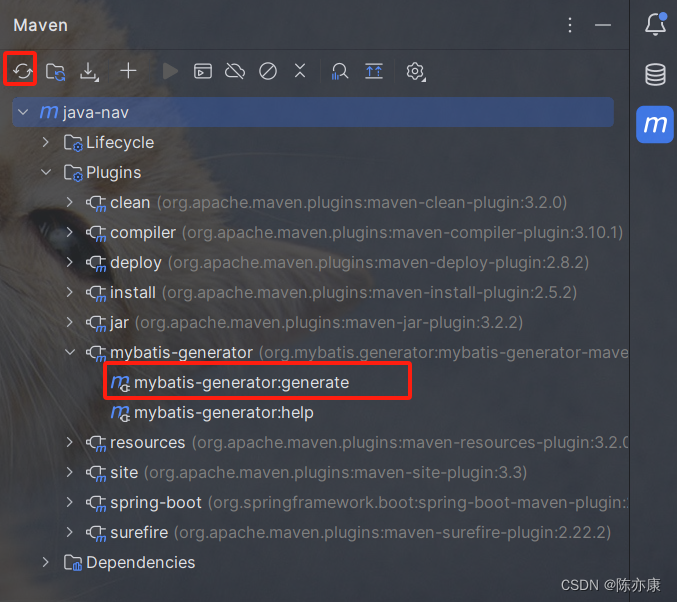
重新加载Maven项⽬,在Plugins节点下出现mybatis-generator,双击运⾏,在对应的目录下⽣成相应的类与映射⽂件:

接着你就可以看到对应的生成了

1.1.4、在 Insert 标签中添加获取主键值的选项
在生成的 xml 文件中,给每一个 insert 标签都添加以下属性:useGeneratedKeys="true" keyProperty="id"
<!-- useGeneratedKeys = true -->
<!-- keyProperty = 主键字段--> <!-- 当插⼊⼀条数据后,可以通过user.getId()获取到⾃动⽣成的Id值,如果⽅法中需要⽴即获取Id值,加⼊这个配置 -->
<insert id="insert" parameterType="com.example.cyk.model.User"
useGeneratedKeys="true" keyProperty="id" >
Ps:这个选项也可以自动生成,但是不理想(有些问题)
1.1.5、扫描配置:添加 @Mapper 注解 / 添加扫描注解
有两种方式配置扫描 Mapper 接口.
1)给每个 mapper 包下的 mapper 接口都添加 @Mapper 注解.

2)给启动类上 或者 新建一个配置类(有 @Configuration 注解)加上 @MapperScan("com.example.cyk.mapper") 注解.
1.1.6、配置 mybatis
在 yml 文件中配置
mybatis:mapper-locations: classpath:mapper/**/*Mapper.xml
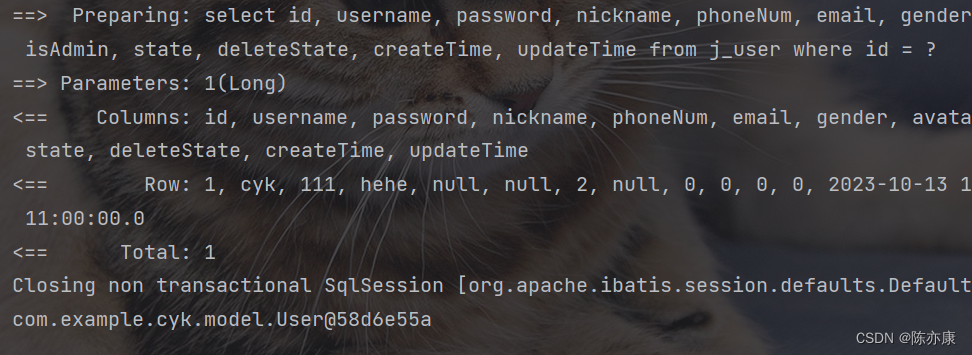
1.1.7、测试
@SpringBootTest
public class TestMapper {@Autowiredprivate UserMapper userMapper;@Testpublic void select() {User user = userMapper.selectByPrimaryKey(1L);System.out.println(user);}}


制作降级包时,到底发生了什么?)
:阿里巴巴开源的线上问题诊断工具)
![[C++]类型转换](http://pic.xiahunao.cn/[C++]类型转换)


)


)

