购物车
流程梳理和本地加入购物车实现
购物车业务逻辑梳理拆解

- 整个购物车的实现分为两个大分支,
本地购物车操作和接口购物车操作 - 由于购物车数据的特殊性,
采取Pinia管理购物车列表数据并添加持久化缓存
本地购物车 - 加入购物车实现
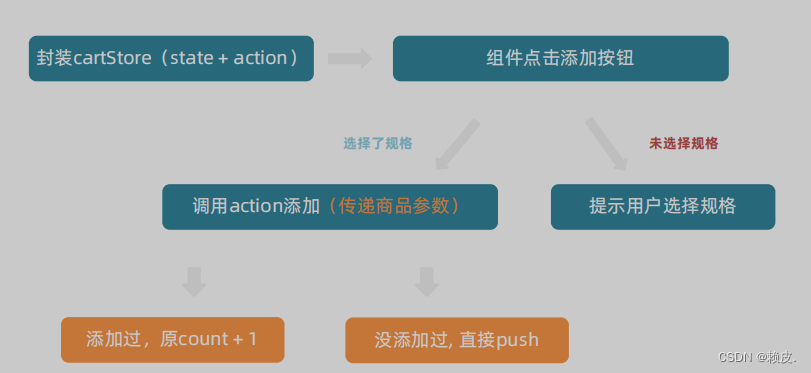
- 添加购物车
基础思想:如果已经添加过相同的商品,就在其数量count上加一,如果没有添加过,就直接push到购物车列表中
// 封装购物车模块import { defineStore } from 'pinia'
import { ref } from 'vue'export const useCartStore = defineStore('cart', () => {// 1. 定义state - cartListconst cartList = ref([])// 2. 定义action - addCartconst addCart = (goods) => {console.log('添加', goods)// 添加购物车操作// 已添加过 - count + 1// 没有添加过 - 直接push// 思路:通过匹配传递过来的商品对象中的skuId能不能在cartList中找到,找到了就是添加过const item = cartList.value.find((item) => goods.skuId === item.skuId)if (item) {// 找到了item.count++} else {// 没找到cartList.value.push(goods)}}return {cartList,addCart}
}, {persist: true,
})
本地购物车 - 头部购物车列表渲染
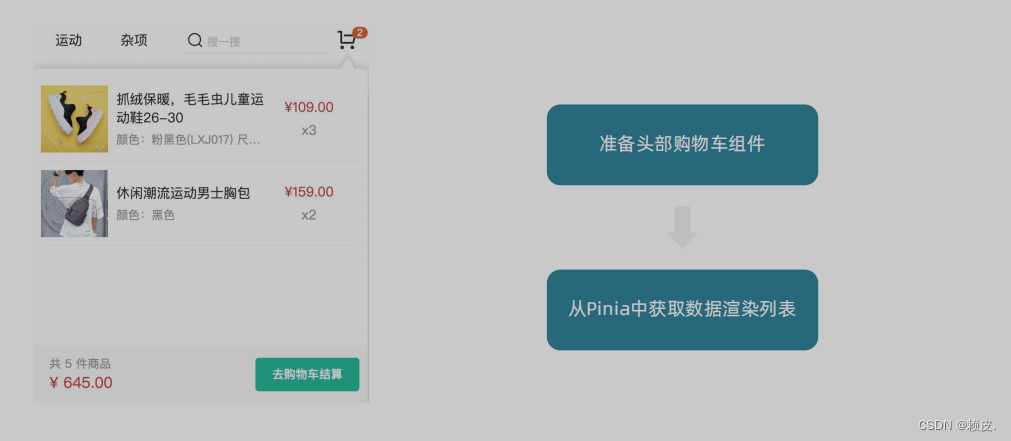
2. 头部购物车
2.1. 头部购物车组件模版
<script setup></script><template><div class="cart"><a class="curr" href="javascript:;"><i class="iconfont icon-cart"></i><em>2</em></a><div class="layer"><div class="list"><!--<div class="item" v-for="i in cartList" :key="i"><RouterLink to=""><img :src="i.picture" alt="" /><div class="center"><p class="name ellipsis-2">{{ i.name }}</p><p class="attr ellipsis">{{ i.attrsText }}</p></div><div class="right"><p class="price">¥{{ i.price }}</p><p class="count">x{{ i.count }}</p></div></RouterLink><i class="iconfont icon-close-new" @click="store.delCart(i.skuId)"></i></div>--></div><div class="foot"><div class="total"><p>共 10 件商品</p><p>¥ 100.00 </p></div><el-button size="large" type="primary" >去购物车结算</el-button></div></div>
</div>
</template><style scoped lang="scss">
.cart {width: 50px;position: relative;z-index: 600;.curr {height: 32px;line-height: 32px;text-align: center;position: relative;display: block;.icon-cart {font-size: 22px;}em {font-style: normal;position: absolute;right: 0;top: 0;padding: 1px 6px;line-height: 1;background: $helpColor;color: #fff;font-size: 12px;border-radius: 10px;font-family: Arial;}}&:hover {.layer {opacity: 1;transform: none;}}.layer {opacity: 0;transition: all 0.4s 0.2s;transform: translateY(-200px) scale(1, 0);width: 400px;height: 400px;position: absolute;top: 50px;right: 0;box-shadow: 0 0 10px rgba(0, 0, 0, 0.2);background: #fff;border-radius: 4px;padding-top: 10px;&::before {content: "";position: absolute;right: 14px;top: -10px;width: 20px;height: 20px;background: #fff;transform: scale(0.6, 1) rotate(45deg);box-shadow: -3px -3px 5px rgba(0, 0, 0, 0.1);}.foot {position: absolute;left: 0;bottom: 0;height: 70px;width: 100%;padding: 10px;display: flex;justify-content: space-between;background: #f8f8f8;align-items: center;.total {padding-left: 10px;color: #999;p {&:last-child {font-size: 18px;color: $priceColor;}}}}}.list {height: 310px;overflow: auto;padding: 0 10px;&::-webkit-scrollbar {width: 10px;height: 10px;}&::-webkit-scrollbar-track {background: #f8f8f8;border-radius: 2px;}&::-webkit-scrollbar-thumb {background: #eee;border-radius: 10px;}&::-webkit-scrollbar-thumb:hover {background: #ccc;}.item {border-bottom: 1px solid #f5f5f5;padding: 10px 0;position: relative;i {position: absolute;bottom: 38px;right: 0;opacity: 0;color: #666;transition: all 0.5s;}&:hover {i {opacity: 1;cursor: pointer;}}a {display: flex;align-items: center;img {height: 80px;width: 80px;}.center {padding: 0 10px;width: 200px;.name {font-size: 16px;}.attr {color: #999;padding-top: 5px;}}.right {width: 100px;padding-right: 20px;text-align: center;.price {font-size: 16px;color: $priceColor;}.count {color: #999;margin-top: 5px;font-size: 16px;}}}}}
}
</style>
2.2 渲染头部购物车数据
<script setup>
import { useCartStore } from '@/stores/cartStore'
const cartStore = useCartStore()</script><template><div class="cart"><a class="curr" href="javascript:;"><i class="iconfont icon-cart"></i><em>{{ cartStore.cartList.length }}</em></a><div class="layer"><div class="list"><div class="item" v-for="i in cartStore.cartList" :key="i"><RouterLink to=""><img :src="i.picture" alt="" /><div class="center"><p class="name ellipsis-2">{{ i.name }}</p><p class="attr ellipsis">{{ i.attrsText }}</p></div><div class="right"><p class="price">¥{{ i.price }}</p><p class="count">x{{ i.count }}</p></div></RouterLink><i class="iconfont icon-close-new" @click="cartStore.delCart(i.skuId)"></i></div></div><div class="foot"><div class="total"><p>共 {{ cartStore.allCount }} 件商品</p><p>¥ {{ cartStore.allPrice.toFixed(2) }} </p></div><el-button size="large" type="primary" @click="$router.push('/cartlist')">去购物车结算</el-button></div></div>
</div>
</template>
本地购物车 - 头部购物车删除实现
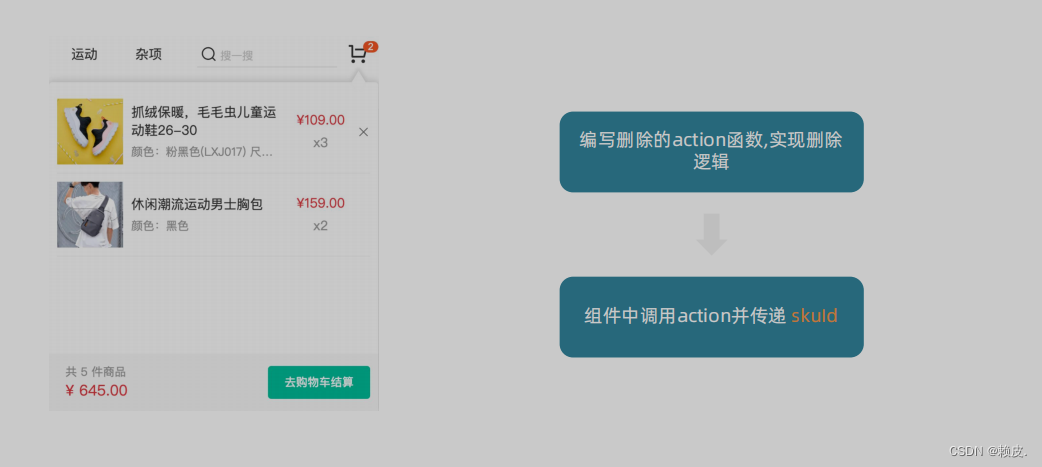
2.3 删除功能实现
1- 添加删除action函数
// 删除购物车const delCart = async (skuId) => {// 思路:// 1. 找到要删除项的下标值 - splice// 2. 使用数组的过滤方法 - filterconst idx = cartList.value.findIndex((item) => skuId === item.skuId)cartList.value.splice(idx, 1)}
2- 组件触发action函数并传递参数
<i class="iconfont icon-close-new" @click="cartStore.delCart(i.skuId)"></i>
本地购物车 - 头部购物车统计计算
用什么来实现: 计算属性
计算逻辑是什么?
- 商品总数计算逻辑: 商品列表中的所有
商品count累加之和 - 商品总价钱计算逻辑:商品列表中的所有商品的
count * price 累加之和
列表购物车基础数据渲染
本地购物车 - 列表购物车
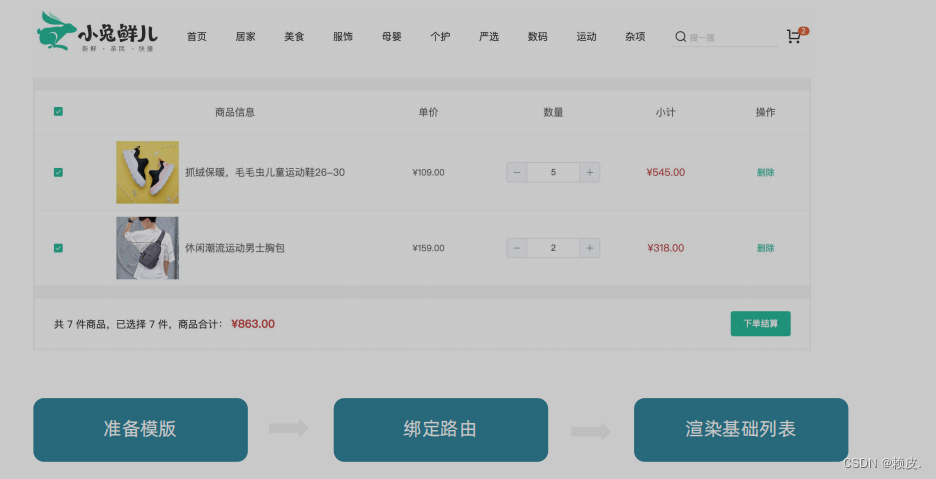
- 准备模板
<script setup>
const cartList = []
</script><template><div class="xtx-cart-page"><div class="container m-top-20"><div class="cart"><table><thead><tr><th width="120"><el-checkbox/></th><th width="400">商品信息</th><th width="220">单价</th><th width="180">数量</th><th width="180">小计</th><th width="140">操作</th></tr></thead><!-- 商品列表 --><tbody><tr v-for="i in cartList" :key="i.id"><td><el-checkbox /></td><td><div class="goods"><RouterLink to="/"><img :src="i.picture" alt="" /></RouterLink><div><p class="name ellipsis">{{ i.name }}</p></div></div></td><td class="tc"><p>¥{{ i.price }}</p></td><td class="tc"><el-input-number v-model="i.count" /></td><td class="tc"><p class="f16 red">¥{{ (i.price * i.count).toFixed(2) }}</p></td><td class="tc"><p><el-popconfirm title="确认删除吗?" confirm-button-text="确认" cancel-button-text="取消" @confirm="delCart(i)"><template #reference><a href="javascript:;">删除</a></template></el-popconfirm></p></td></tr><tr v-if="cartList.length === 0"><td colspan="6"><div class="cart-none"><el-empty description="购物车列表为空"><el-button type="primary">随便逛逛</el-button></el-empty></div></td></tr></tbody></table></div><!-- 操作栏 --><div class="action"><div class="batch">共 10 件商品,已选择 2 件,商品合计:<span class="red">¥ 200.00 </span></div><div class="total"><el-button size="large" type="primary" >下单结算</el-button></div></div></div></div>
</template><style scoped lang="scss">
.xtx-cart-page {margin-top: 20px;.cart {background: #fff;color: #666;table {border-spacing: 0;border-collapse: collapse;line-height: 24px;th,td {padding: 10px;border-bottom: 1px solid #f5f5f5;&:first-child {text-align: left;padding-left: 30px;color: #999;}}th {font-size: 16px;font-weight: normal;line-height: 50px;}}}.cart-none {text-align: center;padding: 120px 0;background: #fff;p {color: #999;padding: 20px 0;}}.tc {text-align: center;a {color: $xtxColor;}.xtx-numbox {margin: 0 auto;width: 120px;}}.red {color: $priceColor;}.green {color: $xtxColor;}.f16 {font-size: 16px;}.goods {display: flex;align-items: center;img {width: 100px;height: 100px;}>div {width: 280px;font-size: 16px;padding-left: 10px;.attr {font-size: 14px;color: #999;}}}.action {display: flex;background: #fff;margin-top: 20px;height: 80px;align-items: center;font-size: 16px;justify-content: space-between;padding: 0 30px;.xtx-checkbox {color: #999;}.batch {a {margin-left: 20px;}}.red {font-size: 18px;margin-right: 20px;font-weight: bold;}}.tit {color: #666;font-size: 16px;font-weight: normal;line-height: 50px;}}
</style>
- 绑定路由
import CartList from '@/views/CartList/index.vue'{path: 'cartlist',component: CartList
}
- 渲染列表
<script setup>
import { useCartStore } from '@/stores/cartStore'
const cartStore = useCartStore()
</script><template><div class="xtx-cart-page"><div class="container m-top-20"><div class="cart"><table><thead><tr><th width="120"><el-checkbox /></th><th width="400">商品信息</th><th width="220">单价</th><th width="180">数量</th><th width="180">小计</th><th width="140">操作</th></tr></thead><!-- 商品列表 --><tbody><tr v-for="i in cartStore.cartList" :key="i.id"><td><!-- 单选框 --><el-checkbox/></td><td><div class="goods"><RouterLink to="/"><img :src="i.picture" alt="" /></RouterLink><div><p class="name ellipsis">{{ i.name }}</p></div></div></td><td class="tc"><p>¥{{ i.price }}</p></td><td class="tc"><el-input-number v-model="i.count" /></td><td class="tc"><p class="f16 red">¥{{ (i.price * i.count).toFixed(2) }}</p></td><td class="tc"><p><el-popconfirm title="确认删除吗?" confirm-button-text="确认" cancel-button-text="取消" @confirm="delCart(i)"><template #reference><a href="javascript:;">删除</a></template></el-popconfirm></p></td></tr><tr v-if="cartStore.cartList.length === 0"><td colspan="6"><div class="cart-none"><el-empty description="购物车列表为空"><el-button type="primary">随便逛逛</el-button></el-empty></div></td></tr></tbody></table></div><!-- 操作栏 --><div class="action"><div class="batch">共 10 件商品,已选择 2 件,商品合计:<span class="red">¥ 200.00 </span></div><div class="total"><el-button size="large" type="primary" >下单结算</el-button></div></div></div></div>
</template>
列表购物车 - 单选功能
核心思路: 单选的核心思路就是始终把单选框的状态和Pinia中store对应的状态保持同步
注意事项: v-model双向绑定指令不方便进行命令式的操作(因为后续还需要调用接口), 所以把v-model回退到一般模式,也就是:model-value和@change的配合实现
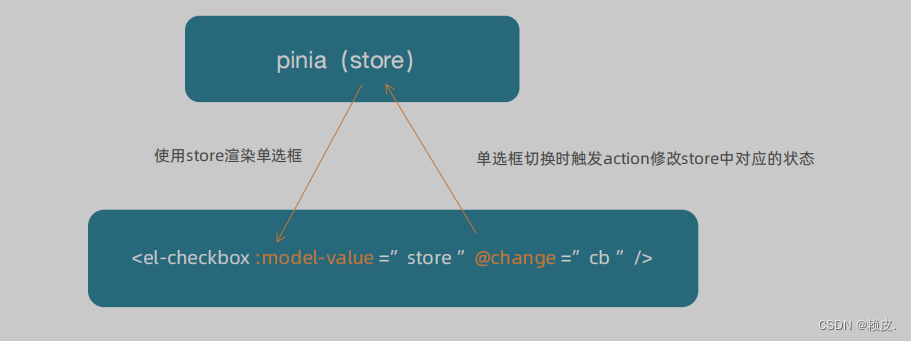
基本思想:通过skuId找到要进行单选操作的商品,把控制是否选中的selected字段修改为当前单选框的状态
1- 添加单选action
// 单选功能
const singleCheck = (skuId, selected) => {// 通过skuId找到要修改的那一项 然后把它的selected修改为传过来的selectedconst item = cartList.value.find((item) => item.skuId === skuId)item.selected = selected
}
2- 触发action函数
<script setup>
// 单选回调
const singleCheck = (i, selected) => {console.log(i, selected)// store cartList 数组 无法知道要修改谁的选中状态?// 除了selected补充一个用来筛选的参数 - skuIdcartStore.singleCheck(i.skuId, selected)
}
</script><template><td><!-- 单选框 --><el-checkbox :model-value="i.selected" @change="(selected) => singleCheck(i, selected)" /></td>
</template>
列表购物车 - 全选
核心思路:
- 操作单选决定全选: 只有当cartList中的所有项都为true时,全选状态才为true
- 操作全选决定单选: cartList中的所有项的selected都要跟着一起变

1- store中定义action和计算属性
// 全选功能action
const allCheck = (selected) => {// 把cartList中的每一项的selected都设置为当前的全选框状态cartList.value.forEach(item => item.selected = selected)
}// 是否全选计算属性
const isAll = computed(() => cartList.value.every((item) => item.selected))
2- 组件中触发aciton和使用计算属性
<script setup>
const allCheck = (selected) => {cartStore.allCheck(selected)
}</script><template><!-- 全选框 --><el-checkbox :model-value="cartStore.isAll" @change="allCheck" />
</template>
列表购物车 - 统计数据实现
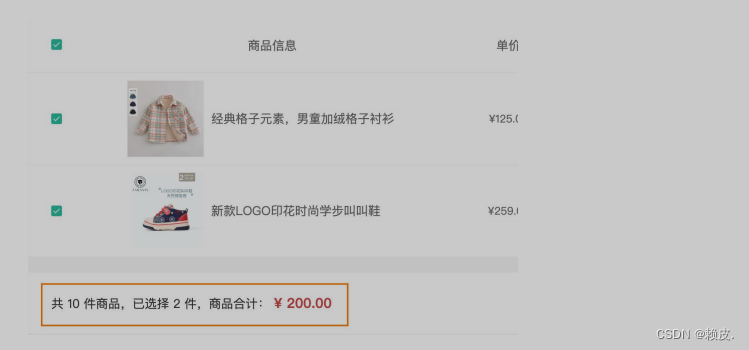
计算逻辑:
- 已选择数量 = cartList中
所有selected字段为true项的count之和 - 商品合计 = cartList中
所有selected字段为true项的count * price之和
// 3. 已选择数量
const selectedCount = computed(() => cartList.value.filter(item => item.selected).reduce((a, c) => a + c.count, 0))
// 4. 已选择商品价钱合计
const selectedPrice = computed(() => cartList.value.filter(item => item.selected).reduce((a, c) => a + c.count * c.price, 0))
接口购物车
整体业务流程回顾

结论
到目前为止,购物车在非登录状态下的各种操作都已经ok了,包括action的封装,触发,参数传递,剩下的事情就是在action中做登录状态的分支判断,补充登录状态下的接口操作逻辑即可.
接口购物车 - 加入购物车
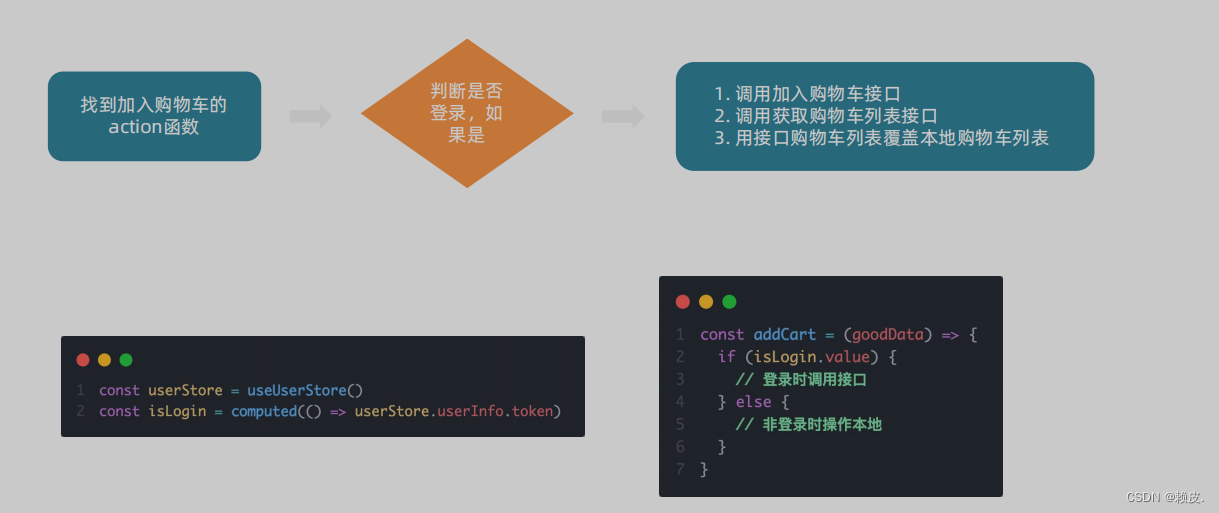
1 - 接口封装
// 加入购物车
export const insertCartAPI = ({ skuId, count }) => {return request({url: '/member/cart',method: 'POST',data: {skuId,count}})
}
// 获取最新的购物车列表
export const findNewCartListAPI = () => {return request({url: '/member/cart',})
}
2- action中适配登录和非登录
import { defineStore } from 'pinia'
import { useUserStore } from './userStore'
import { insertCartAPI } from '@/apis/cart'
export const useCartStore = defineStore('cart', () => {const userStore = useUserStore()const isLogin = computed(() => userStore.userInfo.token)const addCart = async (goods) => {const { skuId, count } = goods// 登录if (isLogin.value) {// 登录之后的加入购车逻辑await insertCartAPI({ skuId, count })updateNewList()} else {// 未登录const item = cartList.value.find((item) => goods.skuId === item.skuId)if (item) {// 找到了item.count++} else {// 没找到cartList.value.push(goods)}}}
}, {persist: true,
})
接口购物车 - 删除购物车

1- 封装接口
// 删除购物车
export const delCartAPI = (ids) => {return request({url: '/member/cart',method: 'DELETE',data: {ids}})
}
2- action中适配登录和非登录
// 删除购物车const delCart = async (skuId) => {if (isLogin.value) {// 调用接口实现接口购物车中的删除功能await delCartAPI([skuId])updateNewList()} else {// 思路:// 1. 找到要删除项的下标值 - splice// 2. 使用数组的过滤方法 - filterconst idx = cartList.value.findIndex((item) => skuId === item.skuId)cartList.value.splice(idx, 1)}}


)

)


中提取的深度学习进行声音分类研究(Matlab代码实现))


)