删除前面配置的目的地规则
[root@k8s-master ~]# kubectl delete destinationrule details
destinationrule.networking.istio.io "details" deleted
[root@k8s-master ~]# kubectl delete destinationrule productpage
destinationrule.networking.istio.io "productpage" deleted
[root@k8s-master ~]# kubectl delete destinationrule ratings
destinationrule.networking.istio.io "ratings" deleted
[root@k8s-master ~]# kubectl delete destinationrule reviews
destinationrule.networking.istio.io "reviews" deleted
删除前面配置的VirtualService
[root@k8s-master rules]# kubectl get VirtualService
NAME       GATEWAYS             HOSTS   AGE
bookinfo   [bookinfo-gateway]   [*]     60m
[root@k8s-master rules]# kubectl delete VirtualService bookinfo
virtualservice.networking.istio.io "bookinfo" deleted
删除前面配置的gateway
[root@k8s-master rules]# kubectl delete gateway bookinfo-gateway
gateway.networking.istio.io "bookinfo-gateway" deleted
流量路由管理
在 Istio 中,流量路由管理是通过 DestinationRule 和 VirtualService 这两个资源来实现的。DestinationRule 用于定义服务的目标规则,例如负载均衡策略、连接池设置等。而 VirtualService 则用于定义服务的路由规则,包括如何将流量路由到不同的版本或实例。
- 创建Istio Ingress Gateway,并与应用程序关联
2bookinfo-gateway.yaml
apiVersion: networking.istio.io/v1alpha3
kind: Gateway
metadata:name: bookinfo-gateway
spec:selector:istio: ingressgateway # use istio default controllerservers:- port:number: 80name: httpprotocol: HTTPhosts:- "*"
---
apiVersion: networking.istio.io/v1alpha3
kind: VirtualService
metadata:name: bookinfo
spec:hosts:- "*"gateways:- bookinfo-gatewayhttp:- match:- uri:exact: /productpage- uri:prefix: /static- uri:exact: /login- uri:exact: /logout- uri:prefix: /api/v1/productsroute:- destination:host: productpageport:number: 9080
创建Istio Ingress Gateway,并与应用程序关联
[root@k8s-master rules]# kubectl apply -f 2bookinfo-gateway.yaml
gateway.networking.istio.io/bookinfo-gateway created
virtualservice.networking.istio.io/bookinfo unchanged
- 为所有服务创建DestinationRule(目的地规则)
为bookinfo所有的服务创建DestinationRule,该CRD定义了服务所有的版本子集。
3destination-rule-all.yaml
apiVersion: networking.istio.io/v1alpha3
kind: DestinationRule
metadata:name: productpage
spec:host: productpagesubsets:- name: v1labels:version: v1
---
apiVersion: networking.istio.io/v1alpha3
kind: DestinationRule
metadata:name: reviews
spec:host: reviewssubsets:- name: v1labels:version: v1- name: v2labels:version: v2- name: v3labels:version: v3
---
apiVersion: networking.istio.io/v1alpha3
kind: DestinationRule
metadata:name: ratings
spec:host: ratingssubsets:- name: v1labels:version: v1- name: v2labels:version: v2- name: v2-mysqllabels:version: v2-mysql- name: v2-mysql-vmlabels:version: v2-mysql-vm
---
apiVersion: networking.istio.io/v1alpha3
kind: DestinationRule
metadata:name: details
spec:host: detailssubsets:- name: v1labels:version: v1- name: v2labels:version: v2
---
创建目标规则
[root@k8s-master rules]# kubectl apply -f 3destination-rule-all.yaml
destinationrule.networking.istio.io/productpage created
destinationrule.networking.istio.io/reviews created
destinationrule.networking.istio.io/ratings created
destinationrule.networking.istio.io/details created
- 创建VirtualService
通过创建VirtualService并设置路由规则可以配置流量的流向。
这里配置一个将所有流量路由到所有服务的v1 版本。
4virtual-service-all-v1.yaml
apiVersion: networking.istio.io/v1alpha3
kind: VirtualService
metadata:name: productpage
spec:hosts:- productpagehttp:- route:- destination:host: productpagesubset: v1
---
apiVersion: networking.istio.io/v1alpha3
kind: VirtualService
metadata:name: reviews
spec:hosts:- reviewshttp:- route:- destination:host: reviewssubset: v1
---
apiVersion: networking.istio.io/v1alpha3
kind: VirtualService
metadata:name: ratings
spec:hosts:- ratingshttp:- route:- destination:host: ratingssubset: v1
---
apiVersion: networking.istio.io/v1alpha3
kind: VirtualService
metadata:name: details
spec:hosts:- detailshttp:- route:- destination:host: detailssubset: v1
---
应用服务
[root@k8s-master rules]# kubectl apply -f 4virtual-service-all-v1.yaml
virtualservice.networking.istio.io/productpage created
virtualservice.networking.istio.io/reviews created
virtualservice.networking.istio.io/ratings created
virtualservice.networking.istio.io/details created
访问http://192.168.200.129:31743/productpage

此时无论如何刷新页面,只可以看见没有星星图案版本的Reviews服务,也就是v1版本的Reviews服务。
基于流量比例的路由
通过Istio我们可以设定流向每个版本流量的比例。在下面的规则中reviews配置了80%v1,20%v2。
5virtual-service-reviews-80-20.yaml
apiVersion: networking.istio.io/v1alpha3
kind: VirtualService
metadata:name: reviews
spec:hosts:- reviewshttp:- route:- destination:host: reviewssubset: v1weight: 80- destination:host: reviewssubset: v2weight: 20
应用服务
[root@k8s-master rules]# kubectl apply -f 5virtual-service-reviews-80-20.yaml
virtualservice.networking.istio.io/reviews configured
配置了20%流量流向v2版本,80%的流量流向v1版本。
刷新页面可以看见黑色星标服务与没有星标的服务交替出现,并且出现的比例大致在1:4左右。
我们可以修改权重,配置可以实时生效,达到灰度发布的目的。
基于身份的路由配置
接下来,将更改路由配置,以将来自特定用户的所有流量路由到特定服务版本。在这种情况下,来自名为 Jason 的用户的所有流量都将路由到该服务reviews:v2。
此示例是由于该productpage服务会为所有出站 HTTP 请求添加自定义标头。
6virtual-service-reviews-test-v2.yaml
apiVersion: networking.istio.io/v1alpha3
kind: VirtualService
metadata:name: reviews
spec:hosts:- reviewshttp:- match:- headers:end-user:exact: jasonroute:- destination:host: reviewssubset: v2- route:- destination:host: reviewssubset: v1
应用服务
[root@k8s-master rules]# kubectl apply -f 6virtual-service-reviews-test-v2.yaml
virtualservice.networking.istio.io/reviews configured
当我们未登录时将无法看见带有星星标记的服务

当我们以jason用户登录时,将会看见带有星星标记的服务

故障注入
故障注入是一种测试技术,用于模拟系统中的故障情况,以验证系统在异常情况下的行为。在 Istio 中,可以使用 Fault Injection 来模拟各种不同类型的故障,例如延迟、错误码、中断等。这有助于评估系统在异常情况下的可靠性和容错性。
延时注入
上文reviews:v2中已经对用户jason进行了基于身份的路由配置
这里在用户 jason 下的reviews:v2和ratings微服务的服务调用之间注入 7 秒延迟。此测试将发现一个有意引入 Bookinfo 应用程序的错误。
请注意,该reviews:v2服务有一个 10 秒的硬编码连接超时。
7virtual-service-ratings-test-delay.yaml
apiVersion: networking.istio.io/v1alpha3
kind: VirtualService
metadata:name: ratings
spec:hosts:- ratingshttp:- match:- headers:end-user:exact: jasonfault:delay:percentage:value: 100.0fixedDelay: 7sroute:- destination:host: ratingssubset: v1- route:- destination:host: ratingssubset: v1[root@k8s-master rules]# kubectl apply -f 7virtual-service-ratings-test-delay.yaml
virtualservice.networking.istio.io/ratings configured当我们以未登录的状态访问bookinfo应用时,我们不会看见星星标记的服务。
当我们用jason登录时,页面会有一个7秒左右的延迟,并且最后由于超时的原因页面会有错误提示。

Http故障注入
也可以为服务注入一个Http的故障,如500等。
8virtual-service-ratings-test-abort.yaml
apiVersion: networking.istio.io/v1alpha3
kind: VirtualService
metadata:name: ratings
spec:hosts:- ratingshttp:- match:- headers:end-user:exact: jasonfault:abort:percentage:value: 100.0httpStatus: 500route:- destination:host: ratingssubset: v1- route:- destination:host: ratingssubset: v1[root@k8s-master rules]# kubectl apply -f 8virtual-service-ratings-test-abort.yaml
virtualservice.networking.istio.io/ratings configured当我们以未登录的状态访问bookinfo应用时,服务可以正常访问。
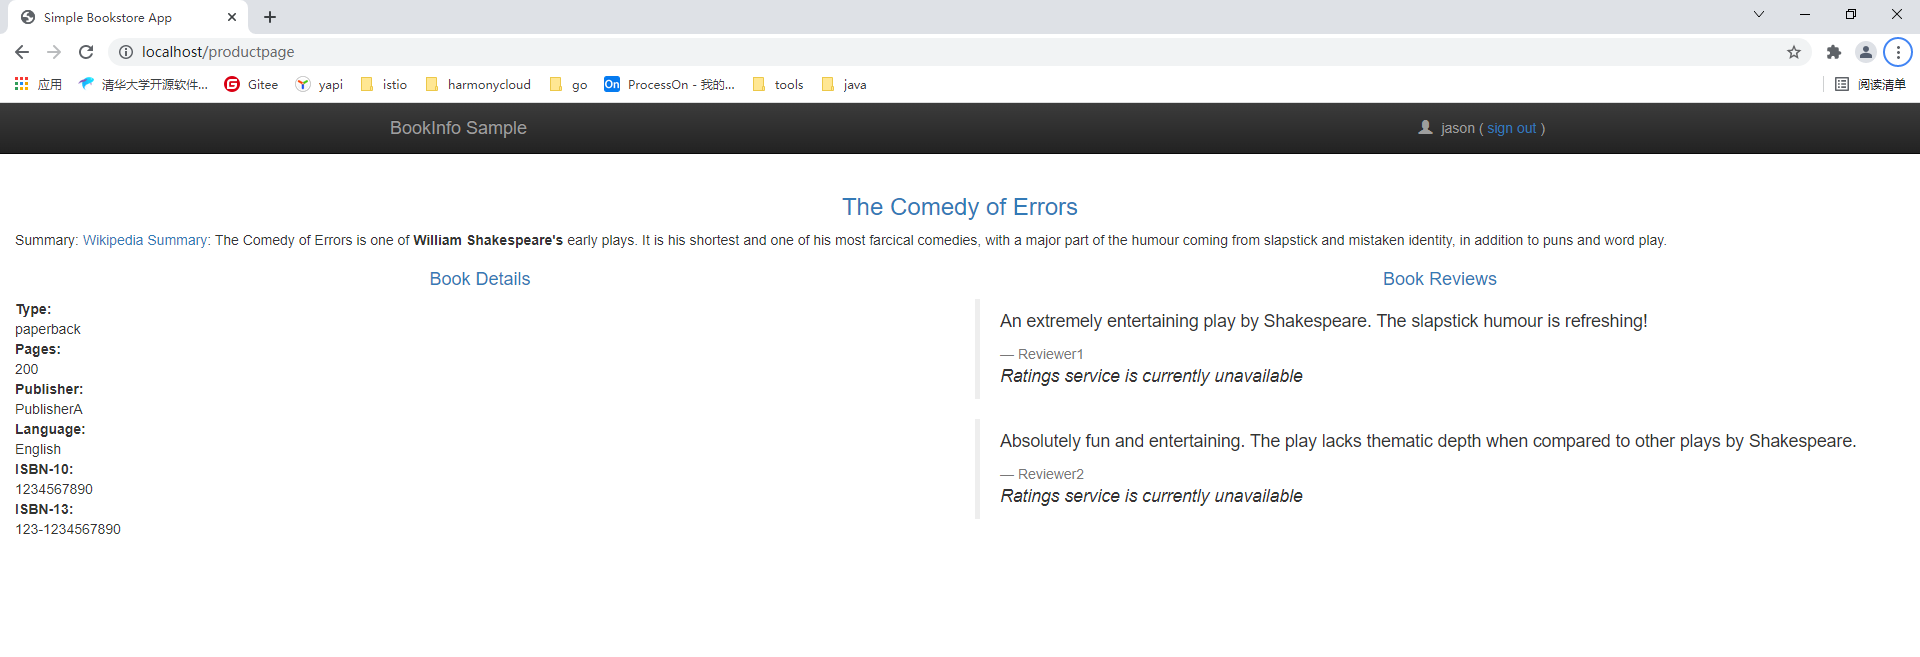
当我们用jason登录时,用户登录时会发现ratings服务不可用。

设置超时时间
我们将前一步的延时缩短一点,缩短为2s,让服务不会因为延时而超时,当我们登录时会有2s左右的延时,但是页面可以正常访问,reviews服务正常提供服务。
我们可以通过配置VirtualService设定服务的超时时间。
9virtual-service-rewiews-test-v2-timeout.yaml
apiVersion: networking.istio.io/v1alpha3
kind: VirtualService
metadata:name: reviews
spec:hosts:- reviewshttp:- route:- destination:host: reviewssubset: v2timeout: 0.5s[root@k8s-master rules]# kubectl apply -f 9virtual-service-rewiews-test-v2-timeout.yaml
virtualservice.networking.istio.io/reviews configured我们设置服务超时的时间为0.5s。
当我们再已jason用户登录时,2s的延迟后服务将会超时报错。
配置熔断
开启自动注入:kubectl label namespace default istio-injection=enabled
1.启动httpbin实例
httpbin.yaml在/usr/local/istio-1.10.4/samples/httpbin下。
[root@k8s-master httpbin]# kubectl apply -f /usr/local/istio-1.10.4/samples/httpbin/httpbin.yaml
serviceaccount/httpbin created
service/httpbin created
deployment.apps/httpbin created
2.配置熔断器
10dr-httpbin.yaml
apiVersion: networking.istio.io/v1alpha3
kind: DestinationRule
metadata:name: httpbin
spec:host: httpbintrafficPolicy:connectionPool:tcp:maxConnections: 1http:http1MaxPendingRequests: 1maxRequestsPerConnection: 1outlierDetection:consecutive5xxErrors: 1interval: 1sbaseEjectionTime: 3mmaxEjectionPercent: 100[root@k8s-master rules]# kubectl apply -f 10dr-httpbin.yaml
destinationrule.networking.istio.io/httpbin created配置文件设置了httpbin服务的tcp流量的最大连接数和http流量的最大请求数为1。
4.启动客户端,连接httpbin服务
root@k8s-master sample-client]# kubectl apply -f /usr/local/istio-1.10.4/samples/httpbin/sample-client/fortio-deploy.yaml
service/fortio created
deployment.apps/fortio-deploy created
foritio作为客户端对httpbin服务发起请求。
查询foritio 服务pod的名称,进入foritio服务容器,对httpbin服务发起请求。
[root@k8s-master sample-client]# kubectl get po
NAME                                   READY   STATUS    RESTARTS   AGE
busybox-7c84546778-9jzpx               1/1     Running   28         68d
busybox-7c84546778-rs5d9               1/1     Running   29         68d
details-v1-6486db986c-8w4m9            2/2     Running   2          5d2h
fortio-deploy-6dc9b4d7d9-m2hpl         1/1     Running   0          36s
httpbin-66cdbdb6c5-c4fqq               1/1     Running   0          4m33s
kindly-robin-mychart-fb68878c8-dlzw8   1/1     Running   1          5d3h
productpage-v1-76ddd6867b-l2sll        2/2     Running   2          5d2h
ratings-v1-54bf9bb699-7sssb            2/2     Running   2          5d2h
reviews-v1-76d5495769-xs4gx            2/2     Running   2          5d2h
reviews-v2-5ff5f7dd8b-jw6wm            2/2     Running   2          5d2h
reviews-v3-7f8467c6ff-wnt6d            2/2     Running   2          5d2h
[root@k8s-master sample-client]# kubectl exec fortio-deploy-6dc9b4d7d9-m2hpl -c fortio -- /usr/bin/fortio curl -quiet http://httpbin:8000/get
HTTP/1.1 200 OK
Server: gunicorn/19.9.0
Date: Tue, 26 Mar 2024 10:09:38 GMT
Connection: keep-alive
Content-Type: application/json
Content-Length: 177
Access-Control-Allow-Origin: *
Access-Control-Allow-Credentials: true{"args": {},"headers": {"Host": "httpbin:8000","User-Agent": "fortio.org/fortio-1.17.1"},"origin": "10.244.2.69","url": "http://httpbin:8000/get"
}
可以看见服务请求成功,那么我们就可以开始提高并发数,测试熔断。
使用两个并发连接 ( -c 2)调用服务并发送 20 个请求 ( -n 20):
$ kubectl exec fortio-deploy-6dc9b4d7d9-m2hpl -c fortio -- /usr/bin/fortio load -c 2 -qps 0 -n 20 -loglevel Warning http://httpbin:8000/get
02:35:44 I logger.go:127> Log level is now 3 Warning (was 2 Info)
Fortio 1.17.1 running at 0 queries per second, 8->8 procs, for 20 calls: http://httpbin:8000/get
Starting at max qps with 2 thread(s) [gomax 8] for exactly 20 calls (10 per thread + 0)
Ended after 45.6804ms : 20 calls. qps=437.82
Aggregated Function Time : count 20 avg 0.00447278 +/- 0.002527 min 0.0030049 max 0.0126282 sum 0.0894556
# range, mid point, percentile, count
>= 0.0030049 <= 0.004 , 0.00350245 , 70.00, 14
> 0.004 <= 0.005 , 0.0045 , 90.00, 4
> 0.011 <= 0.012 , 0.0115 , 95.00, 1
> 0.012 <= 0.0126282 , 0.0123141 , 100.00, 1
# target 50% 0.00369382
# target 75% 0.00425
# target 90% 0.005
# target 99% 0.0125026
# target 99.9% 0.0126156
Sockets used: 2 (for perfect keepalive, would be 2)
Jitter: false
Code 200 : 20 (100.0 %)
Response Header Sizes : count 20 avg 230 +/- 0 min 230 max 230 sum 4600
Response Body/Total Sizes : count 20 avg 854 +/- 0 min 854 max 854 sum 17080
All done 20 calls (plus 0 warmup) 4.473 ms avg, 437.8 qps
可以看到有20%的服务被熔断了。
Istio中的安全策略
Istio中可以直接配置服务间访问时的安全策略,并实时生效
1.Http流量的授权策略
为Http服务设置授权策略可以设定该服务接受哪些服务的调用,这里我们演示的思路是设定一个全局的访问拒绝策略,通过修改配置,一步一步开放每个服务,使其出现在浏览器上。
创建一个全局的访问拒绝策略。
11authorizationPolicy.yaml
apiVersion: security.istio.io/v1beta1
kind: AuthorizationPolicy
metadata:name: allow-nothingnamespace: default
spec:{}[root@k8s-master rules]# kubectl apply -f 11authorizationPolicy.yaml
authorizationpolicy.security.istio.io/allow-nothing created
该策略将会拒绝所有对default命名空间下工作负载的访问,我们访问页面,会发现访问被拒绝了。

2 开放ProductPage服务
apiVersion: security.istio.io/v1beta1
kind: AuthorizationPolicy
metadata:name: "productpage-viewer"namespace: default
spec:selector:matchLabels:app: productpageaction: ALLOWrules:- to:- operation:methods: ["GET"]
运行该配置文件,会为productpage服务设置授权策略,该策略为设置from字段,则运行所有用户对productpage工作负载进行访问,并且只开放了GET方法的访问。
等待几秒钟,Istiod将规则下发,刷新页面我们会看到productpage页面可以正常访问,但是details服务和reviews服务任然无法正常访问。

3.开放Details服务
apiVersion: security.istio.io/v1beta1
kind: AuthorizationPolicy
metadata:name: "details-viewer"namespace: default
spec:selector:matchLabels:app: detailsaction: ALLOWrules:- from:- source:principals: ["cluster.local/ns/default/sa/bookinfo-productpage"]to:- operation:methods: ["GET"]
同样配置授权策略为Details服务开放访问,此时配置了from字段,并且绑定了productpage服务的serviceAccount,说明Details服务只接受来自与bookinfo-productpage这个serviceAccount绑定的工作负载的Get请求访问。
运行该配置,等待几秒钟后刷新页面将会看到Details服务可以正常显示了,而reviews服务任然处于拒绝访问状态。

5.开放Reviews服务
apiVersion: security.istio.io/v1beta1
kind: AuthorizationPolicy
metadata:name: "reviews-viewer"namespace: default
spec:selector:matchLabels:app: reviewsaction: ALLOWrules:- from:- source:principals: ["cluster.local/ns/default/sa/bookinfo-productpage"]to:- operation:methods: ["GET"]
同样我们可以看到reviews服务可以正常访问

6.开放ratings服务
apiVersion: security.istio.io/v1beta1
kind: AuthorizationPolicy
metadata:name: "ratings-viewer"namespace: default
spec:selector:matchLabels:app: ratingsaction: ALLOWrules:- from:- source:principals: ["cluster.local/ns/default/sa/bookinfo-reviews"]to:- operation:methods: ["GET"]
可以看到ratings服务已经恢复正常。
文章参考


)

)


)

)

