1、为什么要学习MyBatis
如果没有MyBatis框架,我们依靠JDBC和连接池已经能够很好的和数据库进行交互了,而学习MyBatis框架最核心的原因是为了减少SQL语句对代码的侵入性。
因为在过往不管是使用连接池还是JDBC Templete,所有的SQL语句都写在代码中,这导致了
一、SQL语句与代码的耦合性太高并且写死的SQL语句无法在其他代码中进行复用
二、我们需要记忆很多操作数据库的方法(例如queryForList、queryForMap……)
2、MyBatis介绍
一、原是Apache的一个开源项目叫做iBatis,后因为商标冲突与2010年被更改为MyBatis
二、MyBatis 是支持定制化 SQL、存储过程以及高级映射的优秀的持久层框架,它避免了几乎所有的 JDBC 代码和手动设置参数以及获取结果集的操作。
三、MyBatis可以使用简单的XML或注解用于配置和原始映射,将接口和Java的实体类映射成数据库中的记录
3、SpringBoot整合MyBatis
①引入依赖
这里不需要引入Spring对JDBC的依赖,因为MyBatis会自动引入
<!--mysql数据库驱动依赖-->
<dependency><groupId>mysql</groupId><artifactId>mysql-connector-java</artifactId><scope>runtime</scope>
</dependency>
<!--引入相关mybatis依赖-->
<dependency><groupId>org.mybatis.spring.boot</groupId><artifactId>mybatis-spring-boot-starter</artifactId><version>2.2.0</version>
</dependency>
②在yml文件中配置数据源
spring:datasource:url: jdbc:mysql://localhost:3306/empdb?serverTimezone=Asia/Shanghai&characterEncoding=utf8&serverTimeZone=Asia/Shanghaiusername: rootpassword: Qwertuiop123.一、基于注解使用MyBatis(掌握即可,工作中一般使用XML形式进行数据库编程)
基于注解方法使用是通过SQL语句和接口方法相绑定,从而达到在调用方法时就可以执行SQL语句
①准备实体类,用于将数据库查询信息封装到实体类中
@Data
public class Teacher {private long id;private String name;private long age;private String title;private long manager;private long salary;private long comm;private String gender;private long subjectId;}
②准备一个持久层接口方法
一般来讲一个接口操作一张表,比如说下面这个接口里定义的方法就是专门用于操作Teacher表
@Mapper
public interface TeacherMapper {@Select("SELECT * FROM teacher")//如果SQL操作后返回的是一条结果,则直接将返回值定义为返回的实体类型//如果SQL操作后返回的是多条结果,则直接将返回值定义为返回的实体类型的集合并定义泛型public List<Teacher> getTeacherAll();//如果SQL绑定的是增删改语句,如果要求返回执行的记录数,则将返回值类型改为int;如果不要求返回则可以改为void@Insert("INSERT INTO teacher VALUES (6666,'光头师傅',22,'宗师',null,100000,50000,'男',0);")public int addTeacher();
}
③准备测试代码
@SpringBootTest
public class TestMyBatisAnno {@Autowiredprivate TeacherMapper teacherMapper;@Testpublic void testSelectAll() {List<Teacher> teacherAll = teacherMapper.getTeacherAll();for (Teacher teacher : teacherAll) {System.out.println(teacher);}}
}
注意:当数据库表字段由多个单词组成或表字段形式为xxx_xxx时,我们要在yml配置中配置驼峰规则映射,否则该字段的值无法查询到
#开启驼峰规则
mybatis:configuration:map-underscore-to-camel-case: true
二、@MapperScan注解的使用
随着后续的开发,可能这样的Mapper接口会变得很多,那么可能每个接口都要加@Mapper注解,就会变得很麻烦,所以可以在SpringBoot的主启动类上添加@MapperScan注解,并指定要扫描的mapper包,这样的话,就会自动去获取指定包下的接口了。
但这样做也会有一个问题,因为我们的持久层的接口一定是要被注入的,当项目没有启动并且在持久层上又没有加mapper注解时,在注入的接口上会有红色波浪线报错提示,大概报错内容是"Spring容器中没有这个bean",所以尽可能在开发过程中还是勤写@mapper注解
三、基于XML文件使用MyBatis
①定义xxxMapper.xml文件,这个文件的命名一般都为表名+mapper,也就是说和持久层的接口名相同
<?xml version="1.0" encoding="UTF-8" ?>
<!DOCTYPE mapperPUBLIC "-//mybatis.org//DTD Mapper 3.0//EN""http://mybatis.org/dtd/mybatis-3-mapper.dtd">//namespace中指定要绑定接口的全路径
<mapper namespace="cn.tedu.mapper.StudentMapper">//id值要和接口中的对应方法名相同
//在查询SQL中,必须指定resultType,它的值和对应接口方法的返回值类型相同<select id="getStudentAll" resultType="cn.tedu.pojo.Student">SELECT id, name, age, gender, job, birth, location_id, team_leader, class_id FROM student</select></mapper>
②指定MyBatis中mapper文件扫描路径(即找到SQL文件的所在位置)
mybatis:mapper-locations: classpath:mapper/*.xml③定义测试文件(在这里不做赘述,和使用注解的时候一致)
四、在mapper.xml中占位符的介绍
当我们在SQL查询语句中需要根据参数查询时,我们需要将该参数用 #{参数} 表示,并且在对应的接口方法中传入形参
①当参数为一个时:
<?xml version="1.0" encoding="UTF-8" ?>
<!DOCTYPE mapperPUBLIC "-//mybatis.org//DTD Mapper 3.0//EN""http://mybatis.org/dtd/mybatis-3-mapper.dtd">
<mapper namespace="tedu.mapper.StudentMapper"><select id="getStudentById" resultType="tedu.pojo.Student">SELECT *FROM student WHERE id = #{id}</select></mapper>
public interface StudentMapper {//这里的形参值比一定要和SQL中占位符内的参数一样,但是为了代码的可读性,一般都定义为一样的public Student getStudentById(Long id);}②当参数为多个时:SQL中占位符内的参数名必须要和接口方法中的参数名一致
<select id="getStudentByBirth" resultType="cn.tedu.pojo.Student">SELECT id,name,age,gender,job,birth,location_id,team_leader,class_idFROM studentWHERE birth > #{minbirth}//在配置文件中 < 为特殊符号,所以直接写会报错,因此需要使用替换符AND birth < #{maxbirth}</select>public interface StudentMapper {public List<Student> getStudentByBirth(String minBirth, String maxBirth);}③当SQL中占位符中传入多个参数正好是属于一个实体类中的属性,则该参数直接命名为对应实体类中的属性即可,例如:
<insert id="addStudent">INSERT INTO studentvalues (#{id}, #{name}, #{age}, #{gender}, #{job}, #{birth}, #{locationId}, #{teamLeader}, #{classId})</insert>public interface StudentMapper {public int addStudent(Student student);}五、ResultMap——手动映射和ResultType——自动映射
ResultType 在之前我们已经使用实际案例说过了,就是通过SQL语句中的字段名和实体类中的属性名相关联,将访问数据库之后的结果封装到对应Type的实体类中,它是属于自动映射。
当然,这样的映射方式也有一个弊端,当我们在xml文件的SQL语句中给某些字段取别名时,通过自动映射结果为null,即SQL字段和实体类属性不能完成匹配


而resultMap可以手动的将属性和表字段匹配
<?xml version="1.0" encoding="UTF-8" ?>
<!DOCTYPE mapperPUBLIC "-//mybatis.org//DTD Mapper 3.0//EN""http://mybatis.org/dtd/mybatis-3-mapper.dtd">
<mapper namespace="cn.tedu.mapper.TeacherMapper"><select id="getTeacherById" resultMap="teacher">SELECT id idddd,name,age,title,manage,salary sal,comm,gender gen,subject_id sub,FROM TeacherWHERE id = #{id}</select><!--resultMap自定义映射规则type: 自定义映射的实体类,相当于ResultType后面的值id:唯一id,resultMap中的id字段要和上方resultMap中的值相一致建议只要定义resultMap,就将整表的全部列的映射全部写上--><resultMap id="teacher" type="cn.tedu.pojo.Teacher"><!--指定主键列的封装规则id映射主键,底层会有优化column:指定数据库表的哪一列,如果在SQL中定义了别名则需要写别名property:指定实体类的属性--><id column="idddd" property="id"/><!--result:映射普通字段--><result column="name" property="name"/><result column="age" property="age"/><result column="title" property="title"/><result column="manager" property="manager"/><result column="sal" property="salary"/><result column="comm" property="comm"/><result column="gen" property="gender"/><result column="sub" property="subjectId"/></resultMap>
</mapper>
当然,ResultMap也没有咱们想的这么不智能,它还是可以和自动映射兼容的(即ResultMap也可以实现自动映射),当数据库表字段列和实体类属性列一致时,我们同样可以将它删除,完成自动映射。
也就是说上方的代码改成如下也没有问题,原因是ResultMap规则中会有一个默认属性autoMapping=true属性,如果改为autoMapping=false则会映射失败。
<?xml version="1.0" encoding="UTF-8" ?>
<!DOCTYPE mapperPUBLIC "-//mybatis.org//DTD Mapper 3.0//EN""http://mybatis.org/dtd/mybatis-3-mapper.dtd">
<mapper namespace="cn.tedu.mapper.TeacherMapper"><select id="getTeacherById" resultMap="teacher">SELECT id idddd,name,age,title,manage,salary sal,comm,gender gen,subject_id sub,FROM TeacherWHERE id = #{id}</select><resultMap id="teacher" type="cn.tedu.pojo.Teacher"><id column="idddd" property="id"/><result column="sal" property="salary"/><result column="gen" property="gender"/><result column="sub" property="subjectId"/></resultMap>
</mapper>
六:ResultMap的高级用法:级联操作
一对一映射
当我们进行多表联查时,很明显,一张表内会有另一张表的关联信息(例如老师表和科目表,老师表内部一定会有一个字段和科目表产生联系),此时,只在手动映射规则中添加一个实体类显然不能满足要求 ,此时我们可以采取如下操作:
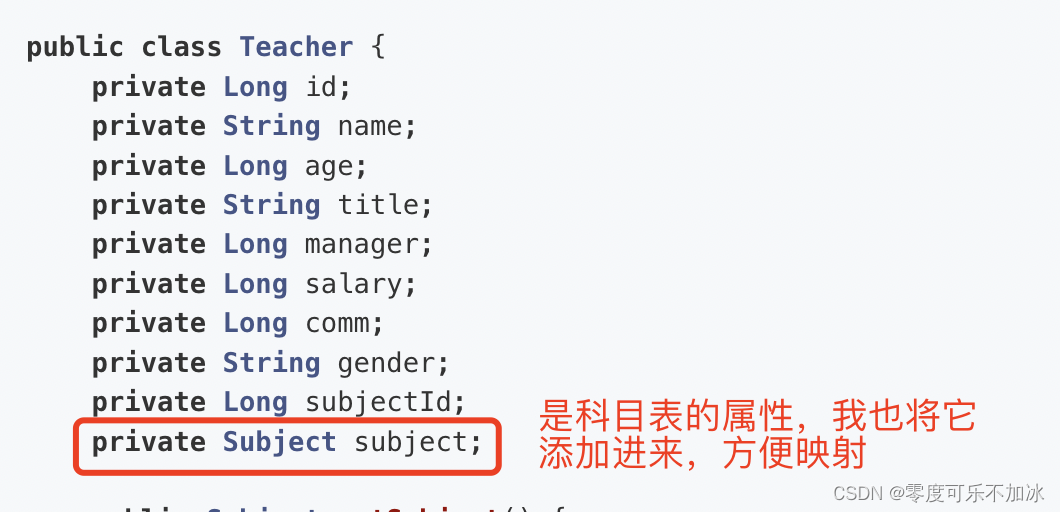
①在其中一张表(以教师表为例)中添加另一张表(以科目表为例)的类属性
注意:这里因为是一个老师教一个科目,相当于是一个一对一的关系,所以在添加的subject属性直接使用类就可以,但是如果一个老师教多个科目,则相当于是一个一对多的关系,因此添加的subject属性应该是一个集合类 ,例如 "private List<Subject> subject "

②在mapper.xml文件的SQL语句中做映射关系
<?xml version="1.0" encoding="UTF-8" ?>
<!DOCTYPE mapperPUBLIC "-//mybatis.org//DTD Mapper 3.0//EN""http://mybatis.org/dtd/mybatis-3-mapper.dtd">
<mapper namespace="cn.tedu.mapper.TeacherMapper"><select id="getTeacherById" resultMap="teacher">SELECT *FROM TeacherWHERE id = #{id}</select><select id="getTeacherSubjectById" resultMap="teacher2">SELECT t.id,t.name,t.age,t.title,t.manager,t.salary,t.comm,t.gender,t.subject_id,<!--以下两个字段属于科目表,而字段名和教师表相同,必须取别名-->s.id sid,s.name snameFROM teacher t,subject sWHERE t.subject_id = s.idAND t.id = #{id};</select><!--联合查询: 使用级联属性封装结果集--><resultMap id="teacher2" type="Teacher" ><id column="id" property="id"/><result column="name" property="name"/><result column="age" property="age"/><result column="title" property="title"/><result column="manager" property="manager"/><result column="salary" property="salary"/><result column="comm" property="comm"/><result column="gender" property="gender"/><result column="subject_id" property="subjectId"/><!--通过教师表的subject属性映射到科目表的id和name属性--><result column="sid" property="subject.id"/><result column="sname" property="subject.name"/></resultMap>
</mapper>
一对多映射
①在其中一张表(以科目表为例)中添加另一张表(以教师表为例)的类属性,因为一个科目有多个老师教,所以定义的老师类应该是一个集合

②在mapper.xml文件的SQL语句中做映射关系,这里需要使用collection标签
<?xml version="1.0" encoding="UTF-8" ?>
<!DOCTYPE mapperPUBLIC "-//mybatis.org//DTD Mapper 3.0//EN""http://mybatis.org/dtd/mybatis-3-mapper.dtd">
<mapper namespace="cn.tedu.mapper.SubjectMapper"><select id="getSubjectTeacherByName" resultMap="subject">SELECT s.id,s.name,t.id   tid,t.name tname,t.age,t.title,t.manager,t.salary,t.comm,t.gender,t.subject_idFROM subject sLEFT JOIN teacher t ON s.id = t.subject_idWHERE s.name = #{name};</select><resultMap id="subject" type="Subject"><id column="id" property="id"/><result column="name" property="name"/><!--collection:表示要开始一对多映射property:表示要进行一对多映射的属性名,即下面这些字段要映射到Subject类的那个属性里呢ofType 表示一对多映射的属性的类型,相当于一对一映射关系中的type,表示要映射的实体类的属性--><collection property="teachers" ofType="Teacher"><!--定义集合中的元素的封装规则--><id column="tid" property="id"/><result column="tname" property="name"/><result column="age" property="age"/><result column="title" property="title"/><result column="manager" property="manager"/><result column="salary" property="salary"/><result column="comm" property="comm"/><result column="gender" property="gender"/><result column="subject_id" property="subjectId"/></collection></resultMap>
</mapper>
4、日志配置
日志的作用是用来追踪和记录我们的程序运行中的信息,我们可以利用日志很快定位问题,追踪分析,
在以上测试中,虽然最终测试都成功了,但是我们没办法清晰的指导知道哪条查询的结果是对应哪条SQL语句的,使用日志就能够结解决这个问题。
日志级别:
SpringBoot的日志框架提供了如下几种日志级别(从高到低,日志级别越高,反映在控制台所打印的内容就越少,比如ERROR级别他就只打印程序的错误信息;WARN级别可能同时会打印警告和错误信息):
ERROR:错误级别,指出发生错误事件,需要立即处理;
WARN:警告级别,表明可能发生错误的情况,需要注意和防止;
INFO:信息级别,描述应用程序的正常运行信息,但不会打印太多的信息;(SpringBoot默认级别)
DEBUG:调试级别,用于调试应用程序,打印详细的调试信息;
TRACE:跟踪级别,记录应用程序中每个步骤的详细信息。
在配置文件中设置日志级别:
注意:一定要设置扫描主启动类所在的包的内容,这里的cn.tedu就是主启动类所在的包
#日志设置
logging:level:cn:tedu: debug
—————————————————————
路漫漫其修远兮,吾将上下而求索~
到此关于MyBatis基础到进阶的讲解就暂时结束啦后续随着博主的功力增加会不断更新(#^.^#),
写作不易,如果你认为博主写的不错!
请点赞、关注、评论给博主一个鼓励吧,您的鼓励就是博主前进的动力。


)


)


真题试卷)
