本文来自#React系列教程:https://mp.weixin.qq.com/mp/appmsgalbum?__biz=Mzg5MDAzNzkwNA==&action=getalbum&album_id=1566025152667107329)
一. 认识react-router
1.2. 前端路由原理
前端路由是如何做到URL和内容进行映射呢?监听URL的改变。
URL 的 hash
URL的hash也就是锚点(#), 本质上是改变window.location的href属性;- 我们可以通过直接赋值
location.hash来改变href, 但是页面不发生刷新;
<div id="app"><a href="#/home">home</a><a href="#/about">about</a><div class="router-view"></div>
</div><script>// 1.获取router-viewconst routerViewEl = document.querySelector(".router-view");// 2.监听hashchangewindow.addEventListener("hashchange", () => {switch(location.hash) {case "#/home":routerViewEl.innerHTML = "home";break;case "#/about":routerViewEl.innerHTML = "about";break;default:routerViewEl.innerHTML = "default";}})
</script>
hash的优势就是兼容性更好,在老版IE中都可以运行,但是缺陷是有一个#,显得不像一个真实的路径。
HTML5 的 History
history接口是 HTML5 新增的, 它有六种模式改变URL而不刷新页面:
replaceState:替换原来的路径;pushState:使用新的路径;popState:路径的回退;go:向前或向后改变路径;forword:向前改变路径;back:向后改变路径;
我们这里来简单演示几个方法:
<div id="app"><a href="/home">home</a><a href="/about">about</a><div class="router-view"></div>
</div><script>// 1.获取router-viewconst routerViewEl = document.querySelector(".router-view");// 2.监听所有的a元素const aEls = document.getElementsByTagName("a");for (let aEl of aEls) {aEl.addEventListener("click", (e) => {e.preventDefault();const href = aEl.getAttribute("href");console.log(href);history.pushState({}, "", href);historyChange();})}// 3.监听popstate和go操作window.addEventListener("popstate", historyChange);window.addEventListener("go", historyChange);// 4.执行设置页面操作function historyChange() {switch(location.pathname) {case "/home":routerViewEl.innerHTML = "home";break;case "/about":routerViewEl.innerHTML = "about";break;default:routerViewEl.innerHTML = "default";}}</script>
1.3. react-router
目前前端流行的三大框架, 都有自己的路由实现:
- Angular的ngRouter
- React的ReactRouter
- Vue的vue-router
React Router的版本4开始,路由不再集中在一个包中进行管理了:
- react-router是router的核心部分代码;
- react-router-dom是用于浏览器的;
- react-router-native是用于原生应用的;
目前我们使用最新的React Router版本是v5的版本:
- 实际上v4的版本和v5的版本差异并不大;
安装react-router:
yarn add react-router-dom
- 安装react-router-dom会自动帮助我们安装react-router的依赖;
二. react-router基本使用
2.1. Router基本使用
react-router最主要的API是给我们提供的一些组件:
- BrowserRouter或HashRouter
- Router中包含了对路径改变的监听,并且会将相应的路径传递给子组件;
BrowserRouter使用history模式;HashRouter使用hash模式;
- Link和NavLink:
- 通常路径的跳转是使用
Link组件,最终会被渲染成a元素; NavLink是在Link基础之上增加了一些样式属性(后续学习);to属性:Link中最重要的属性,用于设置跳转到的路径;
- 通常路径的跳转是使用
- Route:
Route用于路径的匹配;path属性:用于设置匹配到的路径;component属性:设置匹配到路径后,渲染的组件;exact:精准匹配,只有精准匹配到完全一致的路径,才会渲染对应的组件;
在App中进行如下演练:
import React, { PureComponent } from 'react';import { BrowserRouter, Route, Link } from 'react-router-dom';import Home from './pages/home';
import About from './pages/about';
import Profile from './pages/profile';export default class App extends PureComponent {render() {return (<BrowserRouter><Link to="/">首页</Link><Link to="/about">关于</Link><Link to="/profile">我的</Link><Route exact path="/" component={Home} /><Route path="/about" component={About} /><Route path="/profile" component={Profile} /></BrowserRouter>)}
}

2.2. NavLink的使用
路径选中时,对应的a元素变为红色
这个时候,我们要使用NavLink组件来替代Link组件:
activeStyle:活跃时(匹配时)的样式;activeClassName:活跃时添加的class;exact:是否精准匹配;
先演示activeStyle:
<NavLink to="/" activeStyle={{color: "red"}}>首页</NavLink>
<NavLink to="/about" activeStyle={{color: "red"}}>关于</NavLink>
<NavLink to="/profile" activeStyle={{color: "red"}}>我的</NavLink>
但是,我们会发现在选中about或profile时,第一个也会变成红色:
- 原因是
/路径也匹配到了/about或/profile; - 这个时候,我们可以在第一个
NavLink中添加上exact属性;
<NavLink exact to="/" activeStyle={{color: "red"}}>首页</NavLink>
默认的activeClassName:
- 事实上在默认匹配成功时,
NavLink就会添加上一个动态的active class; - 所以我们也可以直接编写样式
a.active {color: red;
}
当然,如果你担心这个class在其他地方被使用了,出现样式的层叠,也可以自定义class
<NavLink exact to="/" activeClassName="link-active">首页</NavLink>
<NavLink to="/about" activeClassName="link-active">关于</NavLink>
<NavLink to="/profile" activeClassName="link-active">我的</NavLink>

2.3. Switch的作用
我们来看下面的路由规则:
<Route exact path="/" component={Home} />
<Route path="/about" component={About} />
<Route path="/profile" component={Profile} />
<Route path="/:userid" component={User}/>
<Route component={NoMatch}/>
- 当我们匹配到某一个路径时,我们会发现有一些问题;
- 比如
/about路径匹配到的同时,/:userid也被匹配到了,并且最后的一个NoMatch组件总是被匹配到;

原因是什么呢?默认情况下,react-router中只要是路径被匹配到的Route对应的组件都会被渲染;
但是实际开发中,我们往往希望有一种排他的思想:
- 只要匹配到了第一个,那么后面的就不应该继续匹配了;
- 这个时候我们可以使用
Switch来将所有的Route进行包裹即可;
<Switch><Route exact path="/" component={Home} /><Route path="/about" component={About} /><Route path="/profile" component={Profile} /><Route path="/:userid" component={User} /><Route component={NoMatch} />
</Switch>
2.3. Redirect的使用
Redirect用于路由的重定向,当这个组件出现时,就会执行跳转到对应的to路径中:
我们这里使用这个的一个案例:
- 用户跳转到
User界面; - 但是在
User界面有一个isLogin用于记录用户是否登录:true:那么显示用户的名称;false:直接重定向到登录界面;
App.js中提前定义好Login页面对应的Route:
<Switch>...其他Route<Route path="/login" component={Login} /><Route component={NoMatch} />
</Switch>
在User.js中写上对应的逻辑代码:
import React, { PureComponent } from 'react'
import { Redirect } from 'react-router-dom';export default class User extends PureComponent {constructor(props) {super(props);this.state = {isLogin: false}}render() {return this.state.isLogin ? (<div><h2>User</h2><h2>用户名: coderwhy</h2></div>): <Redirect to="/login"/>}
}
三. react-router高级使用
3.1. 路由嵌套
在开发中,路由之间是存在嵌套关系的。
这里我们假设about页面中有两个页面内容:
- 商品列表和消息列表;
- 点击不同的链接可以跳转到不同的地方,显示不同的内容;
import React, { PureComponent } from 'react';import { Route, Switch, Link } from 'react-router-dom';function AboutProduct(props) {return (<ul><li>商品列表1</li><li>商品列表2</li><li>商品列表3</li></ul>)
}function AboutMessage(props) {return (<ul><li>消息列表1</li><li>消息列表2</li><li>消息列表3</li></ul>)
}export default class About extends PureComponent {render() {return (<div><Link to="/about">商品</Link><Link to="/about/message">消息</Link><Switch><Route exact path="/about" component={AboutProduct} /><Route path="/about/message" component={AboutMessage} /></Switch></div>)}
}
3.2. 手动跳转
目前我们实现的跳转主要是通过Link或者NavLink进行跳转的,实际上我们也可以通过JavaScript代码进行跳转。
但是通过JavaScript代码进行跳转有一个前提:必须获取到history对象。
如何可以获取到history的对象呢?两种方式
- 方式一:如果该组件是通过路由直接跳转过来的,那么可以直接获取
history、location、match对象; - 方式二:如果该组件是一个普通渲染的组件,那么不可以直接获取
history、location、match对象;
那么如果普通的组件也希望获取对应的对象属性应该怎么做呢?
- 前面我们学习过高阶组件,可以在组件中添加想要的属性;
react-router也是通过高阶组件为我们的组件添加相关的属性的;
如果我们希望在App组件中获取到history对象,必须满足以下两个条件:
App组件必须包裹在Router组件之内;App组件使用withRouter高阶组件包裹;
index.js代码修改如下:
ReactDOM.render(<BrowserRouter><App /></BrowserRouter>,document.getElementById('root')
);
App.js代码修改如下:
import { Route, Switch, NavLink, withRouter } from 'react-router-dom';
...省略其他的导入代码class App extends PureComponent {render() {console.log(this.props.history);return (<div>...其他代码<button onClick={e => this.pushToProfile()}>我的</button><Switch><Route exact path="/" component={Home} /><Route path="/about" component={About} /><Route path="/profile" component={Profile} /><Route path="/:userid" component={User} /><Route component={NoMatch} /></Switch></div>)}pushToProfile() {this.props.history.push("/profile");}
}export default withRouter(App);
源码选读:这里的 history 来自哪里呢?是否和之前使用的 window.history 一样呢?
我们发现withRouter的高阶函数来自react-router-dom:
实际上来自react-router的包;
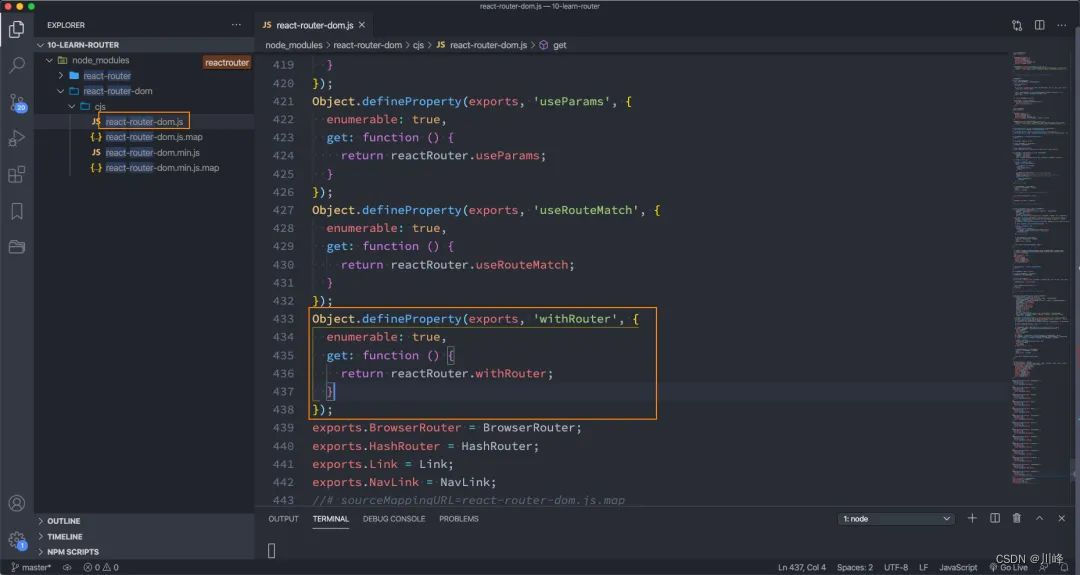
withRouter函数:
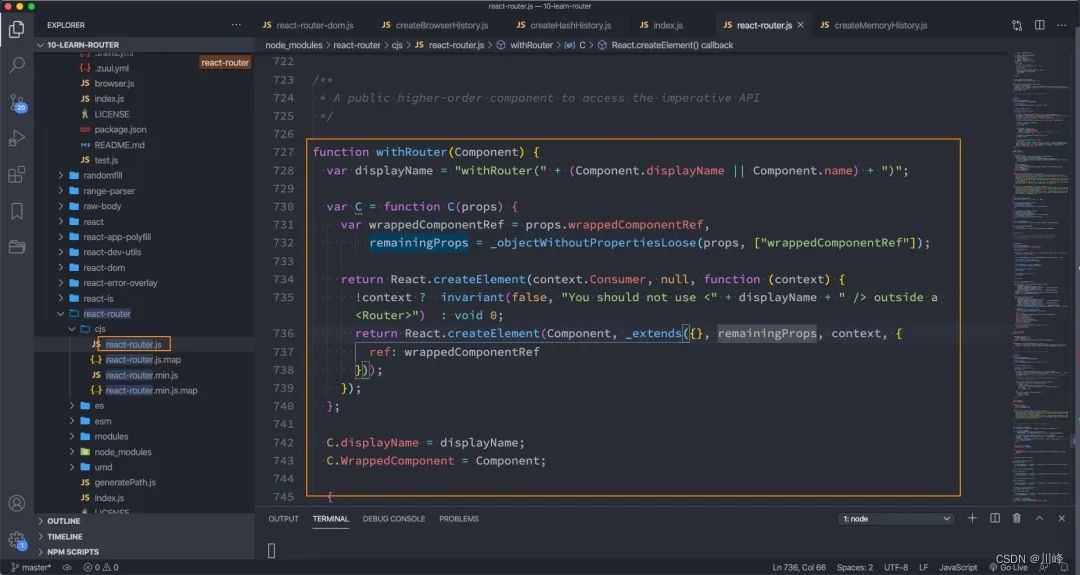
history对象来自哪里呢?
- 实际来自上面代码的
context;

这个context的值来自哪里呢?
- 来自于
context.Consumer的value中;
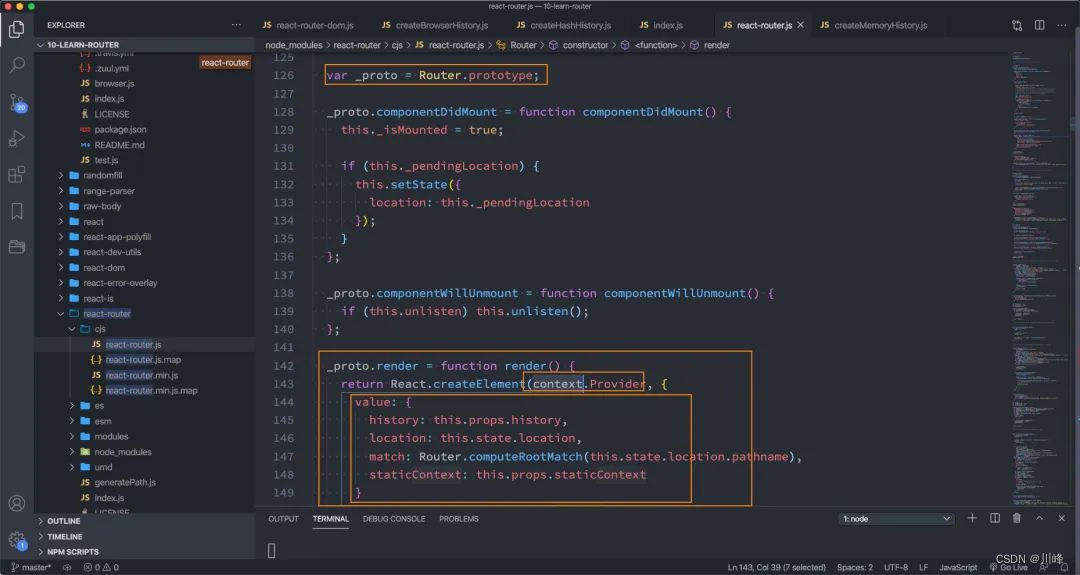
this.props.history来自哪里呢?
- 来自
BrowserRouter或者HashRouter在创建时,传入的值; - 又传递给了
Router,Router的子组件可以通过该context获取到这个值;
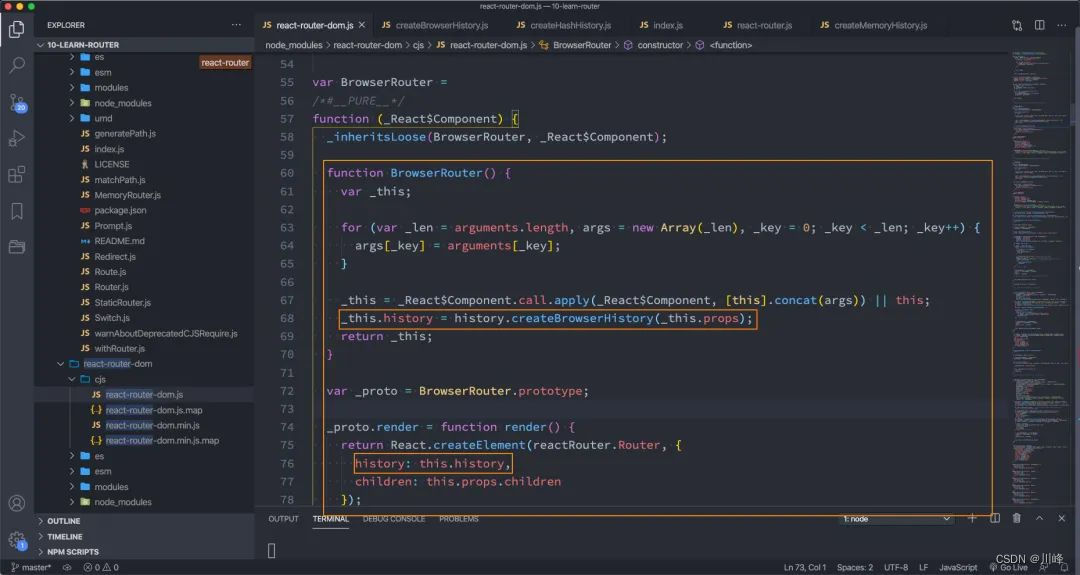
createBrowserHistory来自哪里呢?
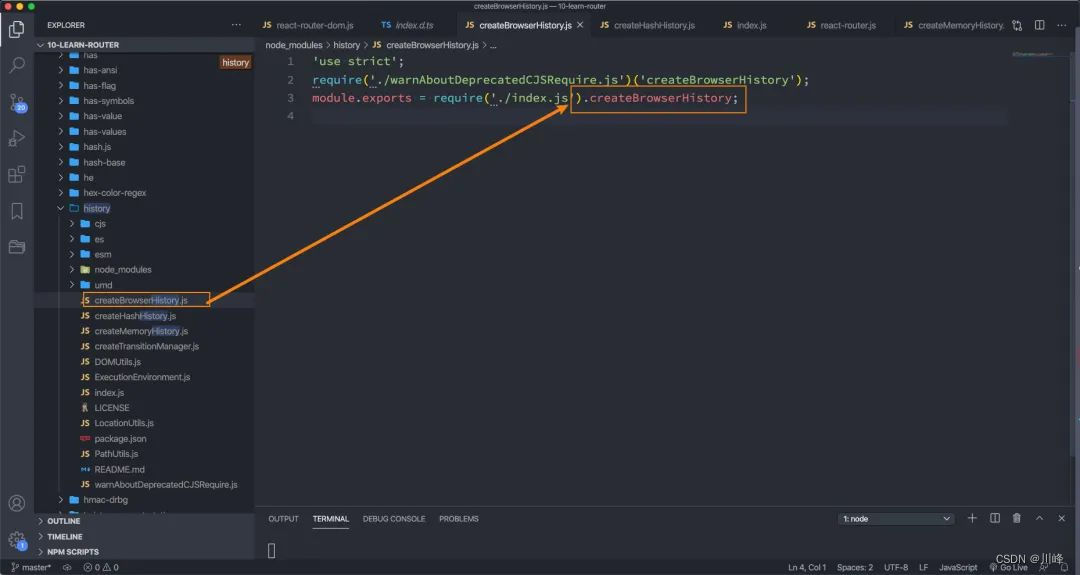
执行push操作的本质:
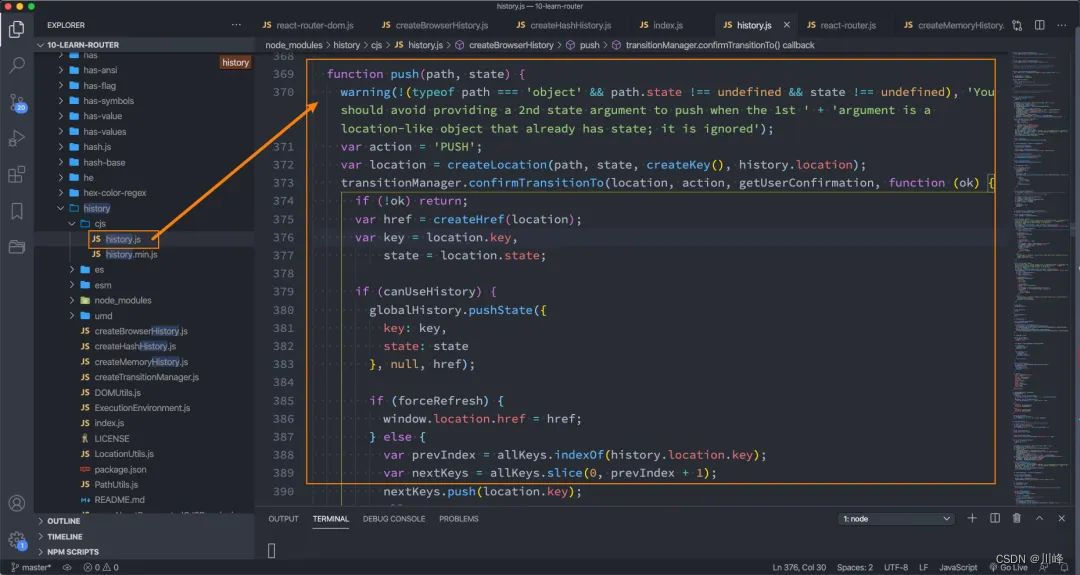
3.3 传递参数
传递参数有三种方式:
- 动态路由的方式;
search传递参数;to传入对象;
动态路由的方式
动态路由的概念指的是路由中的路径并不会固定:
- 比如
/detail的path对应一个组件Detail; - 如果我们将
path在Route匹配时写成/detail/:id,那么/detail/abc、/detail/123都可以匹配到该Route,并且进行显示; - 这个匹配规则,我们就称之为动态路由;
通常情况下,使用动态路由可以为路由传递参数。
<div>...其他Link<NavLink to="/detail/abc123">详情</NavLink><Switch>... 其他Route<Route path="/detail/:id" component={Detail}/><Route component={NoMatch} /></Switch>
</div>
detail.js的代码如下:
import React, { PureComponent } from 'react'export default class Detail extends PureComponent {render() {console.log(this.props.match.params.id);return (<div><h2>Detail: {this.props.match.params.id}</h2></div>)}
}
- 我们可以直接通过
match对象中获取id; - 这里我们没有使用
withRouter,原因是因为Detail本身就是通过路由进行的跳转;
search传递参数
NavLink写法:
<NavLink to="/detail2?name=why&age=18">详情2</NavLink><Switch><Route path="/detail2" component={Detail2}/>
</Switch>
- 我们在跳转的路径中添加了一些
query参数;
Detail2中如何获取呢?
Detail2中是需要在location中获取search的;- 注意:这个
search没有被解析,需要我们自己来解析;
import React, { PureComponent } from 'react'export default class Detail2 extends PureComponent {render() {console.log(this.props.location.search); // ?name=why&age=18return (<div><h2>Detail2:</h2></div>)}
}
to传入对象
to可以直接传入一个对象
<NavLink to={{pathname: "/detail2", query: {name: "kobe", age: 30},state: {height: 1.98, address: "洛杉矶"},search: "?apikey=123"}}>详情2
</NavLink>
获取参数:
import React, { PureComponent } from 'react'export default class Detail2 extends PureComponent {render() {console.log(this.props.location);return (<div><h2>Detail2:</h2></div>)}
}

补充:使用 history.push 如何传递参数
在React中如何使用history.push传递参数主要有三种方式:
第一种如下:
this.props.history.push{pathname:'/router/url/send',query:{'oneFlag':one,}}
接收情况如下:
this.props.location.query.oneFlag
其路由路径显示:
'#/router/url/send?oneFlag=one'
第二种情况如下:
this.props.history.push{pathname:'/router/url/send',state:{'oneFlag':one,}
}
接收情况如下:
this.props.location.state.oneFlag // one
其路由显示:
'#/router/url/send'
第三种情况需要在配置路由时,将路由配置为rest格式路由,
{path: '/device/detail/:id',component: DeviceDetail,pageConfig: {title: '设备详情',auth: ['admin'],},},
传递参数时:
<Button text type="primary" onClick={() => history.push({ pathname: `/device/detail/${record.id}` })}>详情
</Button>
参数接收时:
const { id } = props.match.params;
第一种和第三种,在目标路由刷新后,参数还可以取到,但是第二种页面刷新后,参数就取不到了,第二种适合开发winform类的应用。
第一种和三种在使用时要注意监听参数的变化,不然路由回退,再次进图另外参数的页面,组件不会重新渲染,用hook组件开发的话,需要用useEffect来监听参数变化。
四. react-router-config
目前我们所有的路由定义都是直接使用Route组件,并且添加属性来完成的。
但是这样的方式会让路由变得非常混乱,我们希望将所有的路由配置放到一个地方进行集中管理:
- 这个时候可以使用
react-router-config来完成;
安装react-router-config:
yarn add react-router-config
常见router/index.js文件:
import Home from "../pages/home";
import About, { AboutMessage, AboutProduct } from "../pages/about";
import Profile from "../pages/profile";
import Login from "../pages/login";
import User from "../pages/user";
import Detail from "../pages/detail";
import Detail2 from "../pages/detail2";
import NoMatch from "../pages/nomatch";const routes = [{path: "/",exact: true,component: Home},{path: "/about",component: About,routes: [{path: "/about",exact: true,component: AboutProduct},{path: "/about/message",component: AboutMessage},]},{path: "/profile",component: Profile},{path: "/login",component: Login},{path: "/user",component: User},{path: "/detail/:id",component: Detail},{path: "/detail2",component: Detail2},{component: NoMatch}
];export default routes;
将之前的Switch配置,换成react-router-config中提供的renderRoutes函数:
{renderRoutes(routes)}{/* <Switch><Route exact path="/" component={Home} /><Route path="/about" component={About} /><Route path="/profile" component={Profile} /><Route path="/user" component={User} /><Route path="/login" component={Login} /><Route path="/detail/:id" component={Detail}/><Route path="/detail2" component={Detail2}/><Route component={NoMatch} /></Switch> */}
如果是子组件中,需要路由跳转,那么需要在子组件中使用renderRoutes函数:
- 在跳转到的路由组件中会多一个
this.props.route属性; - 该
route属性代表当前跳转到的路由对象,可以通过该属性获取到routes;
export default class About extends PureComponent {render() {return (<div><Link to="/about">商品</Link><Link to="/about/message">消息</Link>{renderRoutes(this.props.route.routes)}</div>)}
}
实际上react-router-config中还提供了一个matchRoutes辅助函数:
matchRoutes(routes, pathname)传入一个路由对象数组,获取所有匹配的路径;
const routes = matchRoutes(this.props.route.routes, "/about");
console.log(routes);
查看renderRoutes的源码也是非常简单的:
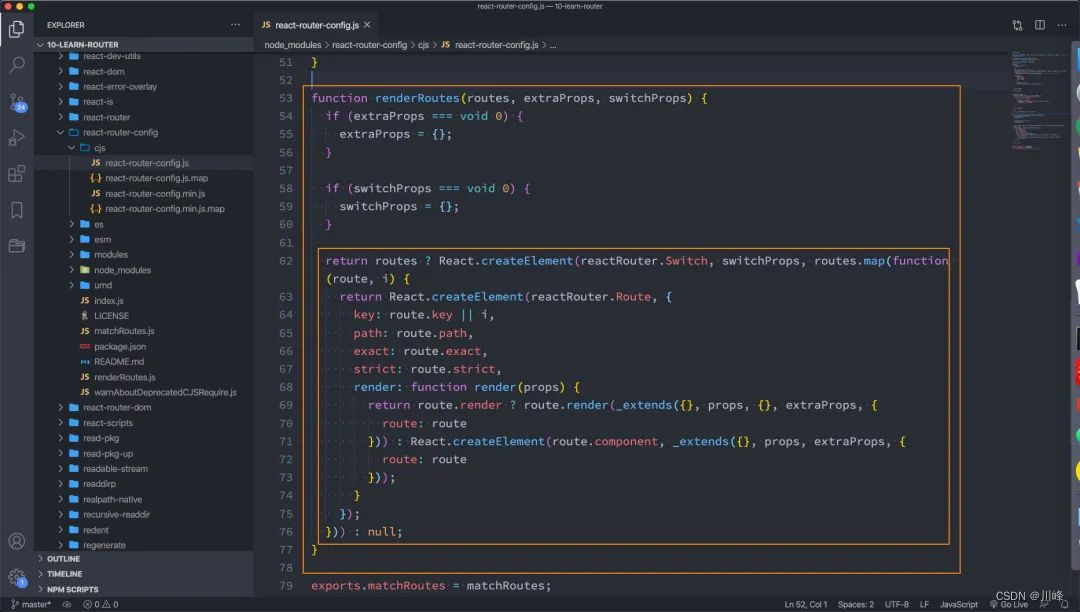

)


 对比学习】深入浅出讲解对比学习)


