文章目录
- 一、集成XFIRE
- 1. 版本选型
- 2. 导入依赖
- 3. 注入XFireSpringServlet
- 4. 创建一个xml文件
- 5. 使用@ImportResource注入xml
- 6. 创建@WebService接口
- 6. 创建实现类
- 7. 添加配置类
- 8. 工具类
- 二、XFIRE 发布服务
- 2.1. 运行项目
- 2.2. 异常解决
- 2.3. 测试验证
- 三、XFIRE客户端
- 开源源码.
一、集成XFIRE
1. 版本选型
| 阿健/框架 | 版本 |
|---|---|
| spring-boot | 2.5.4 |
| xfire-all | 1.2.6 |
2. 导入依赖
导入xfire的依赖包xfire-all,会自动导入相关依赖包,其中spring可能会与项目本身的spring冲突,需要将其排除依赖
<!--xfire start --><dependency><groupId>org.codehaus.xfire</groupId><artifactId>xfire-all</artifactId><version>1.2.6</version><!--排除冲突的依赖包--><exclusions><exclusion><groupId>javax.activation</groupId><artifactId>activation</artifactId></exclusion><exclusion><groupId>org.springframework</groupId><artifactId>spring</artifactId></exclusion><exclusion><artifactId>commons-logging</artifactId><groupId>commons-logging</groupId></exclusion><exclusion><artifactId>stax-api</artifactId><groupId>stax</groupId></exclusion></exclusions></dependency><!--axis end -->
3. 注入XFireSpringServlet
注入XFireSpringServlet
创建XfireBootServlet类
package com.gblfy.ws.servlet;import org.codehaus.xfire.spring.XFireSpringServlet;
import org.springframework.boot.web.servlet.ServletRegistrationBean;
import org.springframework.context.annotation.Bean;
import org.springframework.context.annotation.Configuration;/*** @author gblfy* @date 2021-09-17*/
@Configuration
public class XfireBootServlet {@Beanpublic ServletRegistrationBean registrationBean() {System.out.println("servletRegistrationBean----------");ServletRegistrationBean servletRegistrationBean = new ServletRegistrationBean();servletRegistrationBean.setServlet(new XFireSpringServlet());servletRegistrationBean.addUrlMappings("/webservice/*");return servletRegistrationBean;}
}
相当于web.xml中的:
<?xml version="1.0" encoding="UTF-8"?>
<web-app version="2.5" xmlns="http://java.sun.com/xml/ns/javaee" xmlns:xsi="http://www.w3.org/2001/XMLSchema-instance"xsi:schemaLocation="http://java.sun.com/xml/ns/javaee http://java.sun.com/xml/ns/javaee/web-app_2_5.xsd"><servlet><servlet-name>xfireServlet</servlet-name><servlet-class>org.codehaus.xfire.spring.XFireSpringServlet</servlet-class></servlet><servlet-mapping><servlet-name>xfireServlet</servlet-name><url-pattern>/webservice/*</url-pattern></servlet-mapping>
</web-app>
4. 创建一个xml文件
在resources下创建cofnig文件夹,并在config文件夹下面创建boot-xfire.xml

<?xml version="1.0" encoding="UTF-8" ?>
<beans xmlns="http://www.springframework.org/schema/beans"xmlns:xsi="http://www.w3.org/2001/XMLSchema-instance"xmlns:context="http://www.springframework.org/schema/context"xsi:schemaLocation="http://www.springframework.org/schema/beanshttp://www.springframework.org/schema/beans/spring-beans-2.0.xsdhttp://www.springframework.org/schema/contexthttp://www.springframework.org/schema/context/spring-context-3.1.xsd"><!--扫描被@webService的包--><context:component-scan base-package="com.gblfy.ws.service.impl"/><!-- XFire start --><import resource="classpath:org/codehaus/xfire/spring/xfire.xml"/><!--<import resource="xfire.xml" />--><bean id="webAnnotations" class="org.codehaus.xfire.annotations.jsr181.Jsr181WebAnnotations"/><bean id="jsr181HandlerMapping" class="org.codehaus.xfire.spring.remoting.Jsr181HandlerMapping"><property name="xfire" ref="xfire"/><property name="webAnnotations" ref="webAnnotations"/></bean>
</beans>
5. 使用@ImportResource注入xml
package com.gblfy.ws.config;import org.springframework.context.annotation.ImportResource;
import org.springframework.stereotype.Component;/*** 引入boot-xfire.xml配置文件** @author gblfy* @date 2021-09-17*/
@ImportResource(locations = {"classpath:config/boot-xfire.xml"})
@Component
public class XfireConfig {
}
6. 创建@WebService接口
package com.gblfy.ws.service;import javax.jws.WebService;/*** Xfire接口** @author gblfy* @date 2021-09-17*/
@WebService
public interface IXfireService {public String sayHello(String info);public String sayHello2(String info,String info2);
}
6. 创建实现类
package com.gblfy.ws.service.impl;import com.gblfy.ws.service.IXfireService;
import com.gblfy.ws.utils.SpringBootBeanAutowiringSupport;
import org.springframework.stereotype.Service;import javax.jws.WebService;
import javax.xml.ws.BindingType;
import javax.xml.ws.soap.SOAPBinding;
/*** Xfire接口实现类** @author gblfy* @date 2021-09-17*//*** serviceName:?wsdl前缀* targetNamespace:命名空间* name:无实际意义*/
@WebService(serviceName = "xfireServiceShell", name = "xfireService",targetNamespace = "http://impl.service.ws.gblfy.com")
@BindingType(value = SOAPBinding.SOAP12HTTP_BINDING)
@Service
//继承SpringBootBeanAutowiringSupport 可以让@Autowired注入成功,我重写了WebApplicationContextLocator的onStartup方法
public class XfireServiceImpl extends SpringBootBeanAutowiringSupport implements IXfireService {/*** @param info* @return*/@Overridepublic String sayHello(String info) {return "sayHello:" + info;}@Overridepublic String sayHello2(String info, String info2) {return info + info2;}
}
7. 添加配置类
WebApplicationContextLocator
package com.gblfy.ws.config;import org.springframework.boot.web.servlet.ServletContextInitializer;
import org.springframework.context.annotation.Configuration;
import org.springframework.web.context.WebApplicationContext;
import org.springframework.web.context.support.WebApplicationContextUtils;import javax.servlet.ServletContext;
import javax.servlet.ServletException;/*** 手动获取bean** @author gblfy* @date 2021-09-17*/
@Configuration
public class WebApplicationContextLocator  implements ServletContextInitializer {private static WebApplicationContext webApplicationContext;public static WebApplicationContext getCurrentWebApplicationContext() {return webApplicationContext;}/*** 在启动时将servletContext 获取出来,后面再读取二次使用。* @param servletContext* @throws ServletException*/@Overridepublic void onStartup(ServletContext servletContext) throws ServletException {webApplicationContext = WebApplicationContextUtils.getWebApplicationContext(servletContext);}
}
8. 工具类
SpringBootBeanAutowiringSupport
package com.gblfy.ws.utils;import com.gblfy.ws.config.WebApplicationContextLocator;
import org.slf4j.Logger;
import org.slf4j.LoggerFactory;
import org.springframework.beans.factory.annotation.AutowiredAnnotationBeanPostProcessor;
import org.springframework.util.Assert;
import org.springframework.util.ClassUtils;
import org.springframework.web.context.WebApplicationContext;/*** 手动获取bean** @author gblfy* @date 2021-09-17*/
public abstract class SpringBootBeanAutowiringSupport {private static final Logger logger = LoggerFactory.getLogger(SpringBootBeanAutowiringSupport.class);/*** This constructor performs injection on this instance,* based on the current web application context.* <p>Intended for use as a base class.** @see #processInjectionBasedOnCurrentContext*/public SpringBootBeanAutowiringSupport() {System.out.println("SpringBootBeanAutowiringSupport.SpringBootBeanAutowiringSupport");processInjectionBasedOnCurrentContext(this);}/*** Process {@code @Autowired} injection for the given target object,* based on the current web application context.* <p>Intended for use as a delegate.** @param target the target object to process* @see org.springframework.web.context.ContextLoader#getCurrentWebApplicationContext()*/public static void processInjectionBasedOnCurrentContext(Object target) {Assert.notNull(target, "Target object must not be null");WebApplicationContext cc = WebApplicationContextLocator.getCurrentWebApplicationContext();if (cc != null) {AutowiredAnnotationBeanPostProcessor bpp = new AutowiredAnnotationBeanPostProcessor();bpp.setBeanFactory(cc.getAutowireCapableBeanFactory());bpp.processInjection(target);} else {if (logger.isDebugEnabled()) {logger.debug("Current WebApplicationContext is not available for processing of " +ClassUtils.getShortName(target.getClass()) + ": " +"Make sure this class gets constructed in a Spring web application. Proceeding without injection.");}}}
}
这样就完成了!!!
二、XFIRE 发布服务
2.1. 运行项目

2.2. 异常解决
但是在启动的时候遇到Attribute “singleton” must be declared for element type “bean”.

移步跳转,即可解决:
Attribute “singleton” must be declared for element type “bean”.
移步跳转,即可解决:
遇到cannot convert value of type ‘org.codehaus.xfire.spring.editors.ServiceFactoryEditor’
cannot convert value of type ‘org.codehaus.xfire.spring.editors.ServiceFactoryEditor
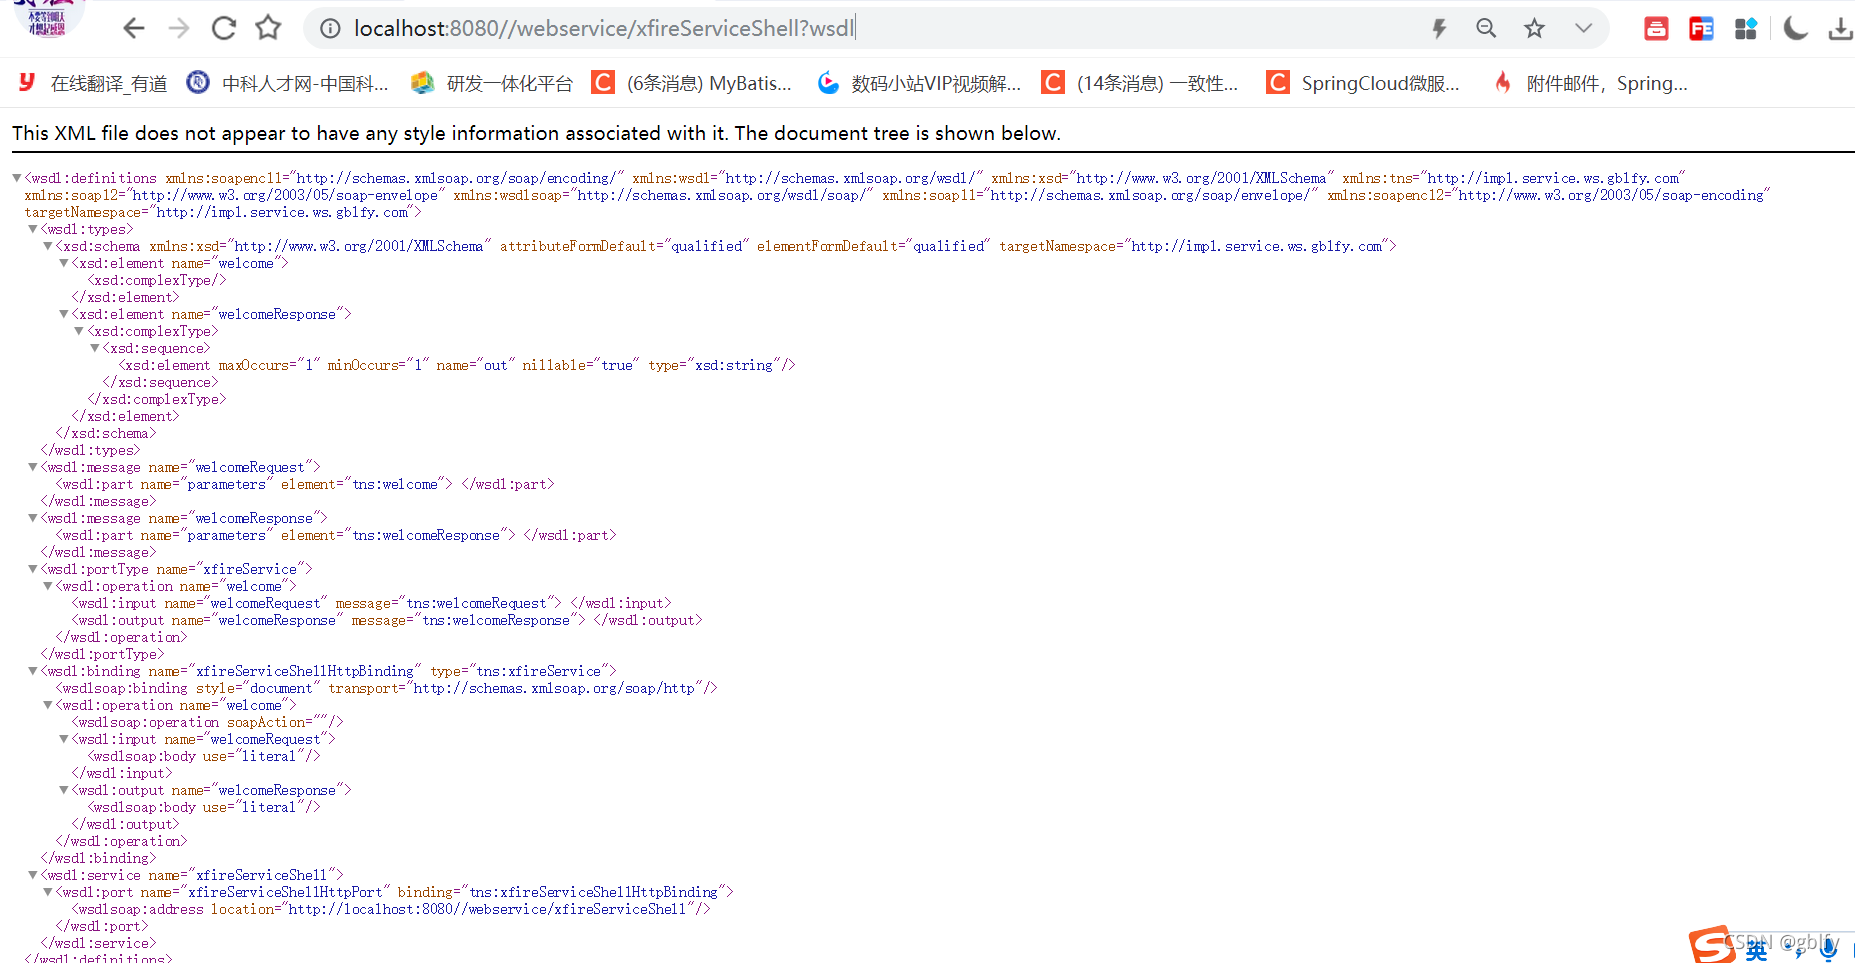
2.3. 测试验证
http://localhost:8080//webservice/xfireServiceShell?wsdl

三、XFIRE客户端
package com.gblfy.ws.client;import org.codehaus.xfire.client.Client;
import org.slf4j.Logger;
import org.slf4j.LoggerFactory;
import org.springframework.stereotype.Component;import java.net.URL;@Component
public class XFireClient {private final static Logger log = LoggerFactory.getLogger(XFireClient.class);public static void main(String[] args) throws Exception {String xfireUrl = "http://localhost:8080/xfire/xfireServiceShell?wsdl";String namespaceURI = "http://impl.service.ws.gblfy.com";//单个参数String method = "sayHello";//多参// String method = "sayHello2";String reqXml = "1";String reqXml2 = "2";//调用服务XFireClient.xfireSendMsg(xfireUrl, namespaceURI, method, reqXml);// XFireClient.xfireSendMsg(xfireUrl, namespaceURI, method, reqXml, reqXml2);}/*** 单参调用工具类** @param xfireUrl url地址* @param method   调用方法名* @param reqXml   发送报文体* @return res 返回结果* @throws Exception 若有异常,在控制台输出异常,并将异常抛出*/public static String xfireSendMsg(String xfireUrl, String namespaceURI, String method, String reqXml) throws Exception {// 创建服务Client client = new Client(new URL(xfireUrl));// 设置调用的方法和方法的命名空间client.setProperty(namespaceURI, method);// 通过映射获得结果Object[] result = new Object[0];try {result = client.invoke(method, new Object[]{reqXml});} catch (Exception e) {e.printStackTrace();throw e;}String xml = (String) result[0];log.info("响应报文 : {}", xml);return xml;}/*** 多参调用工具类(Object类型)** @param xfireUrl url地址* @param method   调用方法名* @param reqXml   发送报文体* @return res 返回结果* @throws Exception 若有异常,在控制台输出异常,并将异常抛出*/public static String xfireSendMsg(String xfireUrl, String namespaceURI, String method, String reqXml, String reqXml2) throws Exception {// 创建服务Client client = new Client(new URL(xfireUrl));// 设置调用的方法和方法的命名空间client.setProperty(namespaceURI, method);// 通过映射获得结果Object[] result = new Object[0];try {result = client.invoke(method, new Object[]{reqXml, reqXml2});} catch (Exception e) {e.printStackTrace();throw e;}String xml = (String) result[0];log.info("响应报文 : {}", xml);return xml;}
}
开源源码.
https://gitee.com/gblfy/unified-access-center


)


)


