本节课我们将了解到以下内容:
- 基本的PCL中的数据类型;
- 使用PCL进行简单编程:写文件与读文件。
一、PCL库基本数据类型
上一节课,我们使用PCL库在本地写入了一个名为test_pcd.pcd的文件。我们划分一下程序的任务步骤:
- 构造pcd文件格式;
- 写入文件;
- 打印输出。

步骤二和步骤三的内容属于基本的C++知识。而步骤一中的pcd文件格式是我们所不熟悉的,所以要先看一看pcd原始文件。
在命令行中输入:
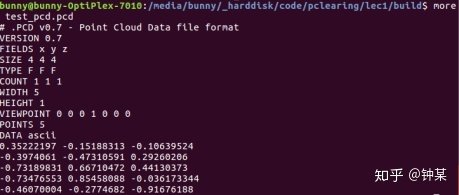
more test_pcd.pcd
可以看到pcd文件的内部结构如下图所示。

三维点云数据最简单的形式是x y z的三维点空间坐标。稍微复杂一些可以加上intensity、RGB等属性。但是这种表达方式有什么缺点呢?
一方面直接以文本形式存储点云的三个坐标在内存上比较浪费空间,另一方面如果用户要取得点云的一些基本信息如点云个数,用户还要自己去查询。如果有一个文件头能够简洁的描述点云数据信息,那么无论是在存储效率还是数据信息提取等方面都会有一定帮助。
pcd格式可以视作“文件格式头+三维点信息”。
请看一个具体pcd文件的例子:
# .PCD v0.7 - Point Cloud Data file format
VERSION 0.7
FIELDS x y z
SIZE 4 4 4
TYPE F F F
COUNT 1 1 1
WIDTH 5
HEIGHT 1
VIEWPOINT 0 0 0 1 0 0 0
POINTS 5
DATA ascii
0.35222197 -0.15188313 -0.10639524
-0.3974061 -0.47310591 0.29260206
………………………………
这个pcd文件里有着不同的字段。常用的有以下几种。
- VERSION - PCD文件的版本号(通常为0.7);
- FIELDS - 每个点所包含的维度或字段(例如x y z);
- SIZE - 每个数据维度所占据的字节(比如float为4字节)
- TYPE -每个数据维度的数据类型(I= signed,U= unsigned,F=float)
- COUNT - 每个数据维度上包含的元素个数。(比如,x, y, or z的count为1,但是hisogram的count包含N)
- WIDTH - 点云的宽度
- HEIGHT - 点云的高度
- VIEWPOINT - 点云的视角 translation (tx ty tz) +quaternion (qw qx qy qz)
- POINTS -点云的数量
- DATA -具体的数据存储格式(ascii or binary)
在之前的内容中我们忽略了一个小小的但是相对重要的知识点:待填充的数据怎么表示?请注意这里不能简单的使用字符串xyz的形式进行填充,如果仍旧使用字符串的格式进行填充,那么pcd文件格式在存储上的优势根本无法体现。一种简单的方法是为点云数据定义一个结构体,详细的情况后文再叙,这里先罗列一下最常用的数据类型(当然自定义数据类型也可)。
Point Types
PointXYZ- float x, y, z
PointXYZI- float x, y, z, intensity
PointXYZRGB- float x, y, z, rgb
PointXYZRGBA- float x, y, z, uint32t rgba
Normal- float normal[3], curvature
PointNormal- float x, y, z, normal[3], curvature
Histogram- float histogram[N]
………………
二、利用PCL写点云文件
现在详细看一下生成点云写入文件的过程。
#include <iostream>
#include <pcl/io/pcd_io.h>
#include <pcl/point_types.h>intmain (int argc, char** argv)
{pcl::PointCloud<pcl::PointXYZ> cloud;// Fill in the cloud datacloud.width    = 5;cloud.height   = 1;cloud.is_dense = false;cloud.points.resize (cloud.width * cloud.height);for (size_t i = 0; i < cloud.points.size (); ++i){cloud.points[i].x = 1024 * rand () / (RAND_MAX + 1.0f);cloud.points[i].y = 1024 * rand () / (RAND_MAX + 1.0f);cloud.points[i].z = 1024 * rand () / (RAND_MAX + 1.0f);}pcl::io::savePCDFileASCII ("test_pcd.pcd", cloud);std::cerr << "Saved " << cloud.points.size () << " data points to test_pcd.pcd." << std::endl;for (size_t i = 0; i < cloud.points.size (); ++i)std::cerr << "    " << cloud.points[i].x << " " << cloud.points[i].y << " " << cloud.points[i].z << std::endl;return (0);
}
关键的部分可以分为以下内容:生成点云、写入文件。
生成点云可以视作一个字段填充的过程,我们来看看具体干了什么事情。
初始化定义一个点云对象,此处我们创建了一个PointXYZ对象
pcl::PointCloud<pcl::PointXYZ> cloud;
设置pcd文件字段,将想要填的内容填进去。
// Fill in the cloud datacloud.width = 5;cloud.height = 1;cloud.is_dense = false;cloud.points.resize (cloud.width * cloud.height);
填充具体的值
for (size_t i = 0; i < cloud.points.size (); ++i){cloud.points[i].x = 1024 * rand () / (RAND_MAX + 1.0f);cloud.points[i].y = 1024 * rand () / (RAND_MAX + 1.0f);cloud.points[i].z = 1024 * rand () / (RAND_MAX + 1.0f);}
写入文件,简单的一句话
pcl::io::savePCDFileASCII ("test_pcd.pcd", cloud);
三、读取pcd文件
读写不分家。读文件的过程同样并不复杂。
#include <iostream>
#include <pcl/io/pcd_io.h>
#include <pcl/point_types.h>int
main (int argc, char** argv)
{pcl::PointCloud<pcl::PointXYZ>::Ptr cloud (new pcl::PointCloud<pcl::PointXYZ>);if (pcl::io::loadPCDFile<pcl::PointXYZ> ("test_pcd.pcd", *cloud) == -1) //* load the file{PCL_ERROR ("Couldn't read file test_pcd.pcd n");return (-1);}std::cout << "Loaded "<< cloud->width * cloud->height<< " data points from test_pcd.pcd with the following fields: "<< std::endl;for (size_t i = 0; i < cloud->points.size (); ++i)std::cout << "    " << cloud->points[i].x<< " "    << cloud->points[i].y<< " "    << cloud->points[i].z << std::endl;return (0);
}
核心工作就是两步:
定义一个句柄用来存放待读取的点云。
pcl::PointCloud<pcl::PointXYZ>::Ptr cloud (new pcl::PointCloud<pcl::PointXYZ>);
读取点云
pcl::io::loadPCDFile<pcl::PointXYZ> ("test_pcd.pcd", *cloud) == -1
对!就是这么简单。
四、xyz文件转成pcd文件
现在让我们研究一个小小的案例。有时候,我们的原始点云数据是存放在txt文件里的。也许它长成这样:
20.623 40.276 -1.999 -1031 127 141 154
20.362 40.375 -2.239 -941 130 141 159
20.36 40.376 -2.402 -1083 139 151 165
20.374 40.367 -2.405 -1122 131 147 163
20.372 40.366 -2.405 -1165 132 145 161
20.375 40.364 -2.404 -1036 133 149 165
20.358 40.371 -2.405 -1137 139 151 165
20.359 40.374 -2.404 -1086 139 151 165
…………
前三个字段为xyz,第四个字段为intensity,后三个字段为rgb。如何将这样的数据转成pcd文件呢?先上代码,运行起来再说。将下列代码复制并保存到xyz2cpp文件。这个程序将xyzirgb数据转成pcd格式的xyzrgb数据。如果想从xyz的数据转成pcd数据,那么只需要剔除若干填充字段即可。
#include <pcl/io/pcd_io.h>
#include <pcl/console/print.h>
#include <pcl/console/parse.h>using namespace std;
using namespace pcl;
using namespace pcl::io;
using namespace pcl::console;void
printHelp (int, char **argv)
{print_error ("Syntax is: %s input.xyz output.pcdn", argv[0]);
}bool
loadCloud (const string &filename, PointCloud<PointXYZRGB> &cloud)
{ifstream fs;fs.open (filename.c_str (), ios::binary);if (!fs.is_open () || fs.fail ()){PCL_ERROR ("Could not open file '%s'! Error : %sn", filename.c_str (), strerror (errno)); fs.close ();return (false);}string line;vector<string> st;while (!fs.eof ()){getline (fs, line);// Ignore empty linesif (line.empty())continue;// Tokenize the lineboost::trim (line);boost::split (st, line, boost::is_any_of ("tr "), boost::token_compress_on);if (st.size () != 7)continue;pcl::PointXYZRGB point;point.x = float (atof (st[0].c_str ())); point.y = float (atof (st[1].c_str ())); point.z = float (atof (st[2].c_str ()));point.r = uint8_t (atof (st[4].c_str ()));point.g = uint8_t (atof (st[5].c_str ()));point.b = uint8_t (atof (st[6].c_str ()));cloud.push_back (point);}fs.close ();cloud.width = uint32_t (cloud.size ()); cloud.height = 1; cloud.is_dense = true;return (true);
}int
main (int argc, char** argv)
{print_info ("Convert a simple XYZ file to PCD format. For more information, use: %s -hn", argv[0]);if (argc < 3){printHelp (argc, argv);return (-1);}// Parse the command line arguments for .pcd and .ply filesvector<int> pcd_file_indices = parse_file_extension_argument (argc, argv, ".pcd");vector<int> xyz_file_indices = parse_file_extension_argument (argc, argv, ".xyz");if (pcd_file_indices.size () != 1 || xyz_file_indices.size () != 1){print_error ("Need one input XYZ file and one output PCD file.n");return (-1);}// Load the first filePointCloud<PointXYZRGB> cloud;if (!loadCloud (argv[xyz_file_indices[0]], cloud)) return (-1);// Convert to PCD and savepcl::io::savePCDFileASCII (argv[pcd_file_indices[0]], cloud);
}
创建CMakeList.txt文件
cmake_minimum_required(VERSION 2.8 FATAL_ERROR)project(xyz2pcd)find_package(PCL 1.2 REQUIRED)include_directories(${PCL_INCLUDE_DIRS})
link_directories(${PCL_LIBRARY_DIRS})
add_definitions(${PCL_DEFINITIONS})add_executable (xyz2pcd xyz2pcd.cpp)
target_link_libraries (xyz2pcd ${PCL_LIBRARIES})
创建build文件夹按照前一节课所讲的内容进行编译。
运行下列命令./xyz2pcd smalldata.xyz smalldata.pcd
其中smalldata.xyz为待转换的文件,smalldata.pcd为目标文件。如果没有数据可以将下列数据存为smalldata.xyz与xyz2pcd 放在同一级目录下。请注意这里intensity这个字段并没有用到,如果想用intensity字段,请自定义数据类型。
测试数据
20.623 40.276 -1.999 -1031 127 141 154
20.362 40.375 -2.239 -941 130 141 159
20.36 40.376 -2.402 -1083 139 151 165
20.374 40.367 -2.405 -1122 131 147 163
20.372 40.366 -2.405 -1165 132 145 161
20.375 40.364 -2.404 -1036 133 149 165
20.358 40.371 -2.405 -1137 139 151 165
20.359 40.374 -2.404 -1086 139 151 165
20.354 40.375 -2.404 -1106 139 148 163
20.356 40.374 -2.404 -1059 139 151 165
20.359 40.374 -2.399 -1059 138 150 166
20.359 40.374 -2.395 -1014 138 150 166
20.354 40.375 -2.395 -1042 138 150 166
20.356 40.374 -2.396 -1050 138 150 166
20.354 40.374 -2.393 -1031 137 149 165
20.356 40.374 -2.393 -1045 137 149 165
20.359 40.374 -2.392 -957 137 149 165
20.374 40.365 -2.402 -1093 133 149 165
20.375 40.367 -2.401 -1096 133 149 165
20.374 40.367 -2.399 -1158 133 149 165
20.371 40.367 -2.399 -1093 133 146 162
20.365 40.371 -2.405 -1283 133 145 159
20.361 40.371 -2.404 -1211 133 145 159
20.362 40.372 -2.405 -1314 133 145 159
20.36 40.373 -2.405 -1213 139 151 165
20.361 40.375 -2.404 -1116 139 151 165
20.363 40.375 -2.402 -1063 133 145 159
20.367 40.371 -2.405 -1231 133 145 159
20.365 40.375 -2.405 -1311 133 145 159
20.367 40.372 -2.404 -1173 133 145 159
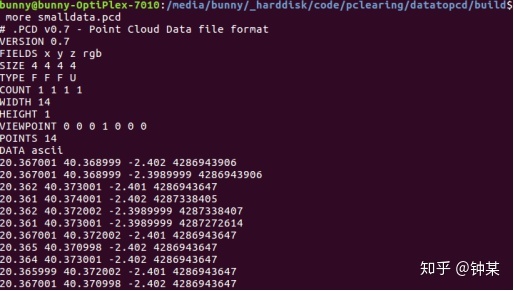
至此运行成功,结果如下:

或许大家会感到疑惑为什么RGB转成了一个大整数?这里为了方便存储使用了移位拼接的方法。下节课我们继续讨论可视化等更深入的内容。
参考材料:
http://www.pointclouds.org/documentation/tutorials/writing_pcd.php#writing-pcd
http://pointclouds.org/documentation/tutorials/pcd_file_format.php


 图示法解分数应用题)


